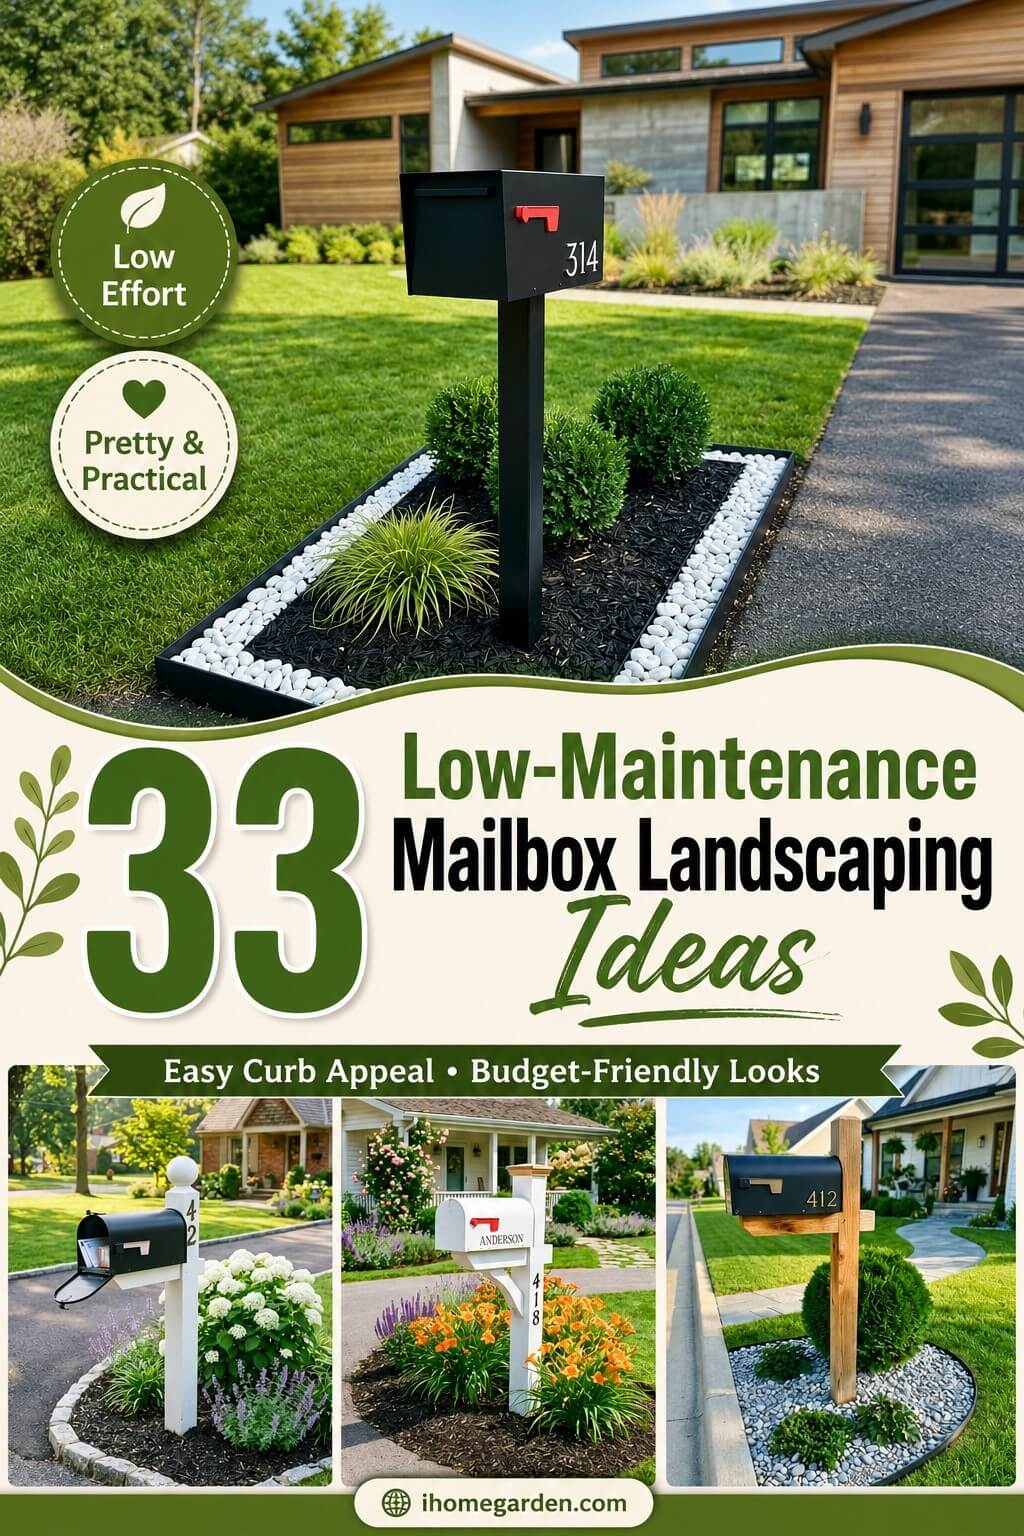
33 Low Maintenance Mailbox Landscaping Ideas for Beginners
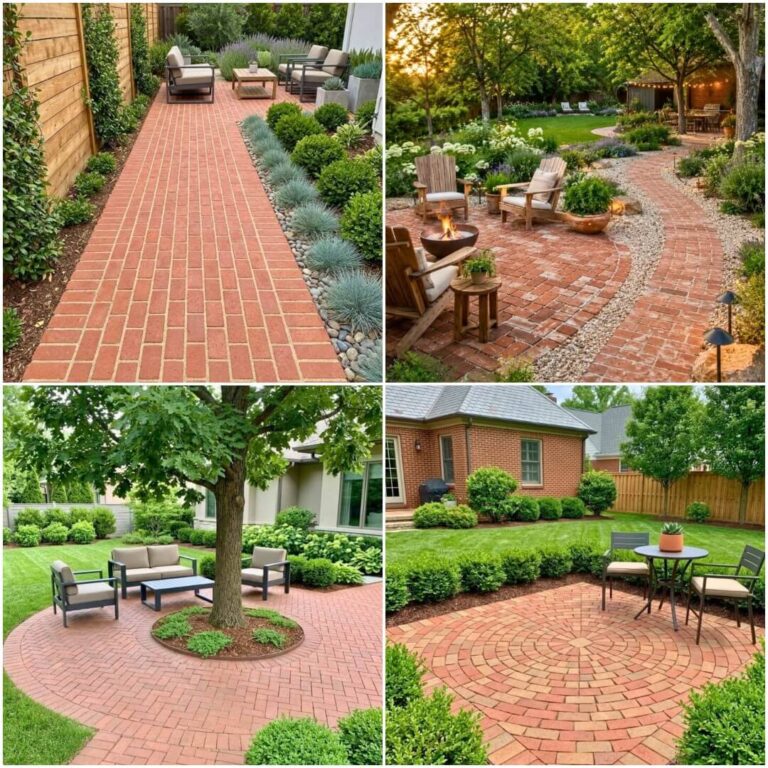
The grass around a mailbox post is almost impossible to mow cleanly, and most people just live with the scraggly edges for years without realizing there’s a better option. These 33 breathtaking low-maintenance mailbox landscaping ideas include everything from simple gravel beds to compact shrub borders — solutions that actually suit the tough conditions a curbside spot deals with daily. A small, well-planned bed around the base takes less time to maintain than that awkward strip of lawn ever did, and it makes the whole front yard look more intentional from the street.
The area around a mailbox takes more abuse than most garden spots — road splash, foot traffic, heat reflected off pavement, and irregular watering. Getting it right means choosing plants and materials that actually suit those conditions, not just what looks good at the garden center in spring and struggles through summer.
Every idea here is practical, specific, and built around real front yard conditions. Whether the spot gets full sun, sits in partial shade, or drains poorly after rain, there’s something here that fits without demanding constant attention. Keep reading — the right combination might be simpler than expected.
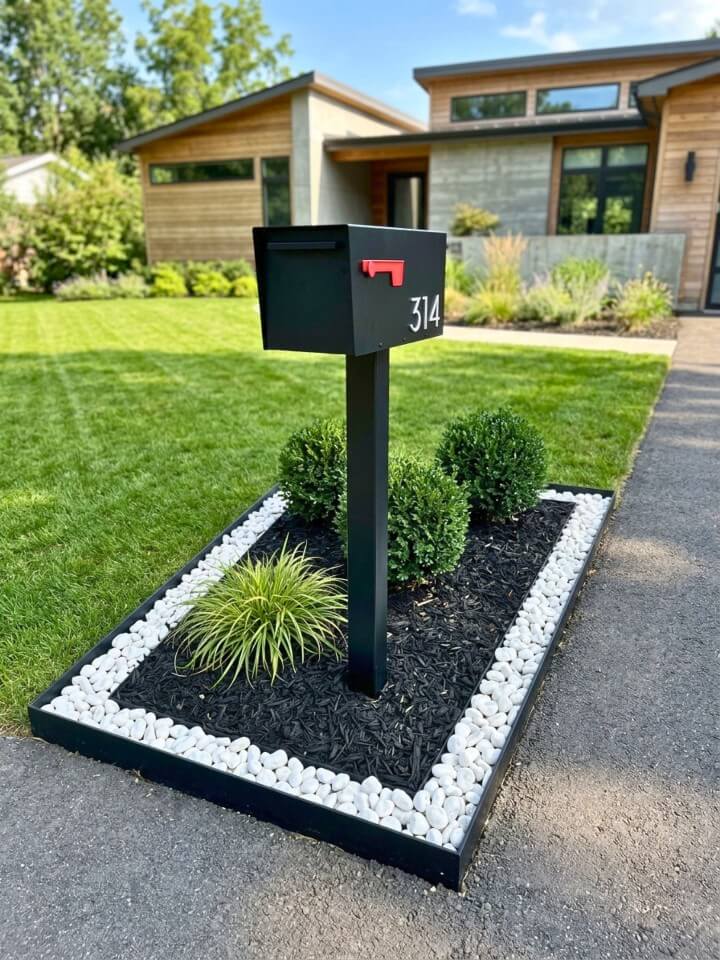
1. White Rock Mailbox Garden
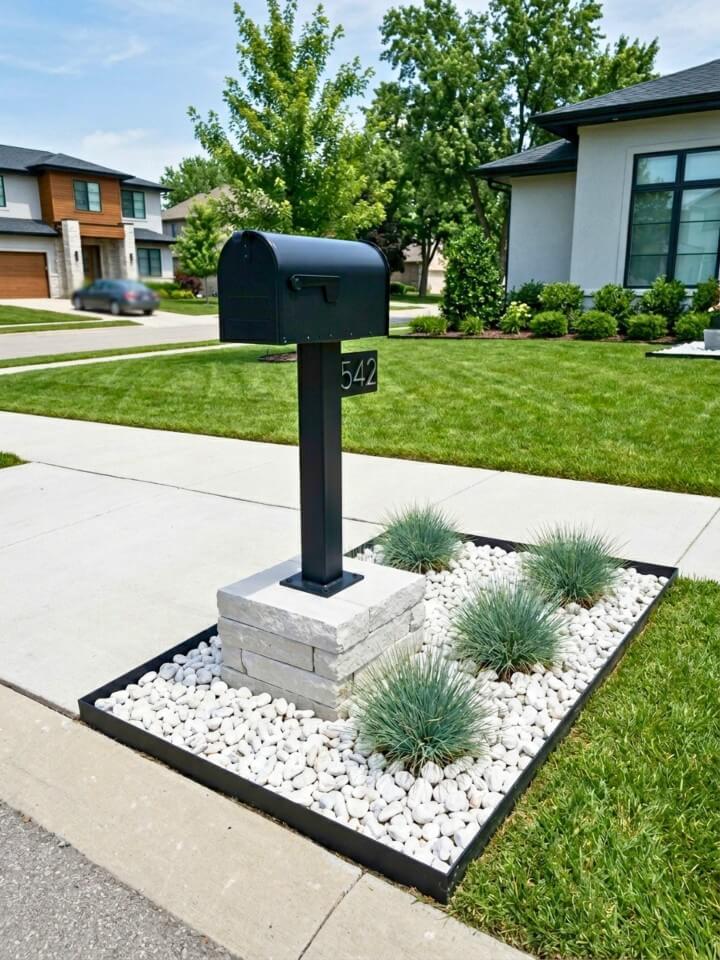
Bright white stone inside a defined bed creates contrast against green lawn and dark pavement that most other mailbox treatments can’t match. Spread white marble chips or white river pebbles three inches deep inside a clean metal or brick border, then add two or three simple plants for color and texture — blue fescue, compact sedum, or a small evergreen shrub work without cluttering the look. Keep the planting minimal so the stone remains the visual element that defines the space. A restrained plant palette also makes this one of the lowest-effort mailbox beds to maintain season after season.
Managing Discoloration Over Time
White stone near a road collects grime, organic debris, and dust faster than darker gravel. A rinse with a garden hose each spring and a light raking to turn the stones over keeps the bed looking fresh without replacing the material every year.
2. Stone Mulch Mailbox Bed
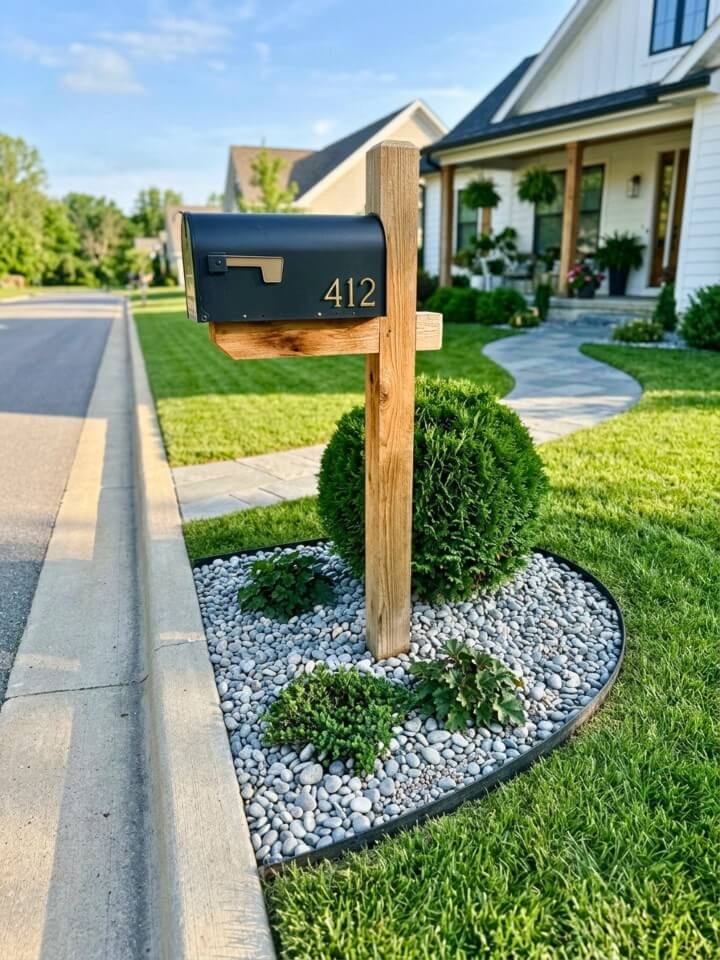
Replacing grass around the mailbox post with pea gravel or river rock cuts down trimming work right away. Lay landscape fabric first to block weeds, then spread two to three inches of stone evenly around the base. A metal or brick edge keeps everything contained when rain hits the curb. For year-round structure, tuck in one or two small evergreen shrubs toward the back. River rock handles runoff better than mulch in areas where water pools near the street after heavy rain.
Picking the Right Stone Size
Pea gravel works well for tight spaces, but river rock holds better along sloped curb edges where small stones tend to scatter. Avoid using decorative glass or very light-colored gravel near the road — vehicle exhaust and dirt stain it quickly.
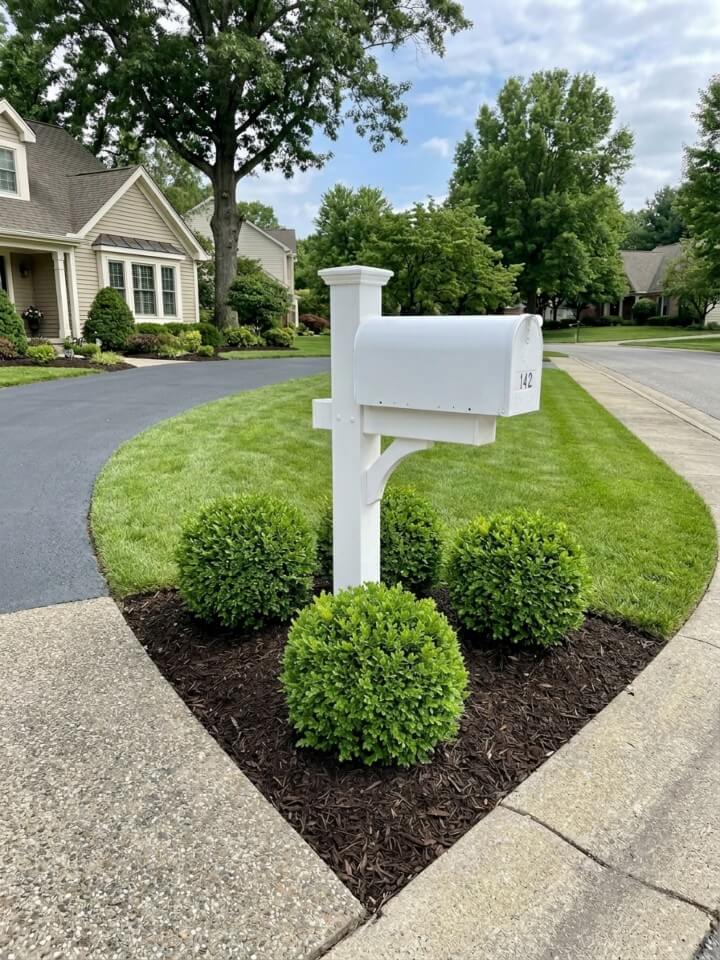
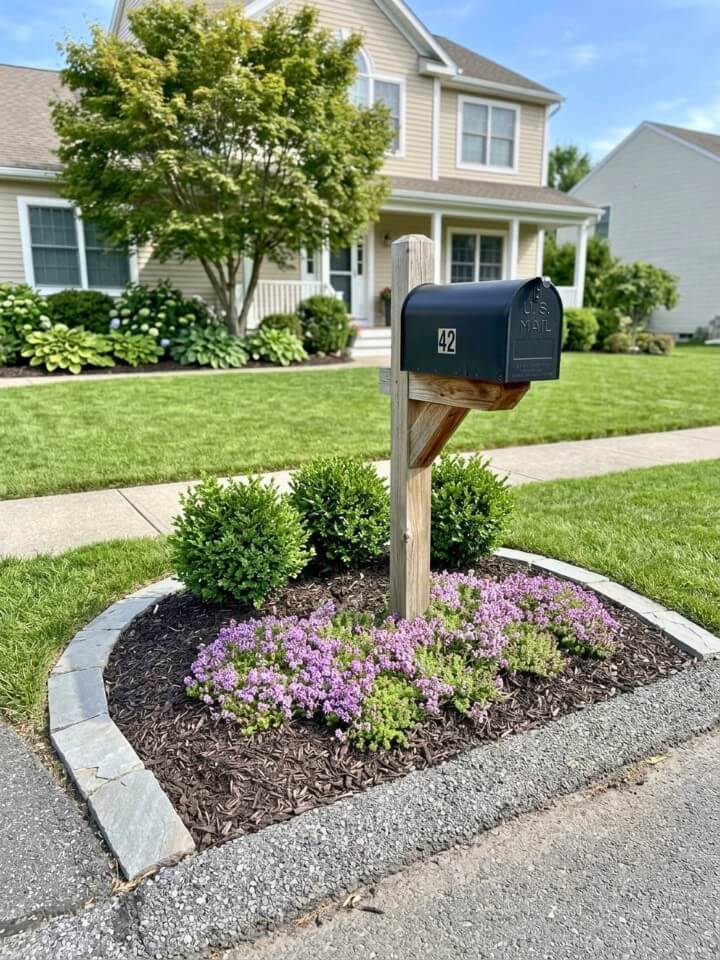
3. Boxwood Ring Around the Mailbox
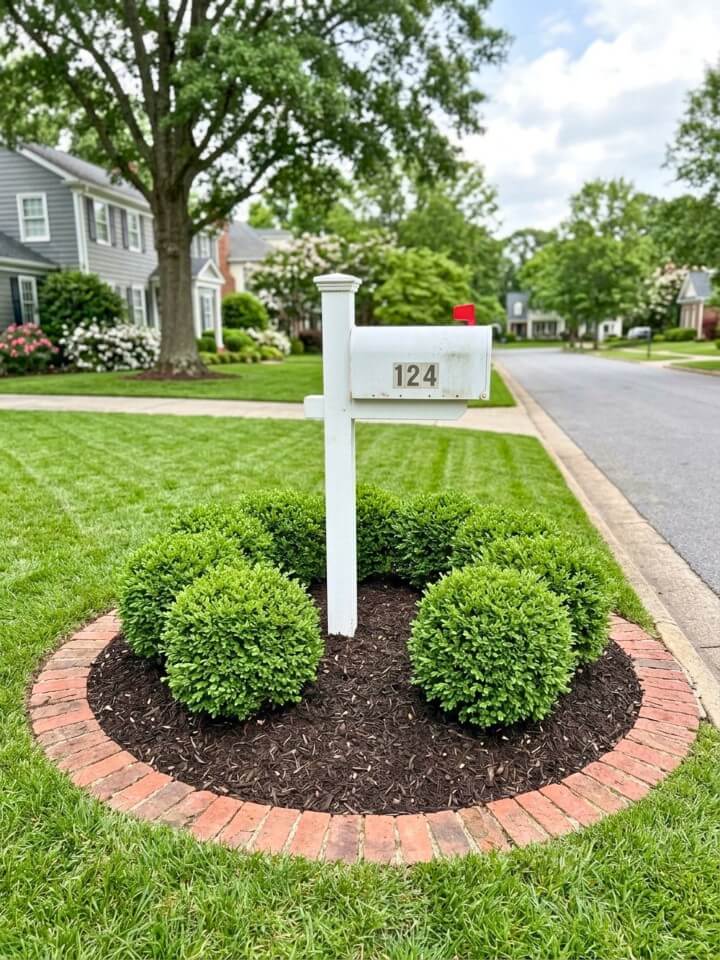
A loose half-circle of dwarf boxwood around the post creates structure without looking overdone. Space each shrub about twelve inches apart so they eventually form a soft, connected border rather than a rigid row. Dark mulch inside the ring keeps the bed clean between the plants and suppresses weeds through the growing season. Leave at least a foot of open space directly in front of the post so the mailbox door opens freely. Boxwood holds its shape with one trim per year, making it a reliable low-effort choice for curbside beds.
Dealing With Boxwood Blight
Check leaves periodically for brown patches or defoliation — boxwood blight spreads quickly between plants. Improving air circulation by not overcrowding and avoiding overhead watering reduces the risk significantly.
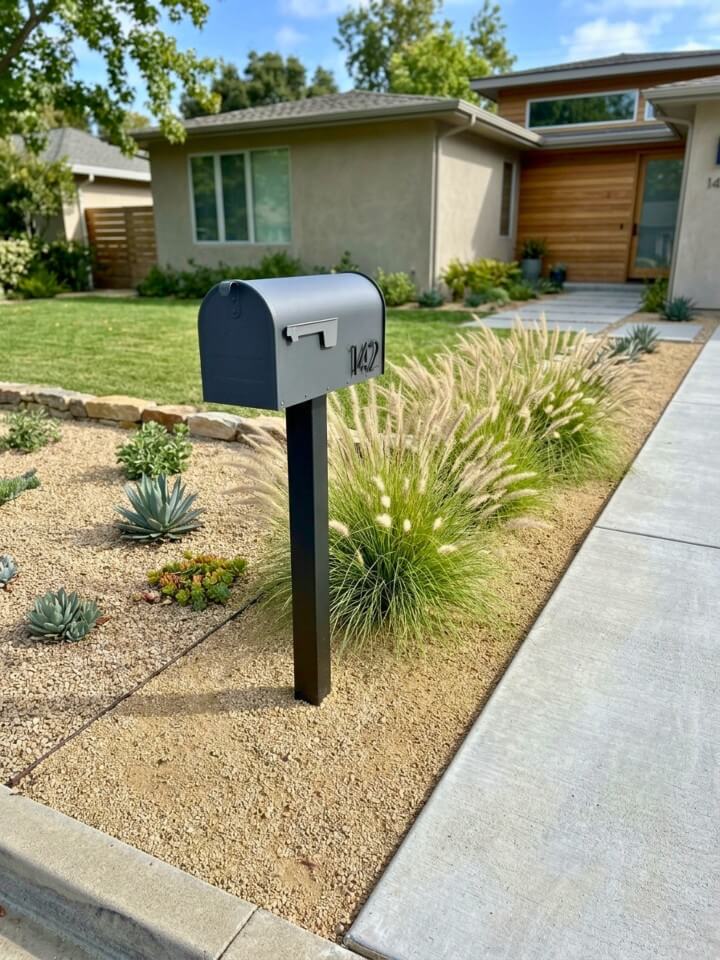
4. Drought-Tolerant Grass Border
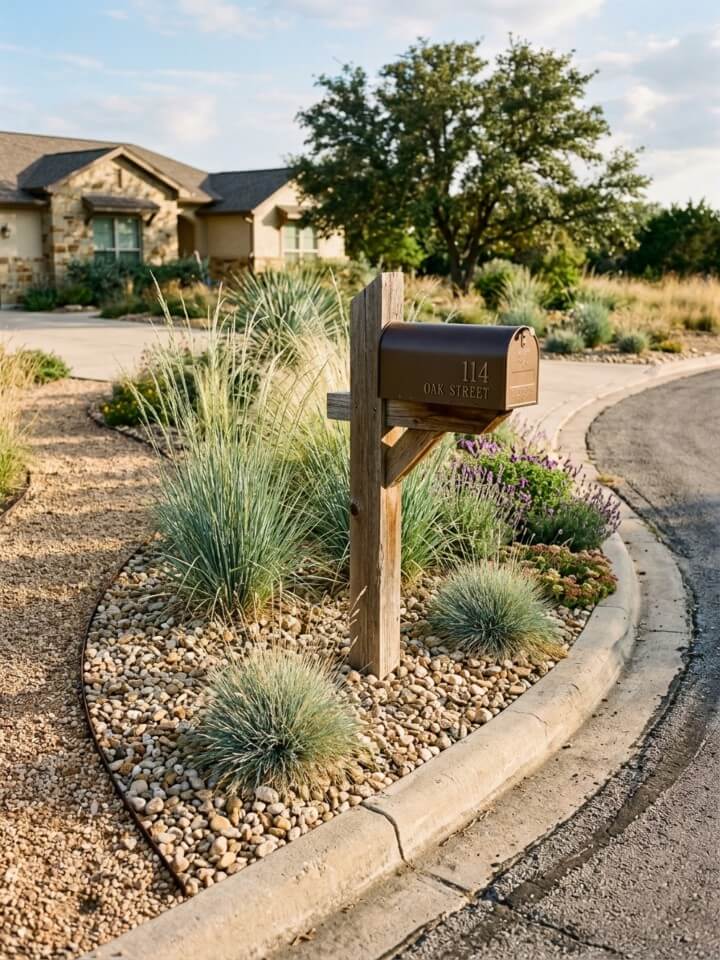
Upgrade your curb appeal with low maintenance mailbox landscaping ideas that use drought-tolerant plants, mulch, and decorative edging. Blue fescue and dwarf fountain grass are compact enough to frame a mailbox post without crowding the door. Plant them along the back and sides, leaving the front completely clear for delivery access.
Space each plant about twelve to fifteen inches apart so they fill in naturally without bunching. A thin layer of gravel between the clumps keeps weeds from pushing through while the roots establish. These grasses go dormant in extreme heat but bounce back without extra watering or attention.
Cutting Back at the Right Time:
Wait until late winter or very early spring before trimming ornamental grasses down. Cutting them in fall removes the seed heads that add texture through the colder months and can stress the plant before dormancy ends.
5. Evergreen Shrub Mailbox Corner
Dwarf boxwood, compact holly, or inkberry hold their shape through every season without much intervention. Plant them at least eighteen inches from the post so the mailbox door swings open without brushing leaves or branches. Along a driveway corner or front walkway edge, a tight grouping of two or three shrubs gives the space a finished, intentional feel. Dark mulch around the base keeps moisture in during dry stretches and stops weeds before they get established. Light shaping once a year is usually all these plants need.
Spacing Near the Curb:
Keep shrubs at least twelve inches back from the curb edge. Road salt runoff and vehicle exhaust affect shallow-rooted plants more than most people expect, especially during winter months.
6. Simple Lavender Mailbox Planting
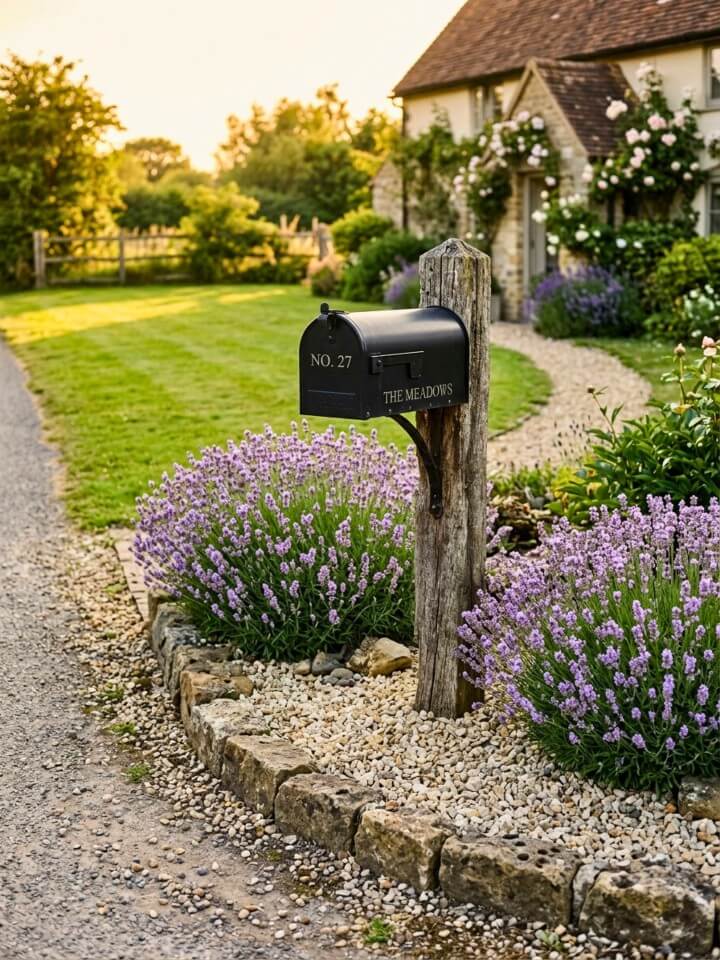
Lavender handles dry, sunny curbside soil better than most flowering plants. Plant it along the sides of the post in well-drained ground, and avoid clay-heavy spots where water sits after rain. A layer of fine gravel at the base keeps moisture from collecting around the crown, which is where most lavender plants rot. Low stone edging helps define the bed without needing constant maintenance. Once established, lavender rarely needs watering and comes back each season with almost no intervention beyond light trimming after the first flush of flowers.
Choosing the Right Variety:
Hidcote and Munstead are compact varieties that stay under two feet and hold their shape well. Avoid Spanish lavender in colder climates — it looks beautiful but struggles through hard winters and often doesn’t return reliably.
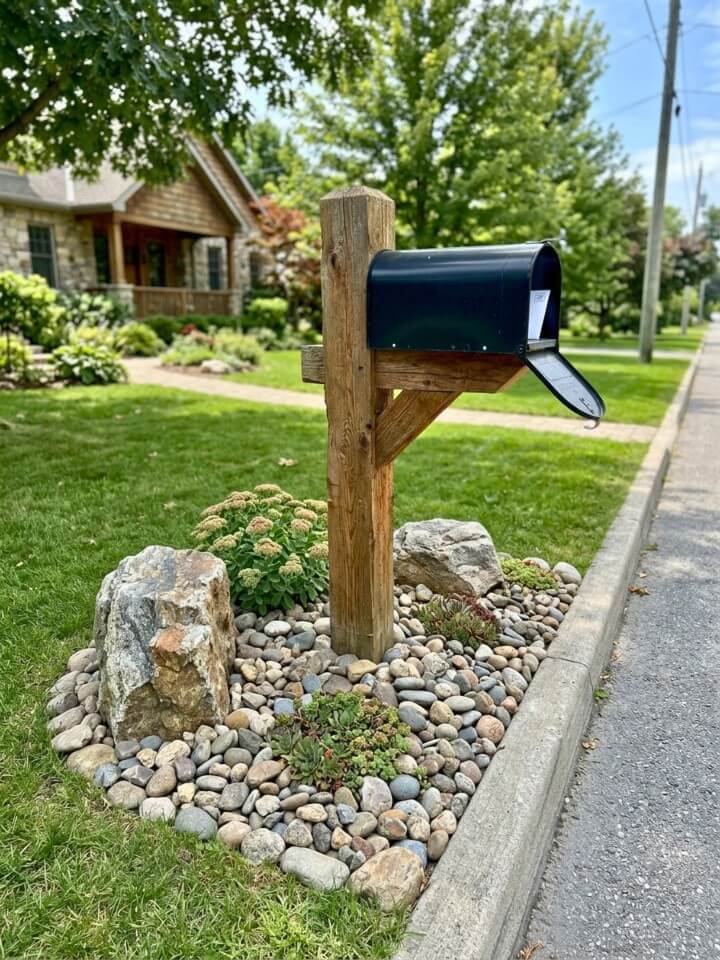
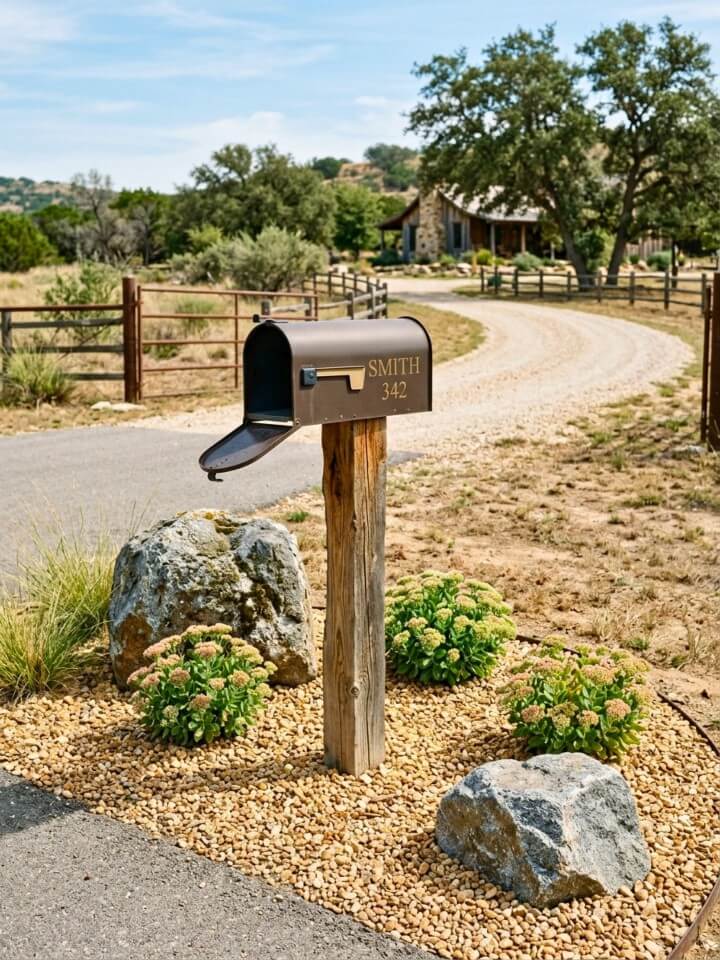
7. River Rock and Succulent Base
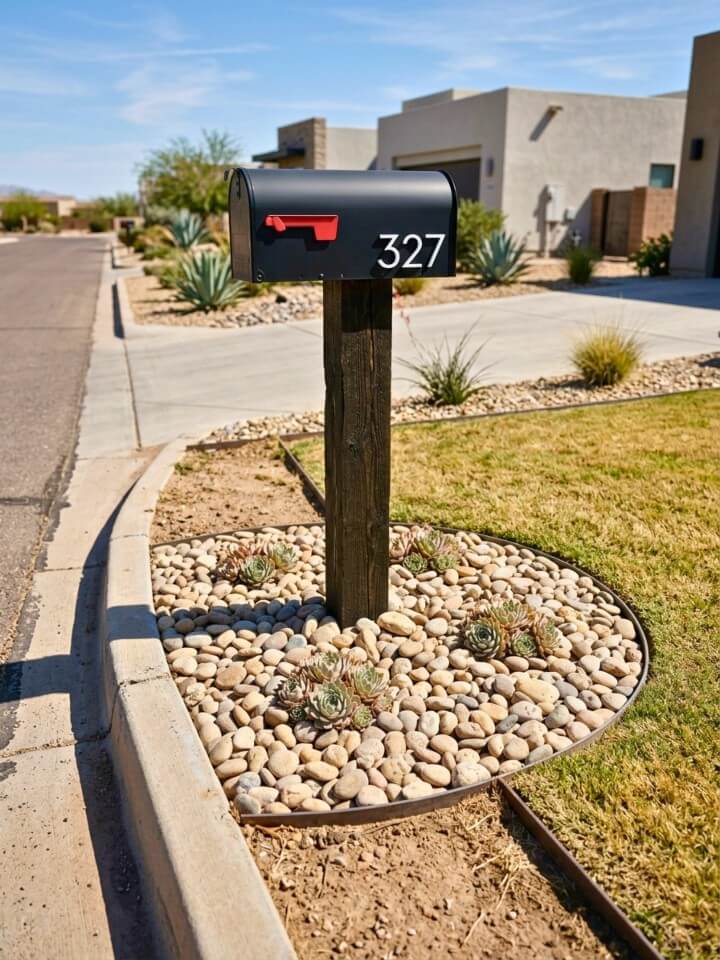
Hot, dry spots near the curb are where succulents genuinely perform well. Spread river rock two to three inches deep around the post, then nestle in sedum, hens and chicks, or ice plant where they get direct sun most of the day. Keep plants low — nothing taller than eight to ten inches — so the mailbox number stays readable from the street. Succulents planted in straight ground soil tend to struggle; mixing in coarse sand or fine gravel before planting improves drainage and gives roots a better start.
Watering During the First Season
Even drought-tolerant succulents need occasional deep watering while roots establish in the first summer. After that, rainfall alone usually handles them unless there’s a stretch of several weeks without any rain.
Discover More Backyard Landscaping Ideas
Explore creative backyard landscaping ideas to transform your outdoor space into a beautiful, relaxing, and functional area.
30 Easy Fence Line Landscaping Ideas You’ll Love
32 Beautiful Above-Ground Swim Spa Ideas Worth Exploring
23 Yard Corner Landscaping Ideas That Add Charm and Curb Appeal
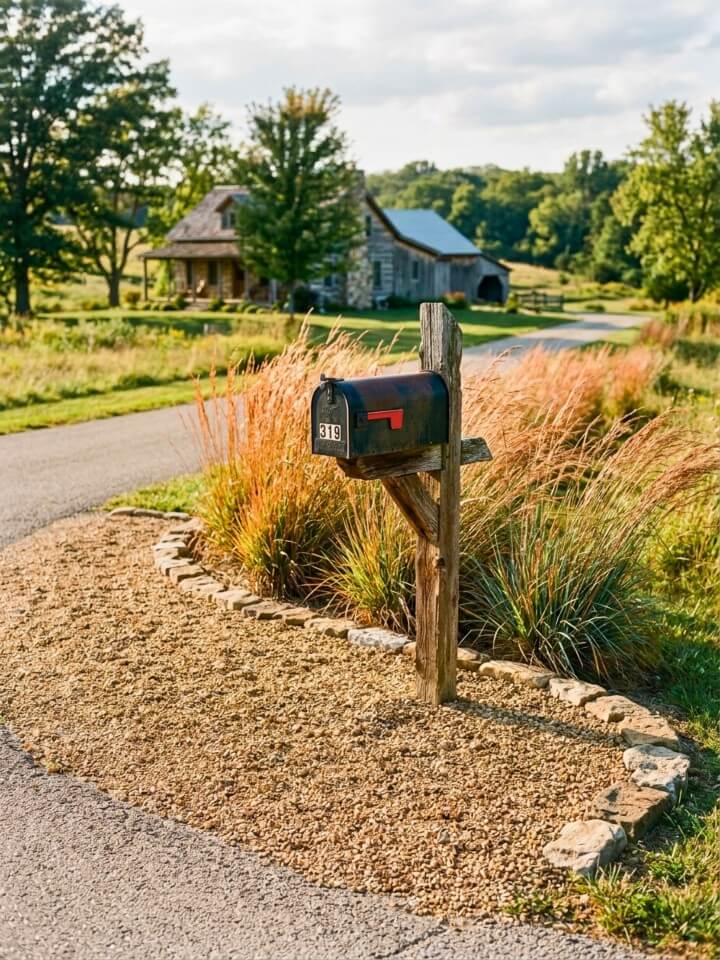
8. Gravel Bed with Ornamental Grass
A gravel bed paired with two or three compact ornamental grasses keeps the mailbox area dry, clean, and low effort. Lay landscape fabric under the gravel to cut weeding down to almost nothing. Plant the grasses toward the back of the bed so they add height without obscuring the box from the street. Karl Foerster or prairie dropseed work well here — both stay upright, handle heat, and need cutting back just once a year. Gravel also reflects heat, which these grasses tolerate better than plants that prefer cooler root zones.
Gravel Depth Matters
A two-inch layer looks thin within a season. Spread at least three inches so the fabric beneath stays covered and the bed maintains a clean, full appearance after rain settles the stones.
9. Hostas for a Shady Mailbox Spot
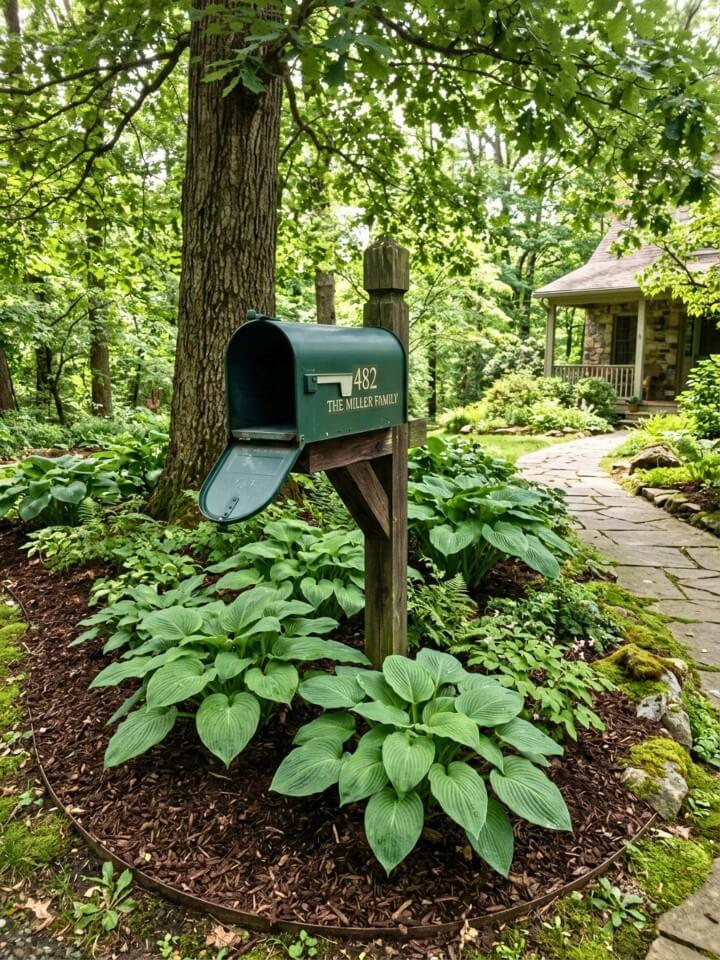
When a mailbox sits under a tree canopy or beside a shaded front walk, hostas are one of the most reliable choices available. Plant small or medium varieties around the base — avoid giant types that would eventually crowd the post entirely. Bark mulch holds soil moisture well in shaded spots where tree roots compete for water. Space hostas about eighteen inches from the post so leaves don’t flop against the door as they mature. They disappear in winter, so pairing them with a low evergreen ground cover fills the bare soil during colder months.
Slug Prevention in Shaded Beds
Hostas in damp, shaded spots attract slugs, which leave ragged holes across the leaves. Keeping mulch pulled slightly back from the crown and removing debris from around the plants reduces hiding spots and keeps damage minimal.
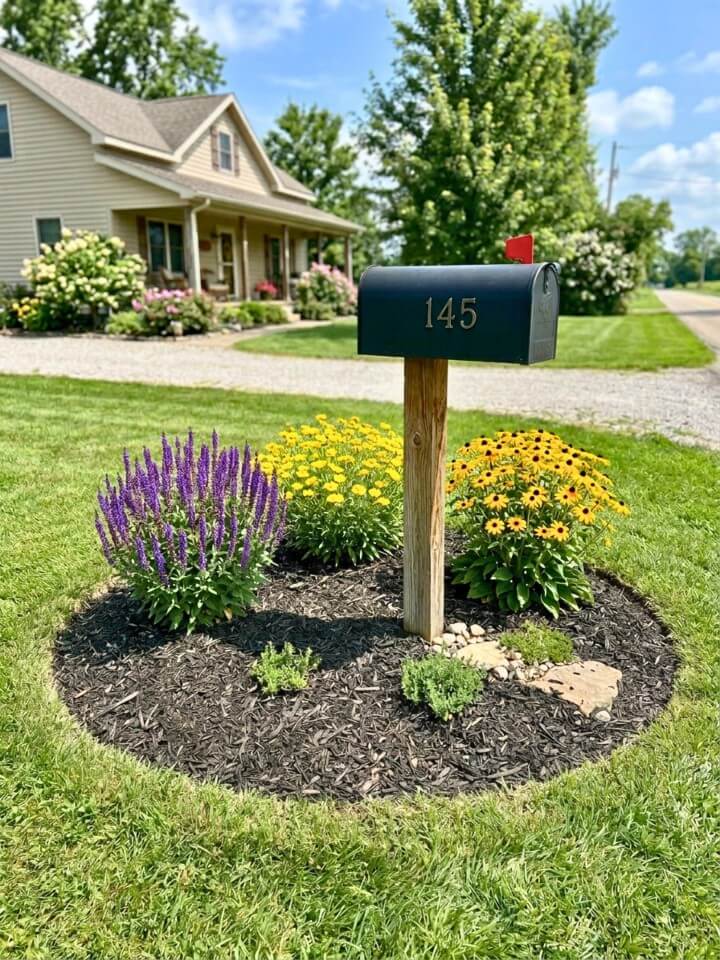
10. Brick Edging Mailbox Garden
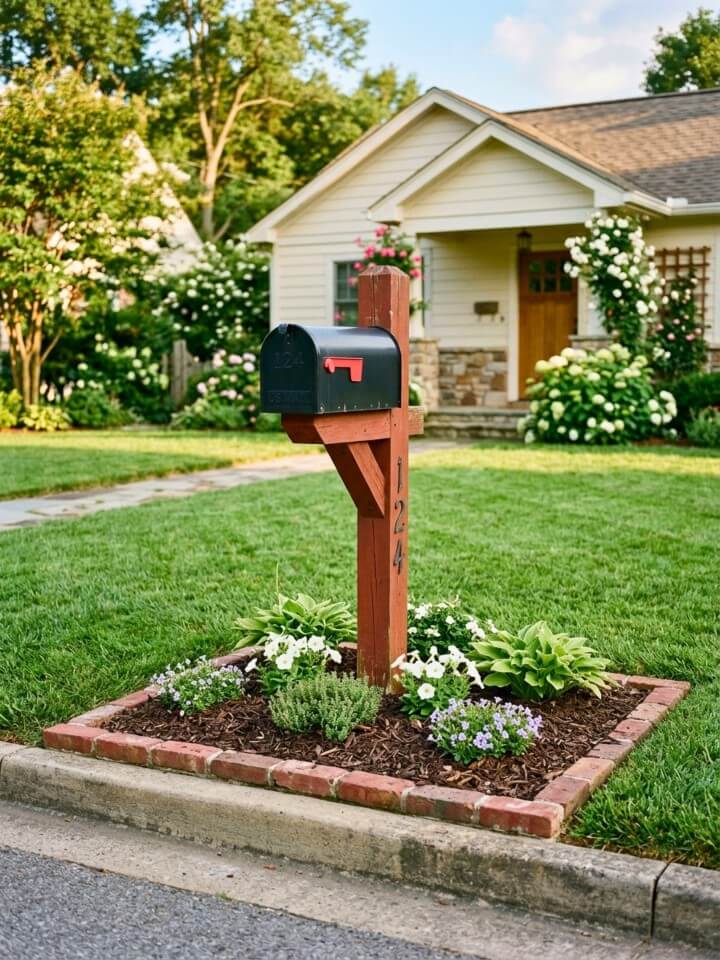
Brick edging gives a mailbox bed a clean, defined border that holds mulch and soil in place without demanding upkeep. Set bricks flat along the perimeter for a low, subtle edge, or stand them slightly upright for a more defined separation from the lawn. Either way, the line between bed and grass stays sharper than soft edging that breaks down over time. Fill the interior with mulch and a small cluster of hardy perennials like black-eyed Susan or salvia. Brick weathers naturally and blends into most front yard settings without looking forced.
Setting Bricks on a Stable Base:
Dig a shallow trench and add an inch of sand before setting bricks. This keeps them level through freeze-thaw cycles and prevents individual bricks from tipping or sinking unevenly over time.
Step-by-Step Brick Edging Tutorial
11. Creeping Thyme Ground Cover
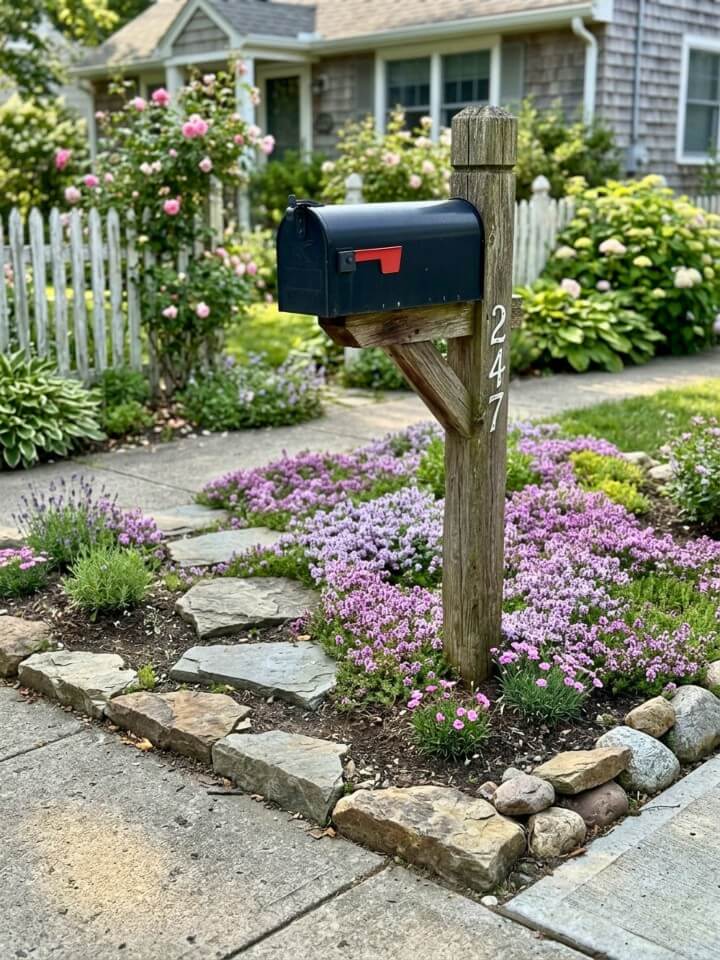
The best landscape around mailbox ideas combine easy-care plants, clean edging, and seasonal color for year-round curb appeal. Creeping thyme fills awkward gaps around the mailbox post that are too small for shrubs and too shaded for grass to grow well. Plant small plugs six to eight inches apart and they’ll knit together into a dense mat within one growing season.
It handles light foot traffic, which makes it practical near the path people walk to collect mail. After it flowers in early summer, a quick pass with a mower or shears on the highest setting keeps it tidy. The plant stays low, spreads slowly, and holds up well in poor, dry soil with almost no extra care.
Avoiding Wet Soil Problems
Creeping thyme thrives in lean, well-drained ground. If the area around the post stays consistently damp, amend the soil with coarse sand or raise the bed slightly — soggy roots cause this plant to thin out and die back in patches.
12. Curbside Rock Garden
Rock gardens work well along street edges where heat, road splash, and foot traffic wear down regular plantings. Use a mix of river rock and two or three larger fieldstones to frame the post naturally, placing bigger rocks toward the back so they don’t block the mailbox door. Fill gaps with sedum, dwarf ornamental grass, or yarrow — plants that handle reflected heat from pavement without needing extra water. Keep the overall height low so the mailbox number stays visible from the road. A weed barrier underneath cuts maintenance down to almost nothing after the first season.
Choosing Plants That Survive Road Conditions
Roadside beds deal with salt spray, exhaust, and compacted soil more than most garden spots. Sedum and yarrow handle these conditions better than most perennials — avoid anything with shallow roots or high moisture needs near a busy street.
13. Daylily Mailbox Border
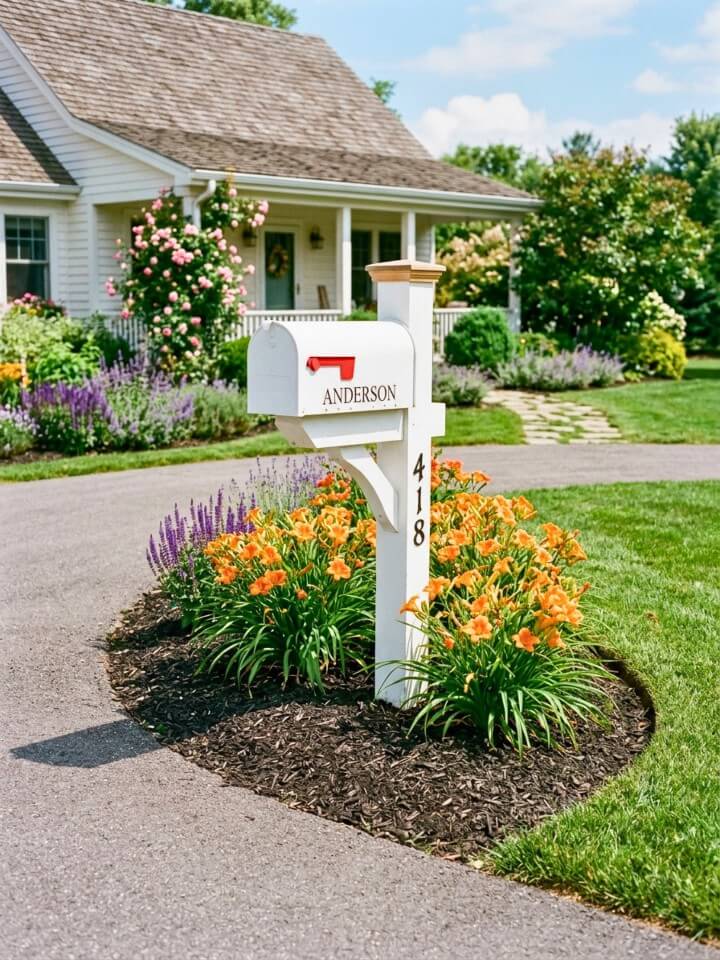
Daylilies earn their place in curbside beds because they come back reliably each year without dividing, feeding, or much watering once established. Plant them in small clumps along the sides and back of the post, spacing each clump about fifteen inches apart. Mulch between groups keeps weeds from filling in during the growing season. They bloom heavily for several weeks in summer, then settle into tidy green foliage for the rest of the season. Choose compact reblooming varieties if you want color that stretches beyond a single flush in midsummer.
Dividing Overgrown Clumps
After three or four years, daylily clumps get crowded and bloom less. Dig them up in early fall, split the root mass into smaller sections, and replant. It takes about ten minutes and keeps the bed productive without buying new plants.
14. Low-Growing Juniper Base
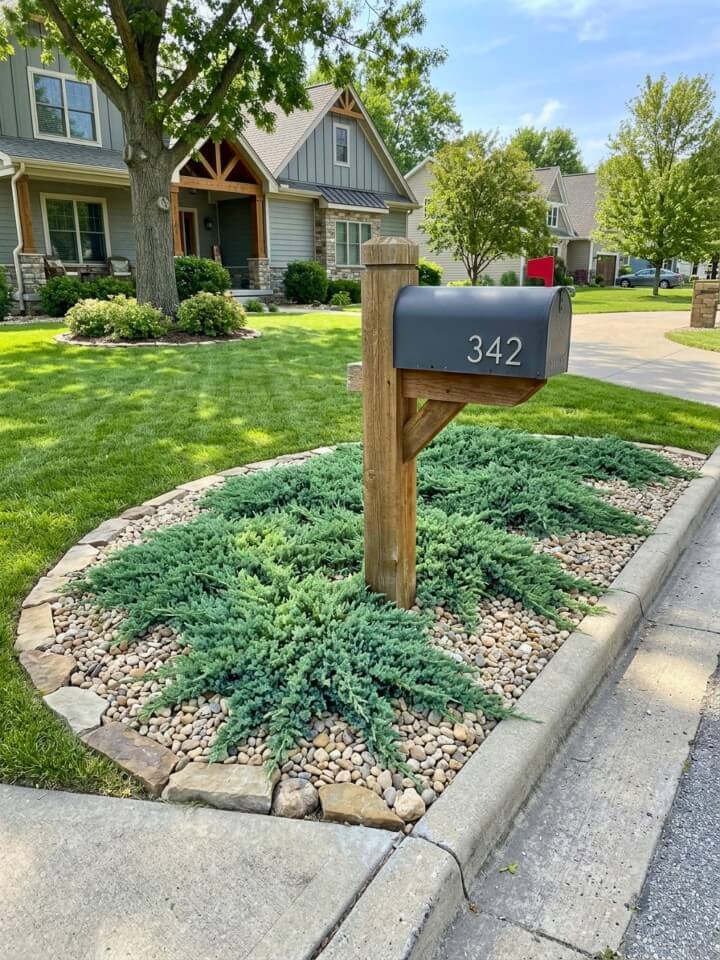
Low-growing junipers spread slowly across bare soil and create a dense mat that suppresses weeds without any regular trimming. Choose varieties that stay under eighteen inches tall — Bar Harbor or Blue Chip work well near a post because they spread outward rather than upward. Plant on the sides of the mailbox and leave the front completely open. Gravel or mulch between young plants fills the gaps while they establish over the first season or two. Junipers handle drought, road exposure, and poor soil far better than most ground covers once their roots settle in.
Planting in Rocky or Sandy Soil:
Junipers actually prefer leaner soil with good drainage. Avoid amending the planting hole heavily with compost — overly rich soil encourages soft, fast growth that’s more vulnerable to winter damage and fungal problems.
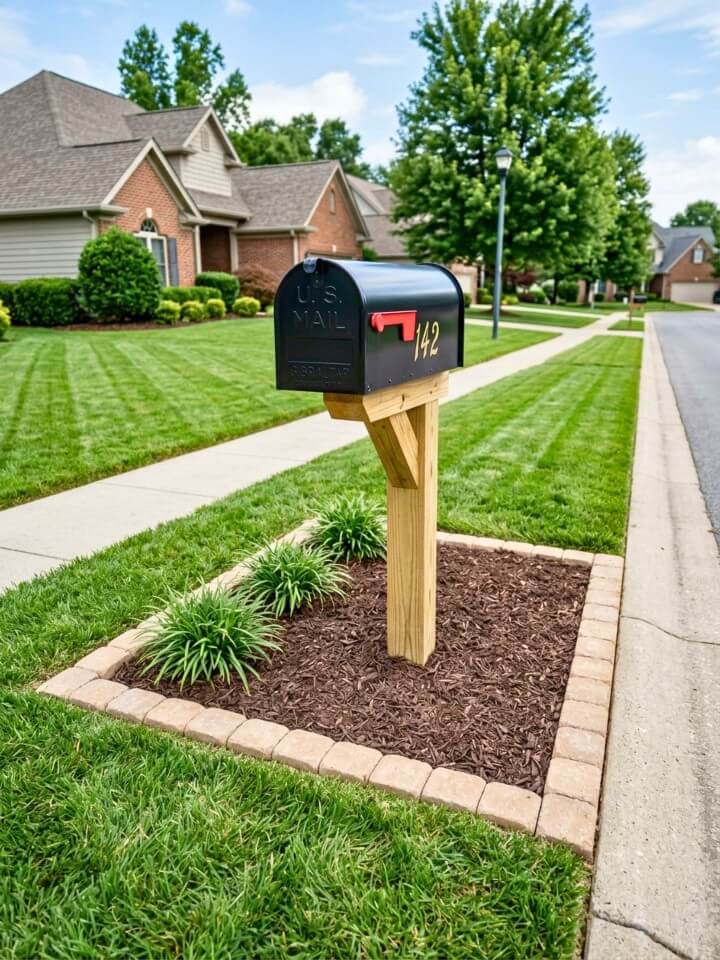
15. Mulch Bed with Solar Lights
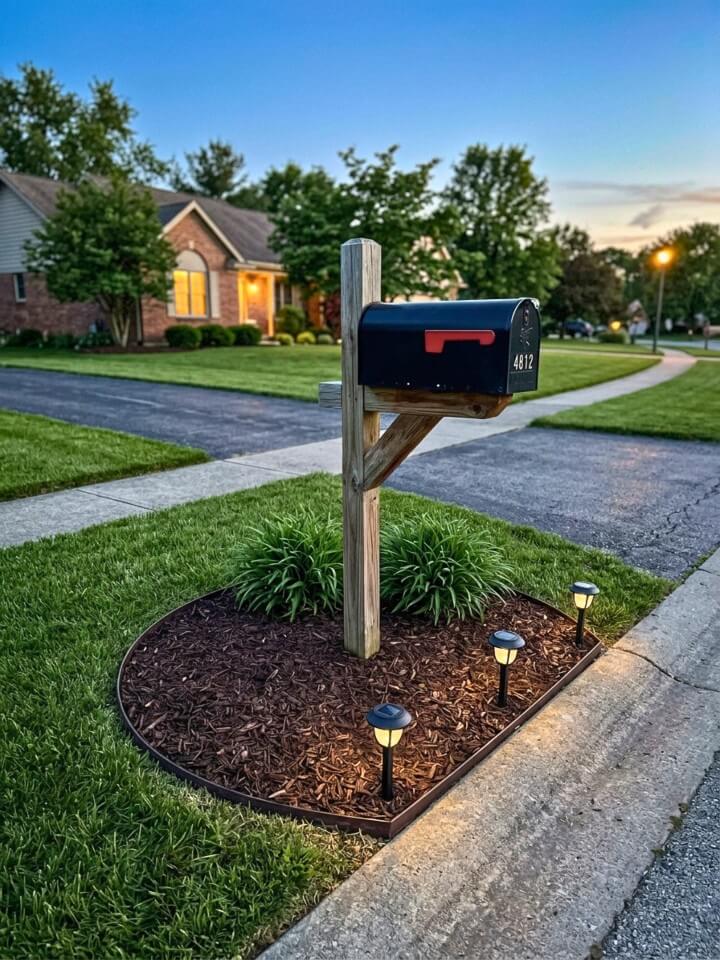
A neat mulch bed with two or three low solar lights makes the mailbox easier to find at night while keeping daytime maintenance minimal. Shape a small oval or rectangle around the post, set a clean edging border, then spread three inches of mulch to block weeds. Place solar lights along the front edge of the bed, positioned where they won’t get clipped by a mower or knocked by a car door. Keep the fixtures simple — spike-style solar lights with warm bulbs blend into most front yards without looking like a product display.
Positioning Lights for Maximum Charge:
Solar lights need direct sun for at least six hours to stay bright through the night. Check that nearby shrubs, the mailbox post itself, or a tree canopy won’t cast shade over the panels during peak afternoon hours.
16. Native Plant Mailbox Garden
Native plants bring color and texture to a curbside bed while needing far less water, feeding, and pest management than non-native alternatives. Choose compact species that stay below mailbox height — native coneflower, wild ginger as ground cover, or little bluestem grass work well depending on the sun exposure. Group plants in odd numbers rather than straight rows for a more natural arrangement. Mulch heavily in the first year to help roots establish before summer heat sets in. After that, most native plants handle dry spells on their own and come back stronger each season.
Matching Plants to Your Soil Type:
Native plants perform best when matched to local soil conditions, not just climate. A plant native to sandy coastal areas may struggle in dense clay soil even within the same region — check each species’ soil preference before buying.
17. Compact Hydrangea Mailbox Planting
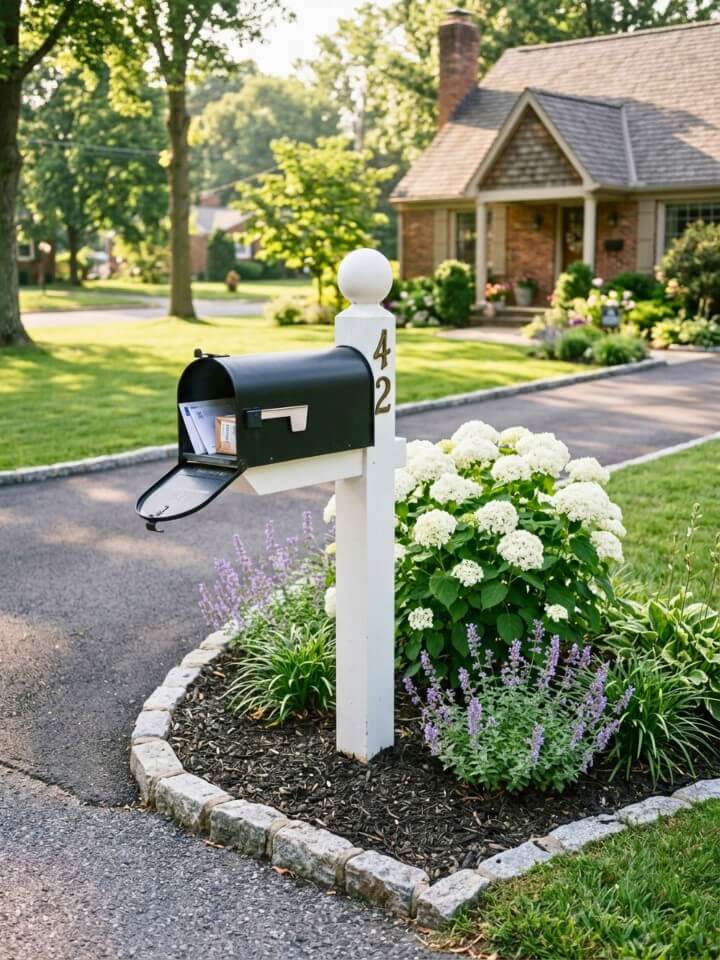
A compact hydrangea beside the mailbox post adds volume and soft color without the sprawl of full-size varieties. Little Quick Fire and Bobo are two reliable options that stay under four feet and bloom reliably each summer. Plant slightly behind or beside the post so the mailbox door has a clear swing path. Morning sun with some afternoon shade suits most compact hydrangeas better than a fully exposed curbside spot. Mulch deeply around the base — about three inches — to hold soil moisture during dry weeks, which is when hydrangeas show stress first.
Avoiding Common Watering Mistakes:
Hydrangeas wilt dramatically in afternoon heat even when soil moisture is fine. Water deeply at the base two or three times a week during the first summer rather than shallow watering daily, which encourages surface roots that dry out faster.
18. Flagstone Path Around the Mailbox
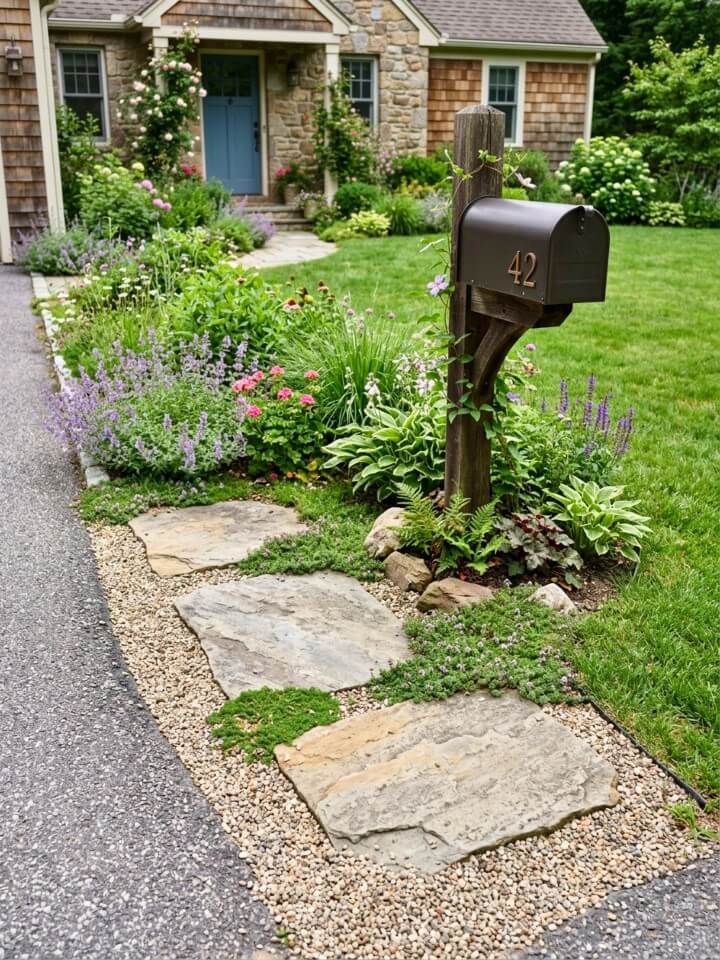
A short flagstone path from the driveway or sidewalk to the mailbox solves the worn grass problem that develops wherever people cut across a lawn daily. Set flat stones with gaps of one to two inches between them, then fill the joints with gravel, decomposed granite, or a low ground cover like creeping thyme. Choose flagstone with a rough surface texture rather than smooth-cut stone — it stays less slippery after rain. Keep border plants along the edges low so the path stays unobstructed and easy to walk without stepping around foliage.
Leveling Flagstone on Uneven Ground:
Dig each stone into a shallow bed of sand rather than laying it directly on soil. Sand lets you adjust the angle of each piece individually, which keeps the path level even when the ground beneath is slightly sloped or uneven.
19. Dwarf Nandina Mailbox Border

Dwarf nandina adds year-round interest with foliage that shifts from green through orange and red as temperatures drop in fall. Choose compact varieties like Harbour Dwarf or Firepower, which stay under two feet and don’t need regular pruning to hold their shape. Plant in a loose curve along the back and sides of the post, keeping the front open for easy mail access. Nandina handles both sun and partial shade, which makes it flexible for mailbox spots that don’t get full sun all day. Mulch around the base and it largely takes care of itself season to season.
Checking Spread in Warmer Climates:
In mild winter regions, some nandina varieties spread more aggressively through self-seeding. Stick with sterile dwarf cultivars rather than the standard species to keep the bed contained without regular pulling of new seedlings.
20. Black Mulch and White Stone Contrast
Explore creative ideas for mailbox landscaping to transform an ordinary mailbox into a beautiful focal point for your yard. Black mulch paired with white stone creates a high-contrast mailbox bed that looks intentional and stays clean with minimal work. Use black mulch around one or two simple shrubs or ornamental grasses, then frame the outer edge with a narrow band of white stone inside a defined border.
Keep the plant selection restrained — boxwood, liriope, or blue fescue work well without overwhelming the clean visual. Refresh the black mulch once a year in spring since it fades to gray faster than natural brown mulch, which is the one maintenance step this design needs consistently.
Preventing White Stone Discoloration:
White gravel near a road picks up dust, tire residue, and organic debris quickly. Rinsing with a garden hose in spring and fall takes about five minutes and keeps the contrast sharp without replacing the stone.
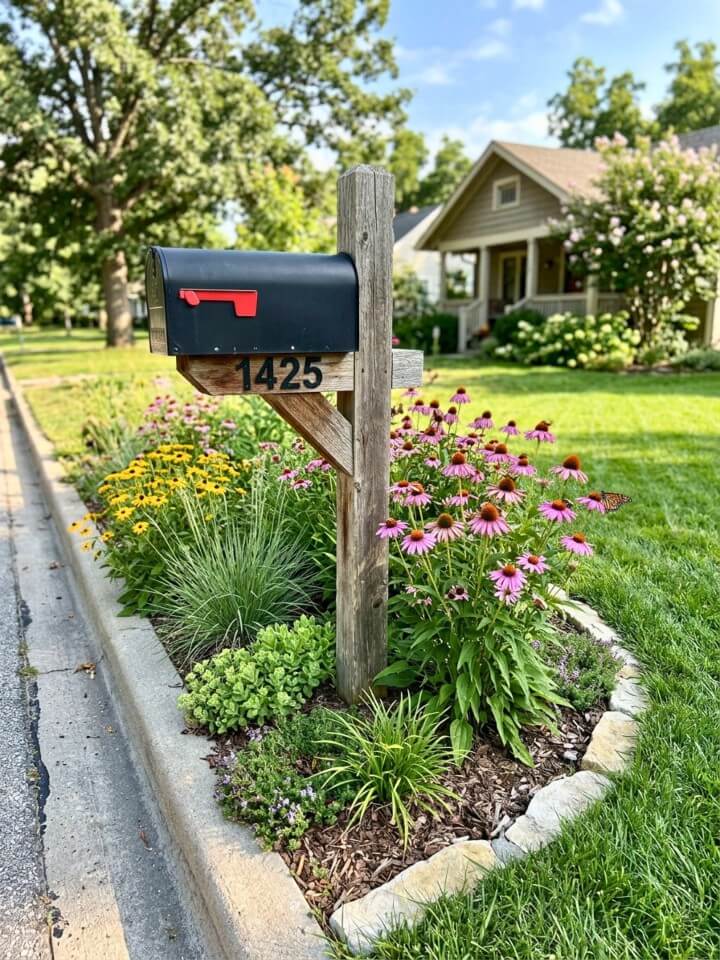
21. Coneflower and Grass Mailbox Bed
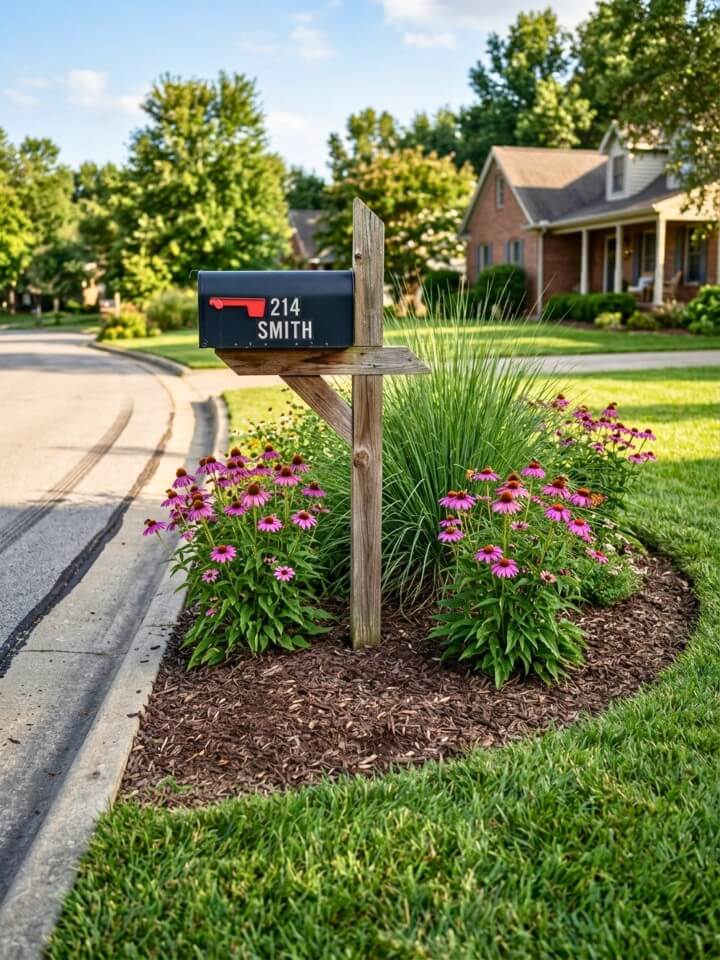
Coneflowers and ornamental grass pair naturally in a sunny curbside bed because they share similar growing needs — full sun, decent drainage, and very little supplemental water once established. Plant coneflowers toward the sides of the post in groups of three, then position a compact grass like Karl Foerster or little bluestem toward the back for height and movement. Mulch between plants while they fill in during the first season. Leave seed heads standing through fall and winter — birds use them regularly, and the dried stems add structure to the bed when everything else has died back.
Cutting Back at Season’s End:
Cut coneflower stems down to about four inches in late winter rather than fall. This keeps the seed heads available for wildlife through the colder months and makes the one annual cleanup quick and straightforward.
22. Pea Gravel Mailbox Border

Thin or patchy grass around a mailbox post is a maintenance headache that gravel solves permanently. Shape a small bed around the base, install a metal or plastic edging strip to hold the border clean, then spread pea gravel three inches deep across the entire area. Drought-tolerant plants like sedum, compact lavender, or dwarf ornamental grass add soft texture without fighting the drainage conditions gravel creates. Pea gravel stays in place better than larger stones on flat ground and gives the bed a tidy, finished appearance that holds up through wet seasons without washing out.
Keeping Gravel Out of the Lawn:
A solid edging strip buried two inches into the soil stops gravel from migrating into grass during heavy rain. Check the border once each season and push any escaped stones back before they become a mowing hazard.
23. Mini Rose Bush Mailbox Planting
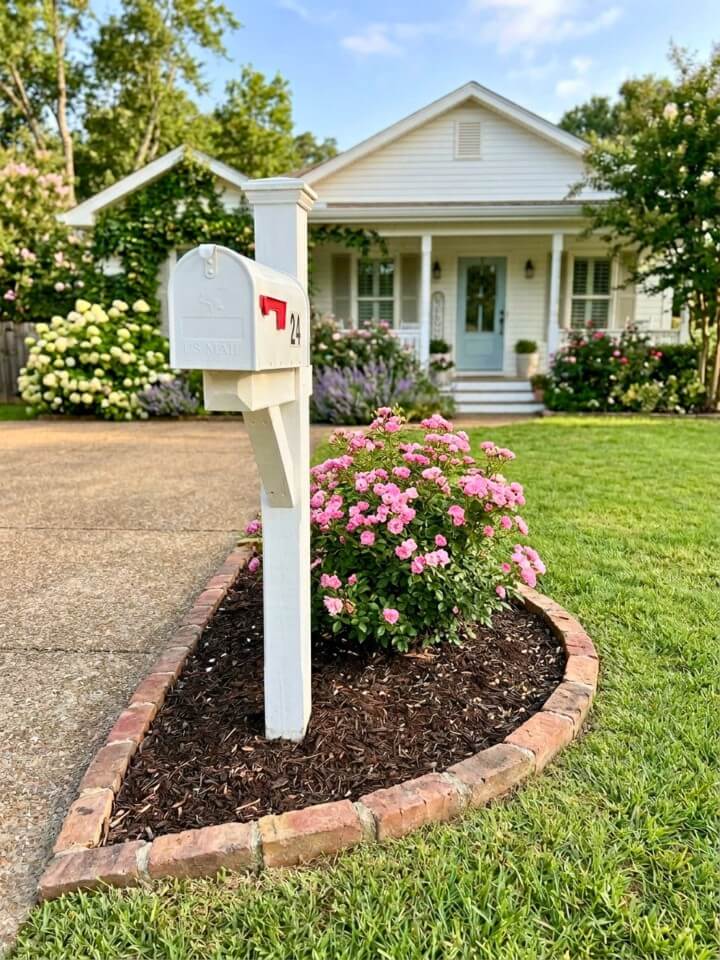
Few flowering plants give a curbside bed as much color per square foot as a well-chosen compact rose. Plant one beside or just behind the post so the mailbox door swings freely, and leave at least a foot of clearance on each side for air to move around the plant. Good air circulation is what separates rose bushes that thrive from ones that spend the season fighting fungal issues. Add mulch around the base and a simple low border to keep the bed defined. Knock Out and Drift roses are worth considering — both rebloom through summer without deadheading and handle curbside heat better than hybrid tea varieties.
Pruning to Keep the Shape Manageable:
Cut compact roses back by about one-third in early spring before new growth starts. Avoid heavy pruning in fall — it stimulates tender new growth that gets damaged by cold and weakens the plant heading into winter.
24. Liriope Around the Mailbox Post
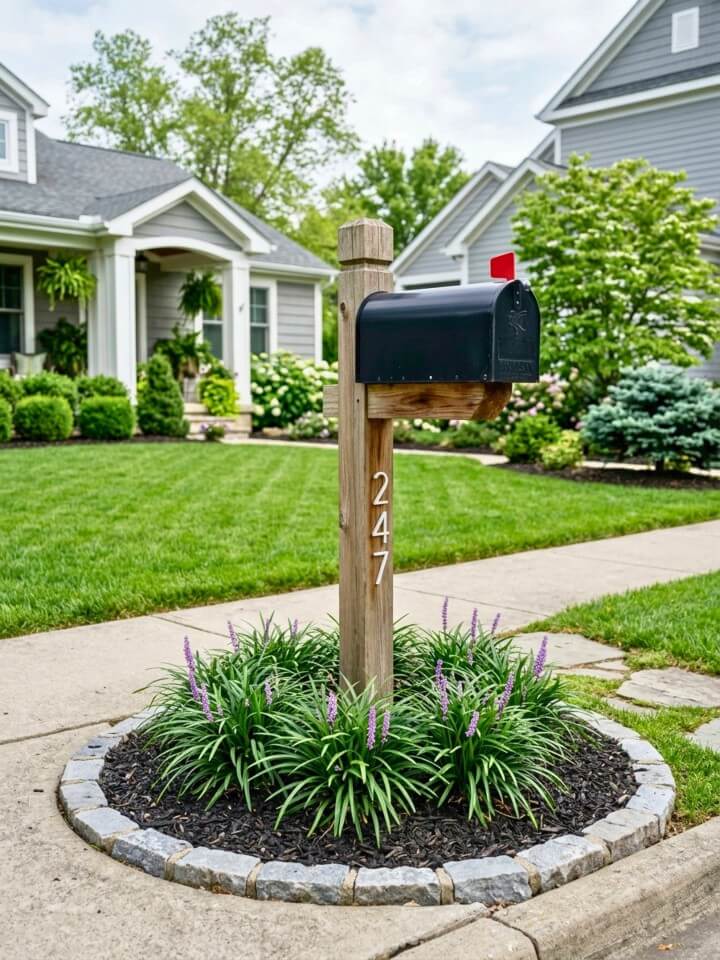
Dark green, grass-like, and nearly indestructible — liriope earns its place in curbside beds by handling conditions that finish off most other plants. Plant clumps in a ring or short curved row around the post, spacing them twelve to fourteen inches apart so they fill in without crowding the mailbox door. It grows in sun or partial shade, which makes it one of the few plants that works reliably regardless of how much light the mailbox spot actually gets. Mulch between clumps during establishment keeps the bed clean. Purple flower spikes appear in late summer, adding quiet seasonal interest without any extra effort.
Dividing Older Clumps:
Liriope clumps grow outward over several years and eventually develop a dead center. Dig and divide every four or five years in early spring, replanting the healthy outer sections and discarding the middle. It refreshes the bed without buying new plants.
25. Raised Stone Mailbox Bed
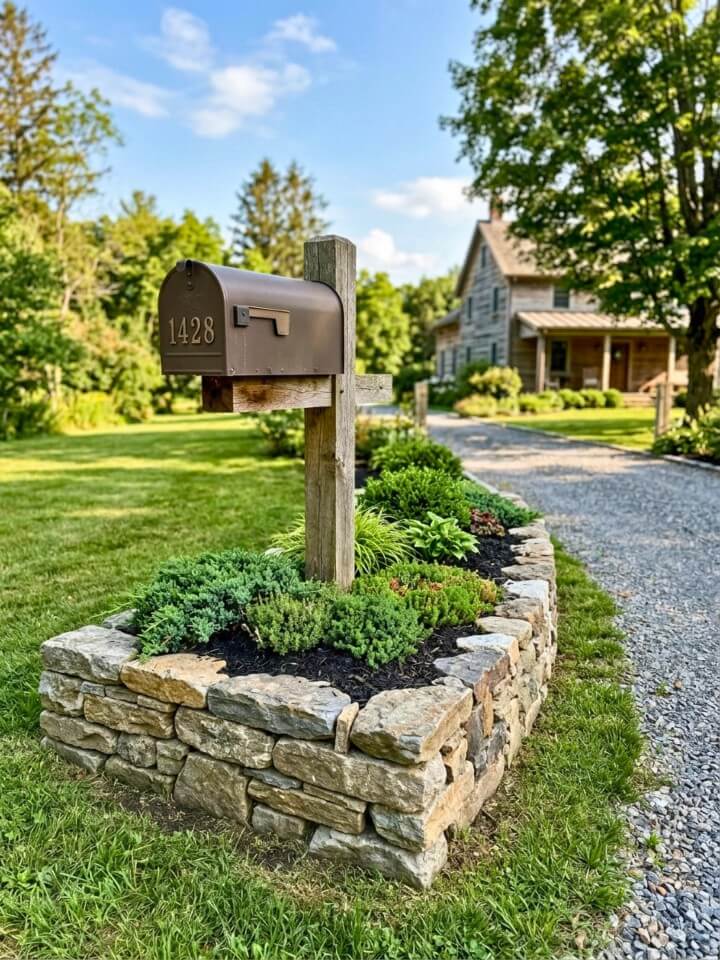
Building a low raised border around the mailbox gives the whole entry point more visual weight and keeps soil, mulch, and plant roots neatly contained above grade. Stack fieldstone or flat concrete blocks two to three courses high — enough to define the space without blocking the mailbox from street view. Fill the interior with well-draining soil mixed with coarse grit, then plant hardy low-growing perennials or compact evergreen shrubs. A raised bed also means better drainage than flat ground planting, which benefits most ornamental plants that struggle in compacted curbside soil.
Choosing the Right Fill Mix:
Standard topsoil alone compacts quickly inside a raised bed. Blend it with compost and coarse perlite or grit at roughly a two-to-one ratio — this keeps the soil loose, drains well after heavy rain, and gives plant roots room to establish without fighting dense ground.
26. Hardy Ferns for a Shaded Corner
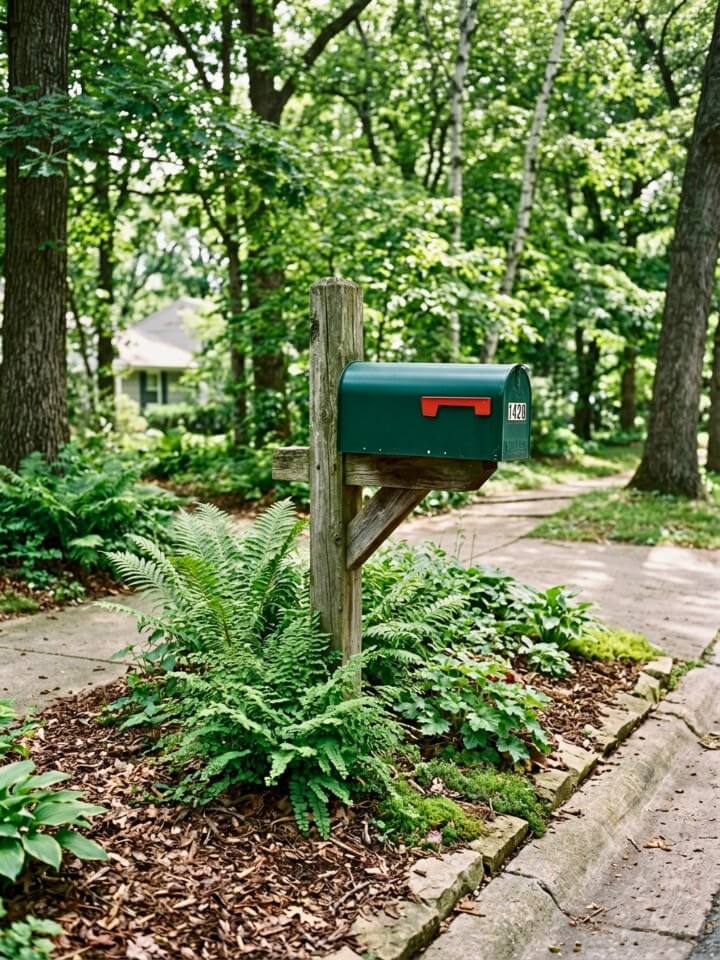
When the mailbox sits in consistent shade from a nearby tree or covered walkway, most sun-loving plants simply don’t perform. Hardy ferns like autumn fern, Japanese painted fern, or ostrich fern fill shaded ground with texture and layered green without needing extra watering or feeding once settled. Plant them behind and beside the post, then apply a generous layer of bark mulch to keep soil moisture consistent through dry spells. Leave space around the door side so fronds don’t sprawl across the opening as they mature. Ferns spread slowly, so the bed stays manageable without dividing or cutting back frequently.
Keeping Fronds Looking Clean:
Remove old brown fronds in early spring before new growth unfurls. This one quick step takes only a few minutes and keeps the bed looking intentional rather than neglected through the growing season.
27. Paver Edging Mailbox Bed
Add instant charm with simple mailbox landscaping using colorful flowers, natural stone borders, and fresh mulch. Small concrete or natural stone pavers set around a mailbox bed create a border that holds its shape through freeze-thaw cycles better than plastic edging or loose stone. Arrange them in a gentle curve or simple rectangle around the post, pressing each paver firmly into a shallow sand base so they sit level.
Fill the interior with mulch and two or three low-maintenance plants — liriope, dwarf spirea, or compact sedum all work well. The defined edge also makes mowing cleaner since the wheel of a mower can run along the paver line without cutting into the bed or leaving a ragged grass border.
Fixing Pavers That Shift Over Time:
Frost heaving and soil settling will move individual pavers out of alignment within a few seasons. Reset them by lifting, adding or removing a small amount of sand beneath, and pressing back into place — a ten-minute fix that keeps the border looking sharp.
28. Dwarf Spirea for a Soft Border
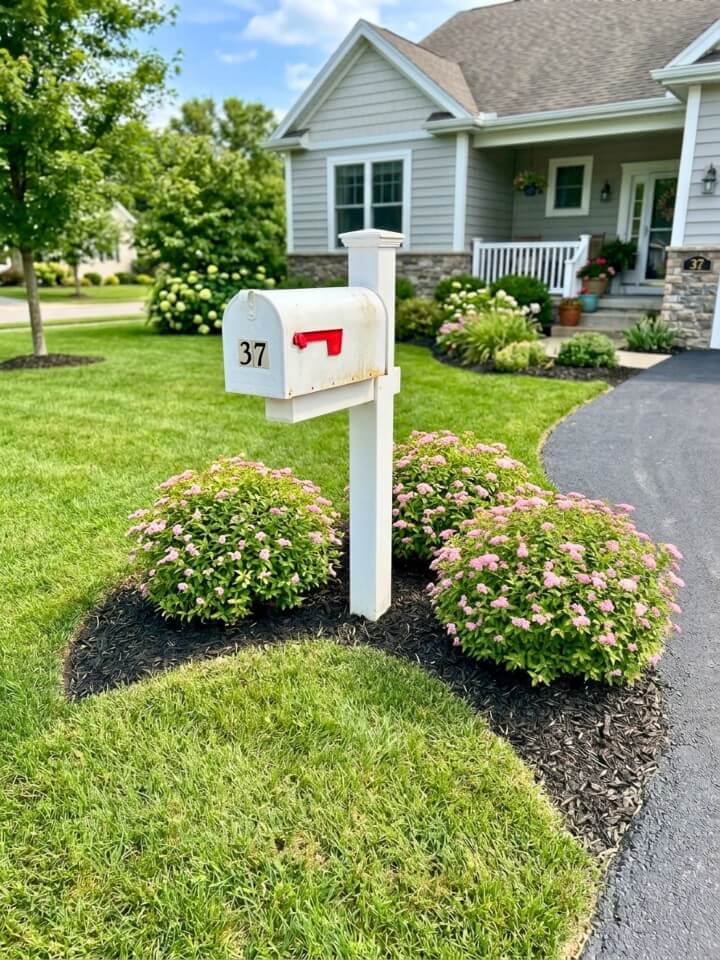
Rounded, naturally compact, and covered in blooms for several weeks each summer — dwarf spirea fits a mailbox bed without the pruning demands of boxwood or holly. Plant two or three along the back and sides of the post, spacing them eighteen inches apart so they grow together into a loose, connected row. After blooming, a light trim removes spent flower clusters and encourages a second flush of color on some varieties. Mulch around the roots and the plants handle most of what a curbside location throws at them, including heat, dry spells, and occasional road splash.
Picking the Best Variety for Small Spaces:
Double Play Gold and Magic Carpet stay under two feet tall and wide, making them better fits for tight mailbox beds than standard spirea varieties that can reach three to four feet without regular cutting back.
29. Mulch Ring with Hardy Perennials
A clean mulch ring around the mailbox post is one of the most practical upgrades a front yard bed can get. Cut a defined oval or circle, install edging to hold the border, then plant tough perennials like coreopsis, salvia, or black-eyed Susan in small clusters. These plants return each year, bloom reliably in full sun, and need dividing only every few years to stay productive. Spread mulch two to three inches deep between plants to suppress weeds through the growing season. The whole bed needs one or two hours of attention in spring and a quick cutback in late fall — nothing more.
Refreshing Mulch Without Overdoing It:
Add a fresh inch of mulch each spring rather than piling new material on top of old layers. Thick mulch buildup traps moisture against plant stems and creates conditions where rot and fungal problems develop gradually without being obvious.
30. Prairie Grass Mailbox Planting
Little bluestem and prairie dropseed bring genuine texture and movement to a sunny curbside bed without asking much in return. Both stay compact enough for a mailbox planting — little bluestem reaches two to three feet and turns a rich copper-red in fall, while prairie dropseed forms tidy, arching mounds under two feet. Plant them behind or beside the post so they frame the mailbox rather than hide it, then finish the base with gravel or mulch for a clean look. These grasses handle heat, drought, and poor curbside soil far better than most ornamental varieties sold at garden centers.
Cutting Back Without Damaging the Crown
Cut prairie grasses down to four to six inches in late winter, not fall. Leaving stems standing through winter protects the crown from freeze damage and gives the bed structure during months when most other plants have died back completely.
31. Ground Cover Mailbox Border
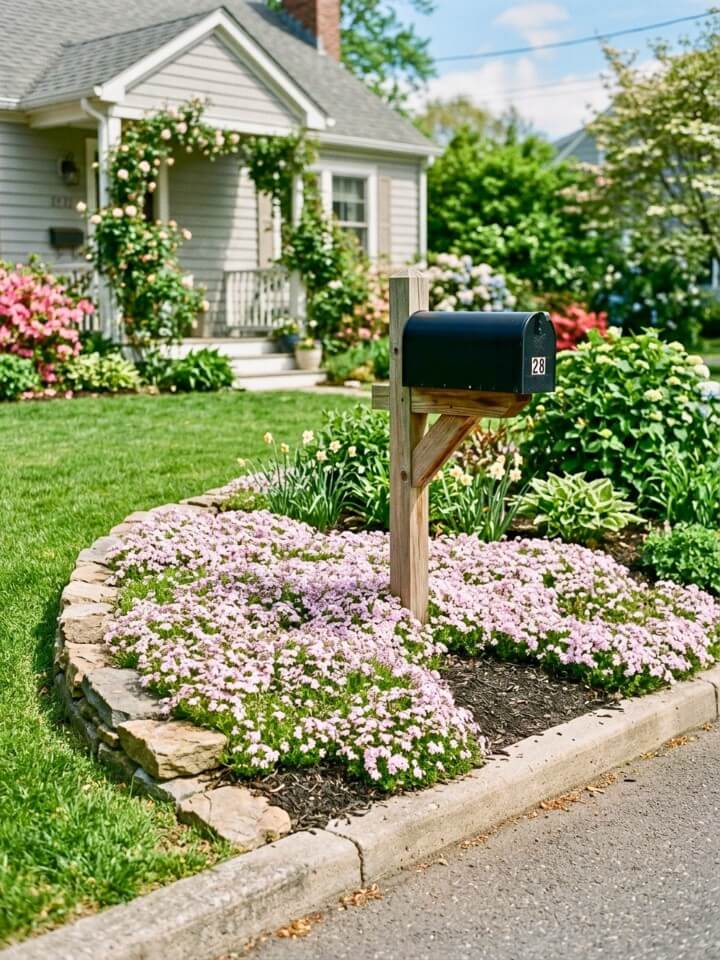
Bare soil around a mailbox post invites weeds, and grass rarely fills in well right at the base. Low ground covers solve both problems without adding much maintenance. Creeping phlox works well in sunny spots and produces a flush of color in spring before settling into dense, weed-suppressing foliage for the rest of the season. Ajuga handles partial shade better than most options and spreads at a steady pace without becoming invasive. Plant plugs six to eight inches apart, mulch between them while they fill in, and leave a clear path directly in front of the post for mail access.
Matching Ground Cover to Light Conditions:
Creeping thyme and sedum need at least six hours of direct sun to stay dense and healthy. In shadier spots, ajuga or sweet woodruff will perform far better — using the wrong plant for the light available is the most common reason ground cover beds thin out and fail within a season or two.
32. Natural Boulder Mailbox Accent
One or two well-placed boulders beside a mailbox post do more visual work than a bed full of plants competing for attention. Choose stones with flat bases so they sit stable without shifting, and position them slightly off-center rather than symmetrically — natural placement looks more considered than a matched pair set equidistant from the post. Fill around the boulders with mulch or gravel, then add low plants like sedum or dwarf grass in the gaps where soil shows. Keep the boulder side away from the mailbox door so delivery access stays completely clear year-round.
Sourcing and Moving Heavy Stone:
Landscape suppliers sell boulders by weight, and most will deliver and place them with equipment if the stones are too heavy to move by hand. A boulder in the one hundred to two hundred pound range creates strong visual presence without needing machinery to reposition if the layout needs adjusting later.
33. No-Mow Mailbox Garden
These mailbox landscape ideas can help create a polished front yard design that makes your home look more inviting. Replacing the awkward strip of grass around a mailbox post with a permanent planted bed eliminates one of the more tedious trimming tasks in a front yard.
Remove the turf within the bed area, lay cardboard or landscape fabric to smother remaining roots, then cover with mulch while young plants establish. Compact shrubs, hardy ground cover, or a mix of low perennials all work depending on sun exposure. Keep everything below the mailbox opening so the box stays easy to reach and visible from the street. Once plants fill in, the bed essentially maintains itself between one annual cleanup session.
Smothering Grass Before Planting:
Cardboard layered two sheets thick under mulch breaks down over one season and adds organic matter to the soil as it decomposes. It outperforms landscape fabric for long-term weed suppression because it improves soil structure rather than sitting inert beneath the surface indefinitely.
FAQs About Mailbox Landscaping
Before you dig, edge, or plant anything near the curb, these are the practical questions worth getting right first.
Do I Need a Permit to Landscape Around My Mailbox?
In most residential areas, a small decorative bed around a mailbox post does not require a permit. That said, there are a few situations worth checking before you start digging.
HOA communities often have specific rules about what can be planted near the curb, how tall plants can grow, and which materials are approved for edging or mulch. Always review your HOA guidelines before buying anything. Municipalities with right-of-way ordinances may regulate anything installed within a certain distance of the road, including raised beds or large boulders. A quick call to your local public works department can confirm whether your plans fall within allowed limits.
When in doubt, keep beds low, avoid permanent hardscape structures taller than a few inches, and stay at least 12 inches back from the curb edge.
What Are the USPS Rules About Planting Near a Mailbox?
The United States Postal Service requires clear carrier access at all times. Mail carriers must be able to reach the mailbox door without stepping out of their vehicle or being blocked by plants, overgrown foliage, or physical barriers. USPS guidelines generally recommend keeping a minimum 30-inch clearance in front of the mailbox door and ensuring nothing obstructs the carrier’s approach from the road.
Plants that grow tall, wide, or unpredictably — climbing roses, sprawling ornamental grasses, or fast-growing shrubs — can result in mail delivery being suspended until the obstruction is removed. Keep everything below the mailbox opening height, avoid planting directly in front of the door, and trim anything that extends toward the opening each growing season. If delivery is ever stopped, a notice will be left explaining what needs to be corrected before service resumes.
How Do I Prepare Compacted Curbside Soil Before Planting?
Soil near the road is often the most difficult planting ground in the entire yard. It gets compacted by foot traffic, contaminated with road salt residue, and is sometimes mixed with construction debris left over from when the driveway or curb was installed. Skipping soil preparation is the most common reason curbside plantings fail within the first season.
Start by testing compaction — push a screwdriver 6 inches into the soil by hand. If it takes real effort or won’t go in at all, the ground needs loosening before anything gets planted. Use a garden fork to break up the top 8 to 10 inches, remove any rocks or debris that turn up, then work in a generous layer of compost — roughly 2 to 3 inches mixed thoroughly into the existing soil.
For areas with known salt contamination from road runoff, gypsum helps displace sodium ions and gradually improves soil structure over one or two seasons. If the soil is extremely poor, building a slightly raised bed with imported growing mix is faster and more reliable than trying to rehabilitate heavily degraded ground from scratch.
How Do I Protect Mailbox Plants from Road Salt Damage in Winter?
Salt damage is one of the most overlooked causes of plant failure in curbside beds. Road crews apply deicing salt from late fall through early spring, and vehicle spray carries it directly onto nearby soil and foliage. The symptoms — brown leaf edges, stunted growth, or plants that look fine in spring but collapse by midsummer — are easy to misread as drought stress or disease.
Choosing salt-tolerant plants from the start makes the biggest difference. Juniper, liriope, sedum, ornamental grasses, and most native prairie plants handle salt exposure far better than lavender, hydrangea, or boxwood. Beyond plant selection, applying a thick mulch layer in fall — 3 to 4 inches of shredded bark or wood chips — slows salt from penetrating the root zone. Flushing the bed thoroughly with fresh water in early spring, before growth resumes, leaches accumulated salt out of the upper soil before it causes damage.
A low burlap screen staked along the road-facing side of the bed can also intercept direct salt spray through winter without blocking sunlight from reaching the plants behind it.
What Is the Best Time of Year to Install a Mailbox Landscaping Bed?
Timing the installation well gives plants the best chance of establishing before they face summer heat or winter cold.
Early fall is generally the best window in most climates. Soil temperatures are still warm enough for roots to grow, air temperatures have dropped so plants lose less moisture through their leaves, and rainfall tends to be more reliable than in summer. This gives shrubs, perennials, and ground covers 6 to 8 weeks of root development before the ground freezes.
Early spring is the second-best option — just after the last frost date when soil is workable but before summer heat sets in. Avoid planting in midsummer unless you’re committed to consistent deep watering for the first 6 to 8 weeks, which adds maintenance effort that defeats the point of a low-maintenance bed.
For hardscape elements — gravel, edging, boulders, or pavers — timing matters less. Any dry stretch without frozen ground works fine. If installing plants in fall, wait until the soil has cooled slightly before laying mulch so you’re not trapping residual heat that can disrupt the plant’s natural dormancy cycle.
Conclusion:
Going through these low maintenance mailbox landscaping ideas makes one thing clear — the fix is almost always simpler than expected. A defined bed, the right plants for the actual conditions, and a clean edge does more for a front yard’s appearance than most costly upgrades. The mailbox is the first thing people see from the street, and the last thing most homeowners think about. Getting that small patch right takes an afternoon at most. Start with one material, one plant, one clean border — and the rest usually falls into place on its own.