38 Herb Garden Ideas for Every Home, Patio, and Windowsill
There’s something quietly satisfying about snipping basil for dinner from a plant you grew yourself instead of paying four dollars for a sad plastic clamshell at the store. That single habit changes how you cook. Suddenly you’re tossing fresh thyme into eggs, muddling mint into iced tea, and tearing parsley over pasta without a second thought. The good news? You don’t need a sprawling backyard to make this happen. These 38 incredible herb garden ideas cover every situation I can think of — a tiny apartment windowsill, a shady patio corner, a blank fence, a forgotten yard nook begging for purpose.

Some are weekend builds with stone and cedar. Others take twenty minutes and a few thrift store finds. A handful work beautifully indoors through winter, so you’re never stuck buying tired grocery-store herbs again. Pick the ones that fit your space, your budget, and how much effort you actually want to spend.
1. Raised Wooden Herb Beds
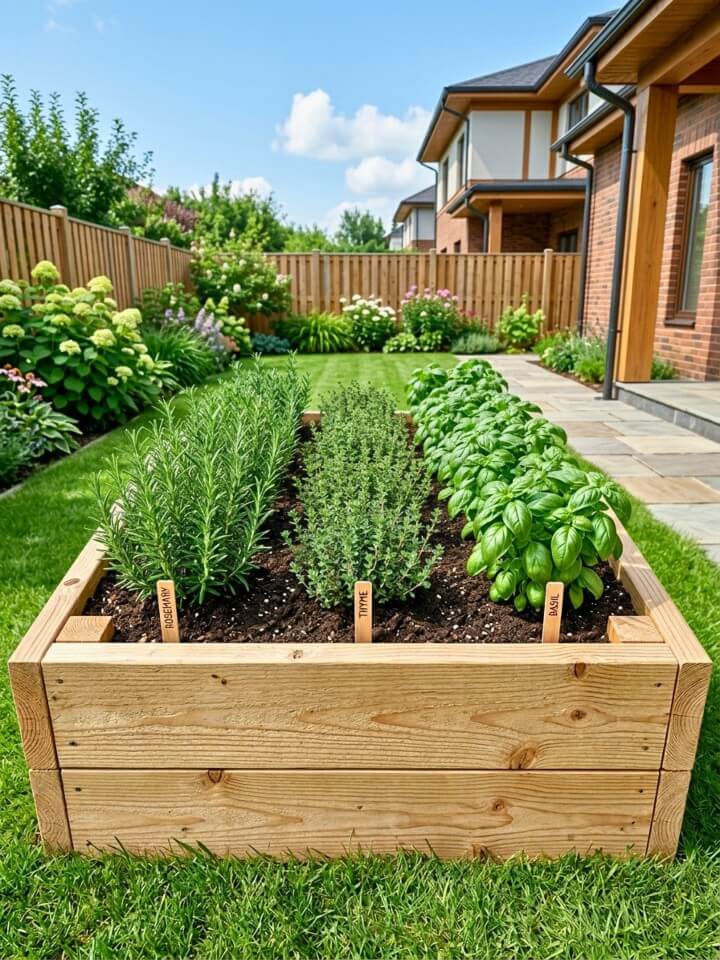
If you’re serious about herbs, a raised wooden bed is where you start. Cedar is your best friend here — untreated, naturally rot-resistant, and good for a solid decade or more before it needs replacing. Build it 12 inches deep so rosemary and sage roots have room to stretch.
A 4×4 foot bed runs about $80–$150 in lumber, plus soil. Mix 60% topsoil, 30% compost, and 10% coarse sand for the perfect blend that drains well but holds nutrients. One side for perennials (thyme, oregano, sage), the other for annuals you’ll swap out each season.
One mistake people make: letting wood touch wet soil directly. Line the inside walls with landscape fabric and your bed will last twice as long.
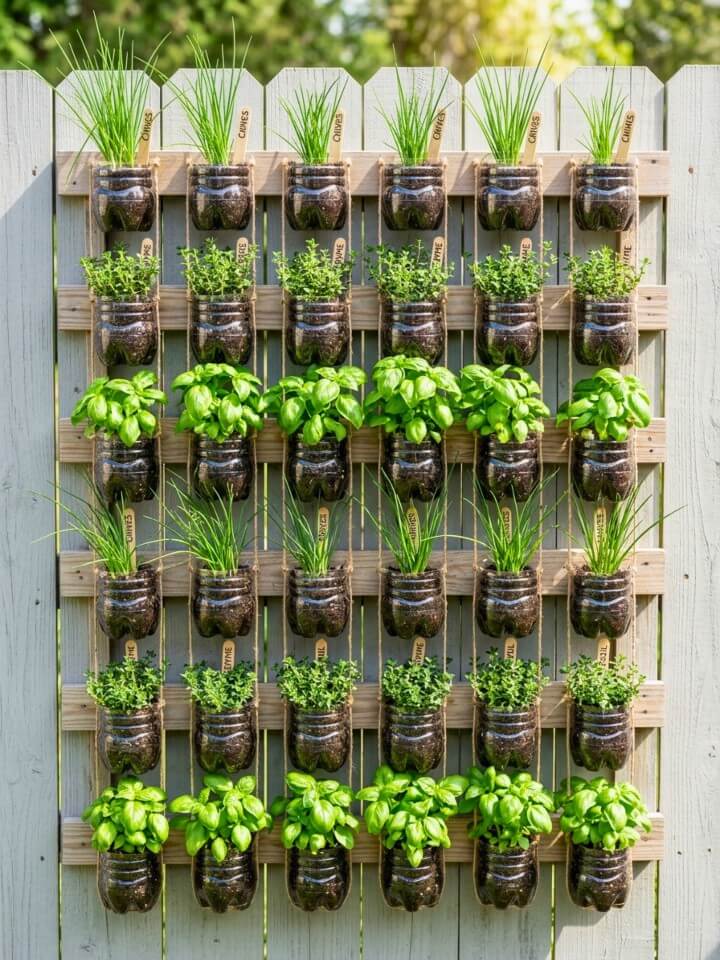
2. Vertical Wall Planters
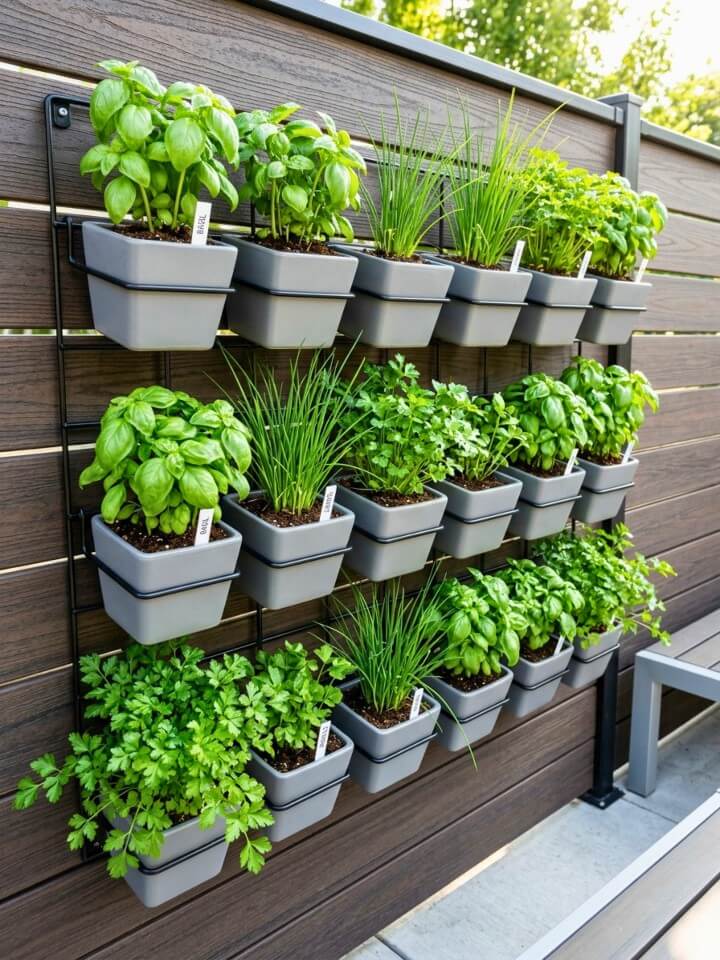
Got a blank fence staring at you? Turn it into dinner. Felt pocket planters cost around $25–$40 for a 12-pocket setup and mount easily on any vertical surface.
Here’s what nobody tells you: vertical setups dry out two to three times faster than ground beds. In July heat, you’re watering daily — sometimes twice. A simple drip line across the top solves this in an afternoon.
Plant these: parsley, chives, basil, cilantro, compact thyme varieties Skip these: rosemary, sage, mint (their roots need more space than pockets allow)
Mount on south or east-facing walls, and always put a waterproof barrier between the planter and wood siding. If you want the wall to feel lush without exposing the whole yard, this setup can double as a privacy-friendly green screen in compact outdoor spaces.
3. Mason Jar Windowsill Garden
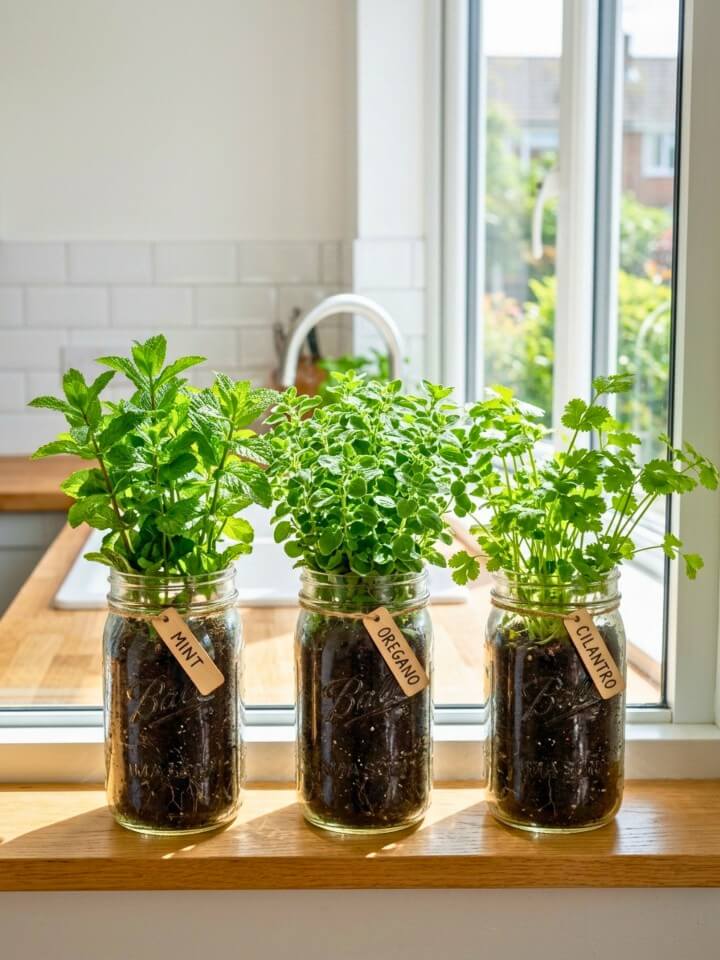
Mason jars look gorgeous on a sunny windowsill. They also kill plants if you don’t prep them right, because there’s no drainage hole.
The fix is a three-layer system at the bottom of each quart jar: one inch of pebbles, a thin layer of activated charcoal, then potting mix on top. The charcoal keeps things fresh and prevents that swampy smell stagnant water creates.
Chives, parsley, oregano, and small basil plants all thrive in this setup. Mint will not — it’ll take over the jar in three weeks flat and look miserable doing it. Water just 2 tablespoons every 4–5 days, and rotate the jars regularly so plants grow upright instead of leaning toward the light.
4. Circular Herb Spiral

Discover fresh herb garden ideas to transform your space into a fragrant, flavorful green paradise. The herb spiral is honestly one of the smartest garden designs ever invented. Picture a 6-foot circle of stone or brick that spirals upward to about 3 feet at the center. In that single 30 square foot footprint, you’ve created four distinct growing environments.
The dry, sunny top is paradise for Mediterranean herbs — rosemary, sage, thyme, lavender. The middle band offers moderate conditions for oregano, parsley, and chives. Down at the shaded bottom where moisture collects, mint and cilantro flourish.
Building one takes a weekend and somewhere between $50 and $200 depending on whether you use reclaimed brick or fancy stone. Point the spiral opening south for maximum sun.
5. Reclaimed Pallet Planter
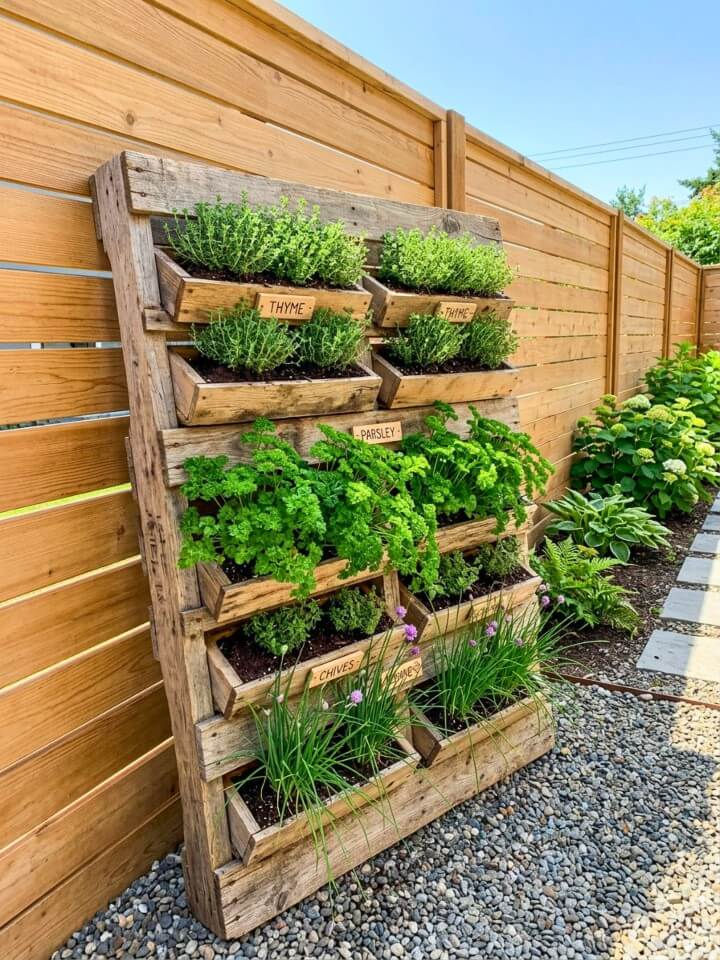
Before you grab any old pallet, flip it over and look for a stamp. You want “HT” — heat-treated. Avoid “MB” pallets at all costs; they’re treated with methyl bromide, which is toxic and absolutely cannot touch anything you’ll eat.
Once you’ve got a safe pallet, sand the rough spots, staple landscape fabric tightly across the back and bottom, then fill the slat openings with potting mix.
A pro move: lean the pallet at a 75-degree angle for the first two weeks. This lets roots establish before gravity becomes a problem. After that, you can stand it fully vertical against a wall.
Stick to shallow-rooted herbs — thyme, oregano, marjoram, dwarf basil. Expect 2–3 good seasons before the wood gives up.
6. Tiered Stone Planters
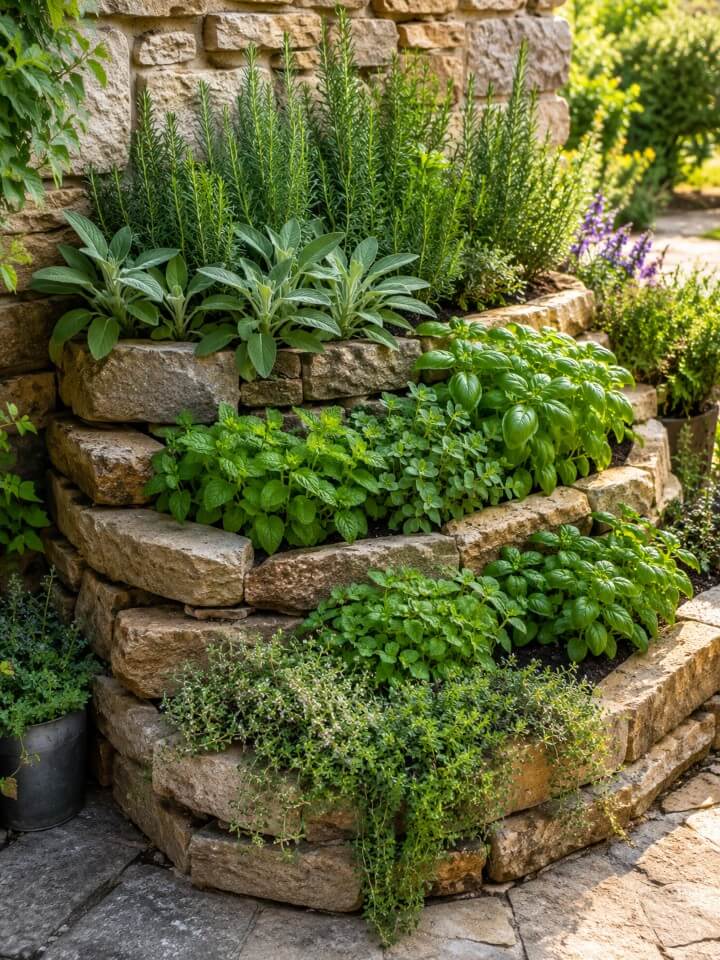
Here’s the genius of tiered stone: stone absorbs heat all day and releases it slowly through cold nights. That alone extends your growing season by two to three weeks on each end of the year — which means earlier basil in spring and later harvests in fall.
Stack three flat-stone tiers, each around 8 inches tall. The top catches full sun (rosemary, sage, lavender love this), while the lower tiers sit in partial shade cast by the levels above (perfect for parsley, chervil, mint).
Natural stone will run you $150–$300, but concrete pavers cut that cost in half and honestly look just as good once they weather. Check the mortar joints every spring for cracks where freeze-thaw cycles can do damage.
7. Hanging Basket Herb Garden
Hanging baskets bring herbs to eye level, which sounds great until you realize they dry out faster than anything else in your garden.
Two tricks change the game. First, use coco-fiber lined baskets at least 14 inches across — anything smaller is a constant watering battle. Second, mix water-retaining polymer crystals into your potting soil. These little gems absorb moisture and release it slowly, cutting your watering frequency roughly in half.
For arrangement, think “thriller, filler, spiller.” Upright basil claims the center, bushy parsley fills around it, and creeping thyme or oregano cascades over the edges. Hang baskets at about 5.5 feet high so you can harvest without dragging out a step stool.
8. Herb-Infused Pathway Edging
Walking past your garden should be a sensory experience, not just a visual one. Pathway herbs deliver on that — brush against them or step lightly and you get a burst of fragrance.
Creeping thyme is the undisputed champion here. It handles light foot traffic, blooms purple in early summer, and spreads about a foot per plant. Roman chamomile gives you that sweet apple scent, and Corsican mint releases a cool, minty aroma underfoot.
Space plants 8–10 inches apart along stone or gravel paths. Amend the soil with sand for drainage — these herbs hate wet feet. Avoid planting them in your main walkway where heavy foot traffic happens daily, but along secondary paths? They thrive with very little fuss after year one.
9. Indoor Hydroponic Herb Station
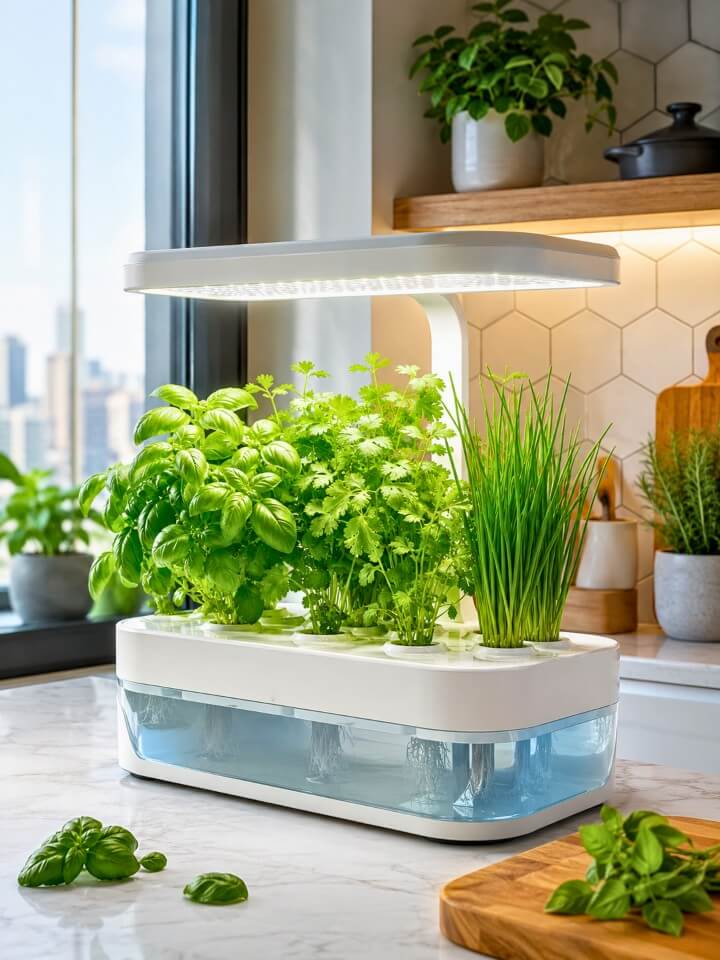
When January hits and your outdoor garden is buried in snow, hydroponics keeps the fresh herbs coming. A countertop unit with 12–20 pods runs $100–$250 and includes built-in LED grow lights, so you don’t even need a sunny window.
Basil is the superstar of hydroponic growing — it grows 30–50% faster than in soil and tastes incredible. Cilantro, parsley, mint, and chives all do beautifully too.
What doesn’t work? Rosemary, sage, and thyme. These Mediterranean natives evolved in dry, rocky soil and they rot when their roots sit in water continuously.
Swap out the nutrient solution every 2–3 weeks, clean the reservoir monthly to keep algae out, and you’ll harvest continuously for 4–6 months per planting cycle. Electricity costs about $3–$5 monthly.
10. Tea Tin Mini Garden
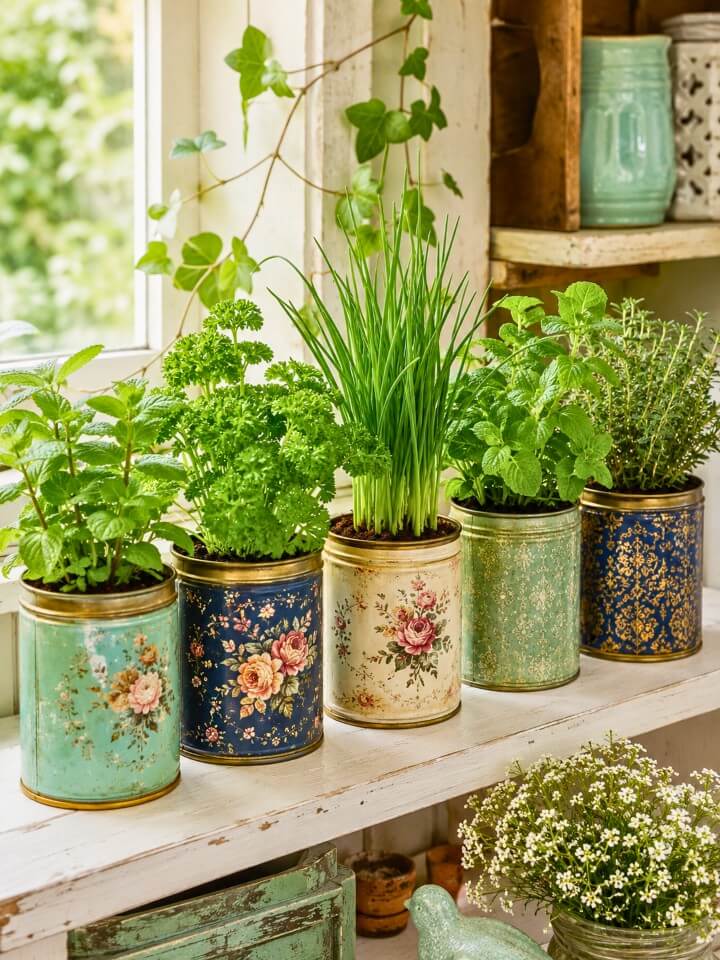
Repurposed tea tins bring serious vintage charm to a kitchen counter, but they share the same drainage issue as mason jars. The fix is simpler though — grab a nail and hammer, punch 3–4 holes in the bottom, and set each tin on a small saucer to catch runoff.
One word of caution: only use tins with the interior coating still intact. Rust will leach into soil over time and that’s bad news for anything you’re planning to eat.
Each tin comfortably holds one small herb. Microgreens, chives, parsley, and small thyme cuttings work beautifully. Place them where they’ll catch at least 4 hours of direct sun and give each a quarter-turn every few days.
Chalkboard paint on the front makes labeling effortless — and easy to change when you rotate plants seasonally.
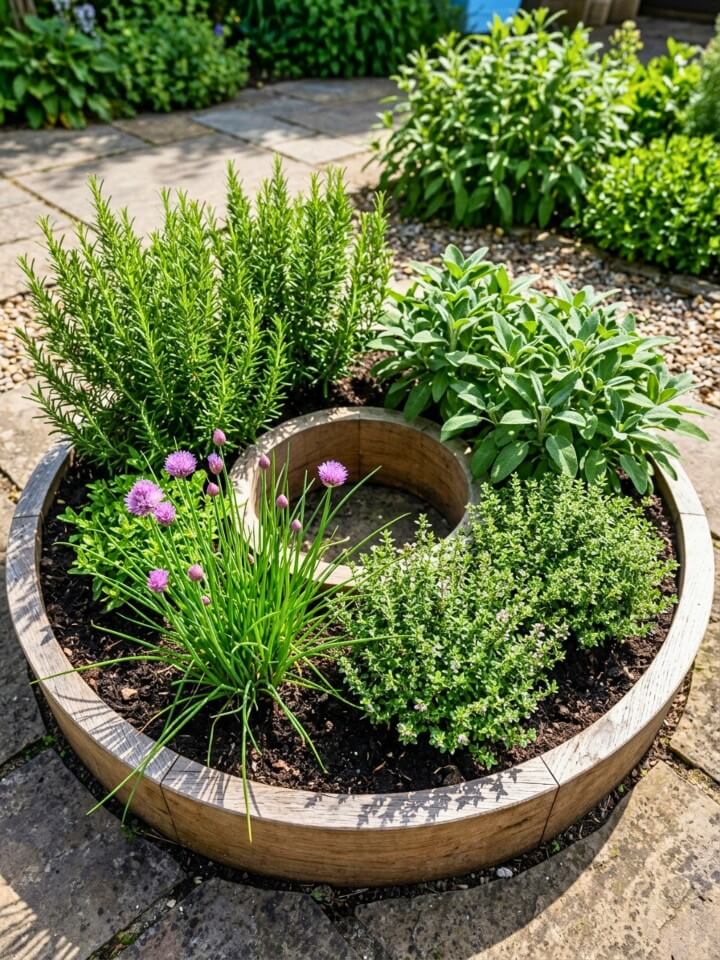
11. Circular Raised Bed with Center Feature
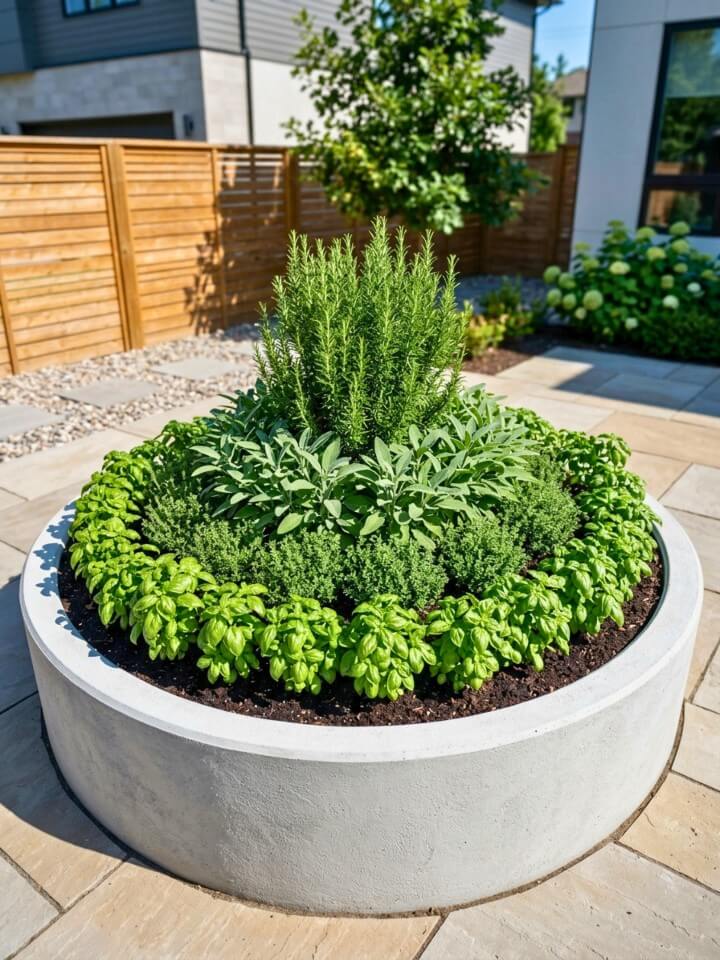
Imagine standing in your backyard and being able to reach every herb you grow without stepping on a single plant. That’s what a circular raised bed delivers. Build a low stone or wooden ring about 5 feet across — small enough that your arm reaches the center from any side.
The middle becomes prime real estate for a focal point: a tall rosemary trained as a small tree, a birdbath, or a decorative obelisk. Around it, plant in concentric rings working from tall to short. Sage and tarragon in the inner ring, oregano and parsley in the middle, creeping thyme spilling over the outer edge.
The circular shape also improves airflow naturally, which means fewer fungal problems during humid stretches.
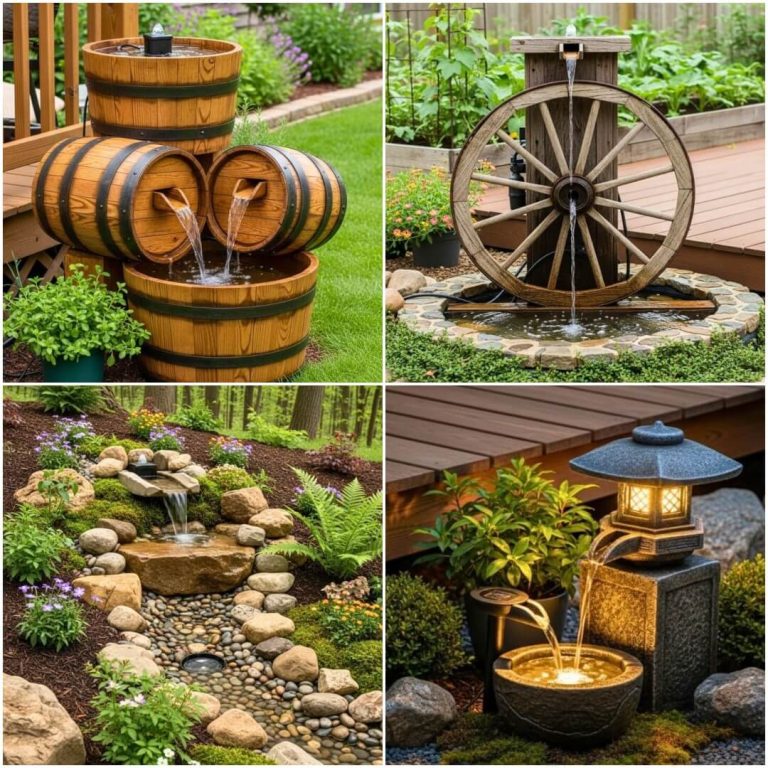
12. Rustic Wooden Barrel Herb Planters
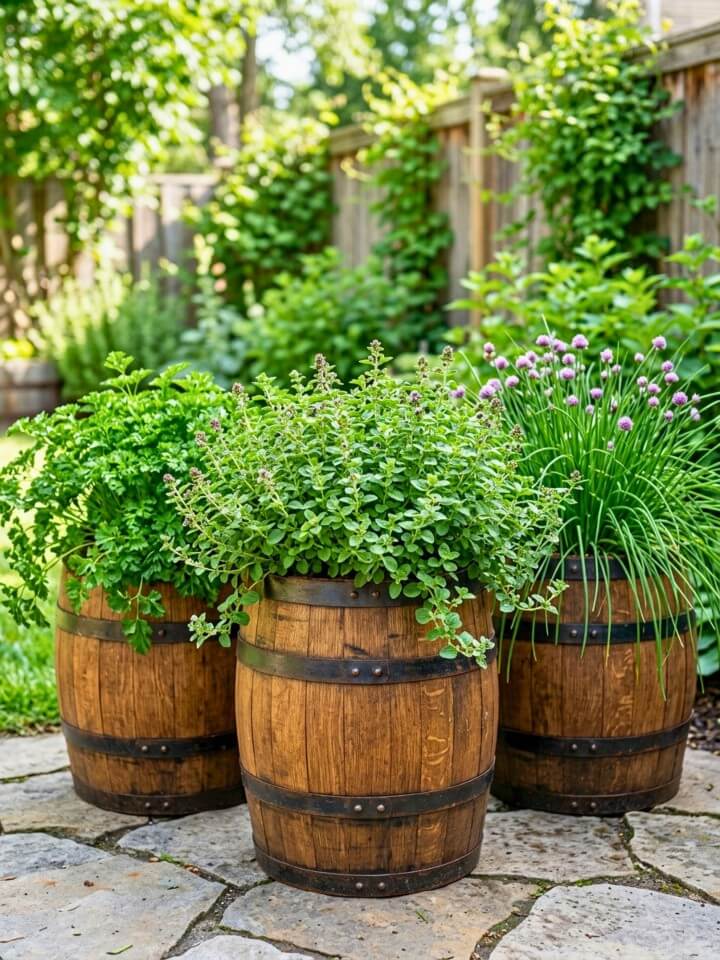
Build a thriving outdoor herb garden that boosts your cooking, health, and backyard charm year-round. Old whiskey barrels have a presence that plastic pots will never match. Half-barrels typically run $40–$80 at garden centers, and the oak holds up outdoors for 8–10 years before showing real wear.
Before planting, drill 5–6 drainage holes in the bottom. Oak retains moisture beautifully — almost too well — so without proper drainage you’ll end up with rot. Add a layer of gravel, then fill with quality potting mix.
A single barrel comfortably holds a full Mediterranean herb collection: rosemary in the center, three sage plants around it, and oregano or thyme filling the perimeter. By midsummer, you’ve got a fragrant, abundant container that becomes a real centerpiece for any patio or deck corner.
Position in full sun, water deeply once weekly.
13. Window Box Herb Display
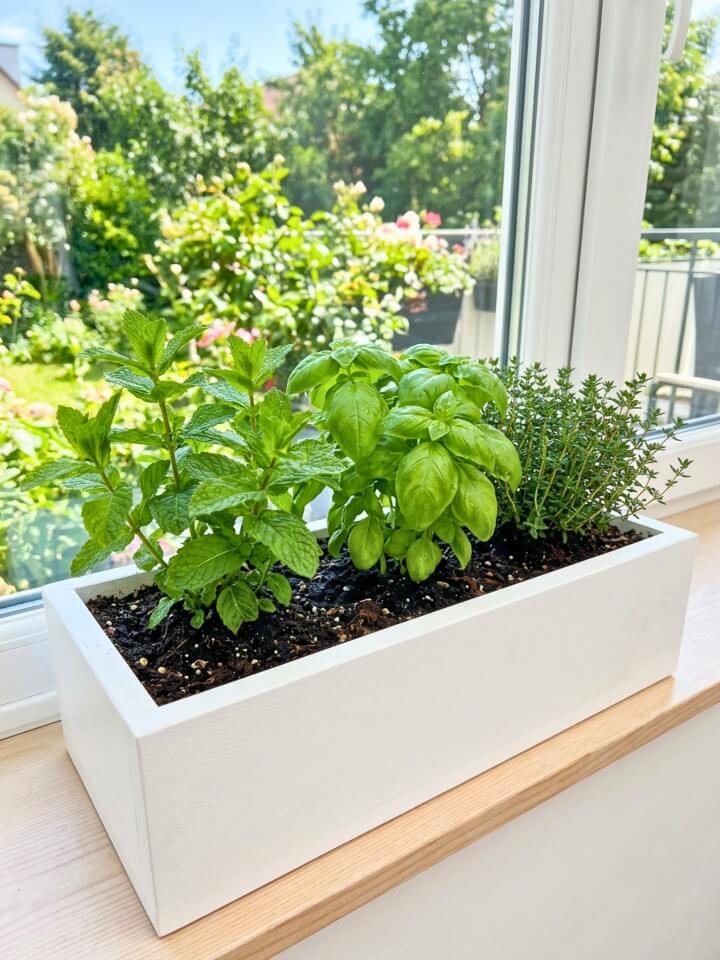
There’s something genuinely cheerful about herbs growing right outside a kitchen window. You see them while doing dishes, snip a handful while cooking, and they make even a plain window look intentional.
Choose a box at least 8 inches deep and 8 inches wide — anything shallower dries out too fast and limits root growth. Cedar boxes last longest outdoors, but powder-coated metal works beautifully for modern homes. Always install with sturdy brackets rated for the soil weight when wet, which is significant.
Layer your planting from back to front: taller basil and parsley against the window, medium chives in the middle, trailing oregano spilling over the front edge. South-facing windows get the best results, but east-facing works for less heat-tolerant varieties.
14. Spiral Staircase Planter Tower
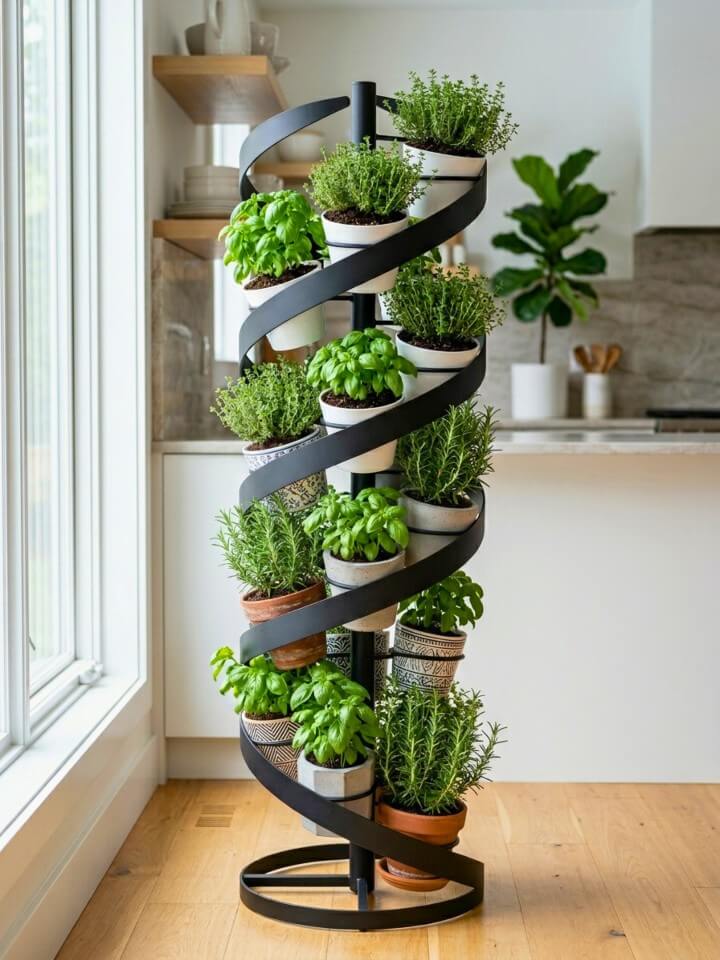
A spiral planter tower is the answer when floor space is essentially zero but vertical room is plentiful. These standalone structures typically stand 4–6 feet tall with rotating tiers, fitting a footprint smaller than a dinner plate.
The clever part is that each tier sits offset from the one above, so sunlight reaches every level instead of getting blocked by upper plants. Top tiers receive the most direct light — perfect for sun-loving thyme and oregano. Lower levels get filtered light, ideal for parsley, chives, and cilantro that bolt in too much heat.
Metal versions hold up best outdoors but heat up quickly in summer, potentially stressing roots. Solution? Either keep them in morning sun only, or wrap the base tier with light-colored cloth to reflect heat away.
15. Rock Crevice Herb Garden
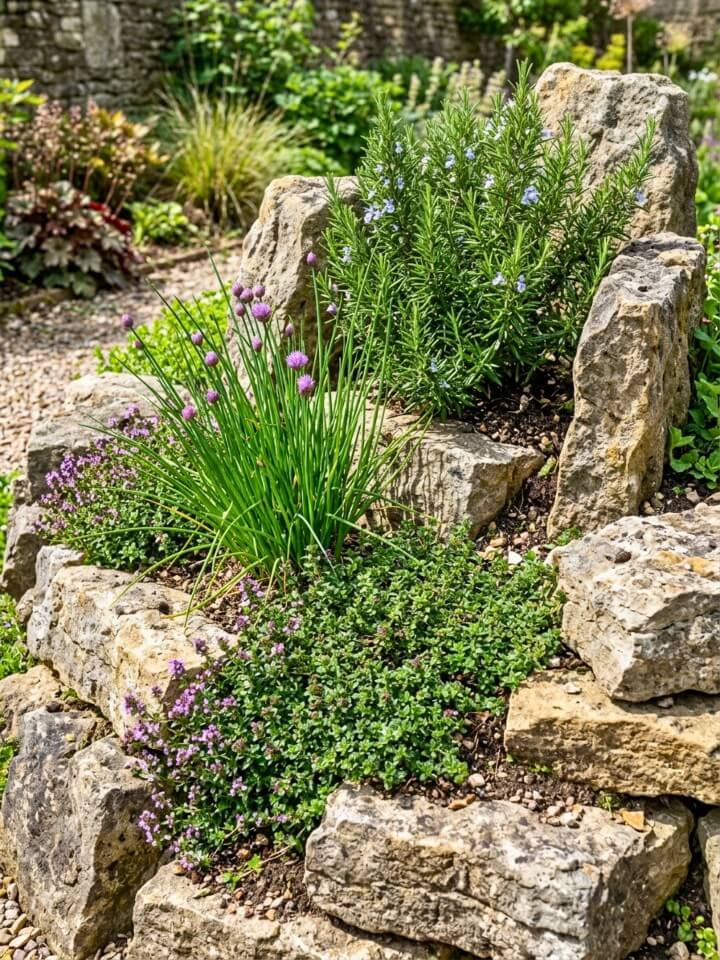
Mediterranean herbs evolved on rocky hillsides where most plants would starve. Recreating those conditions in your yard isn’t just possible — it produces some of the most flavor-intense herbs you’ll ever taste, because stress concentrates essential oils.
Find or build a low rock wall, leaving 2–3 inch gaps between stones. Fill those gaps with a gritty mix: one part potting soil to two parts coarse sand or fine gravel. Tuck in creeping thyme, winter savory, oregano, and Greek sage. Lavender works too if you have full sun all day.
The stones do triple duty — radiating heat, blocking wind, and preserving soil moisture underneath. Once established, these plantings need almost no watering. Mother Nature designed them for exactly this.
16. Herb Garden in a Wheelbarrow
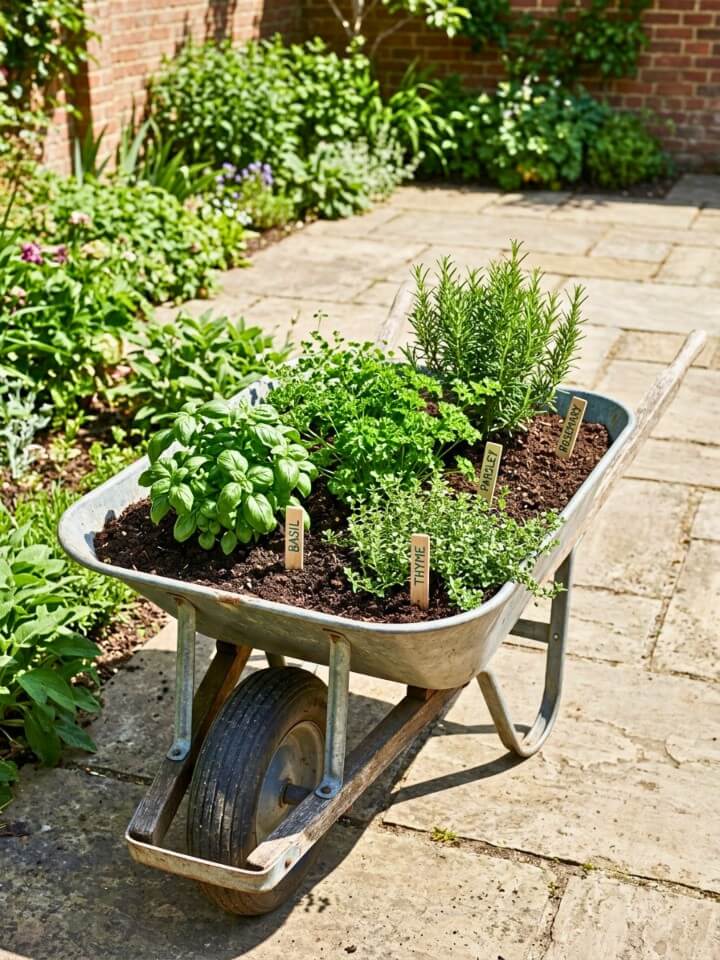
A vintage wheelbarrow as a planter sounds gimmicky until you realize how genuinely practical it is. When a late frost threatens, roll your herbs into the garage. Hot afternoon sun cooking your basil? Wheel it to the shaded side of the house. Hosting a dinner party? Position your living herb display right next to the grill for fresh garnishes.
Drill several drainage holes in the bottom of the tray before adding soil — this step gets skipped surprisingly often and ruins the whole project.
Old galvanized wheelbarrows from estate sales or flea markets ($30–$60) develop a beautiful weathered patina outdoors. Plant a mixed herb collection arranged from tallest at the back to trailing at the front. The handles even give you something to grab when moving it.
17. Concrete Block Herb Planters
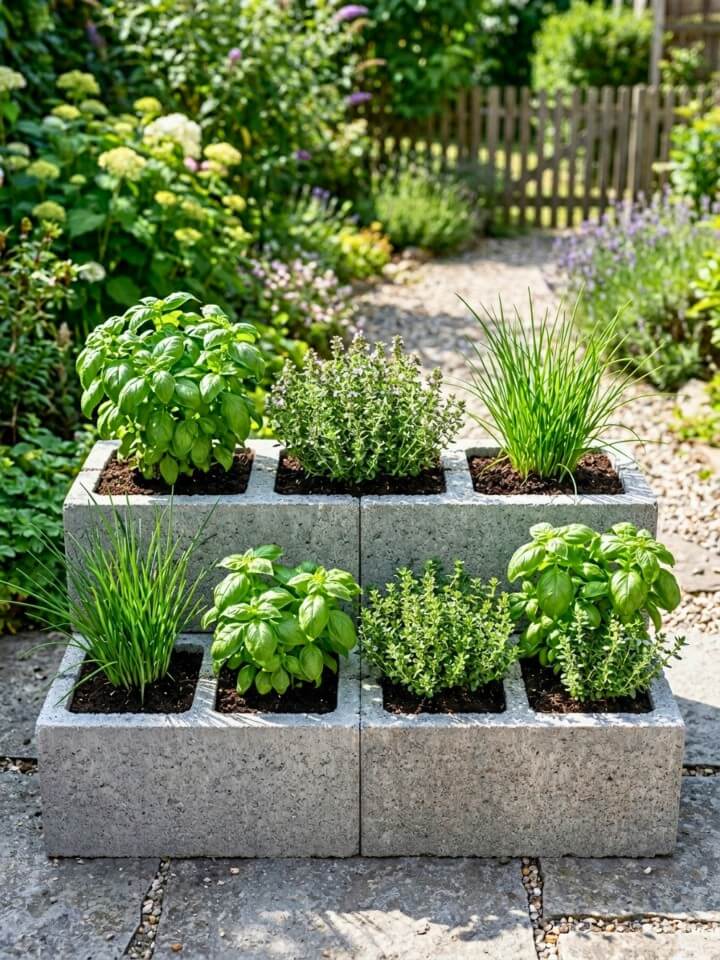
Plan the perfect herb garden layout with smart spacing tips for healthier, fuller, tastier harvests. Standard concrete blocks (about $2 each at hardware stores) become surprisingly stylish planters when arranged thoughtfully. Each block has two cavities, giving you roughly 6 inches of planting depth — enough for most herbs.
Stack them in pyramid shapes, L-configurations along a patio edge, or curve them into a serpentine border. The modular nature means you can rearrange whenever inspiration strikes.
For each cavity, place a small piece of landscape fabric at the bottom to keep soil from washing out, fill with potting mix, and plant one herb per opening. Thyme, oregano, parsley, chives, and small basil all work beautifully.
The concrete absorbs heat all day, creating warm microclimates that herbs love. Paint the exterior surfaces if grey feels too industrial — bright colors work surprisingly well.
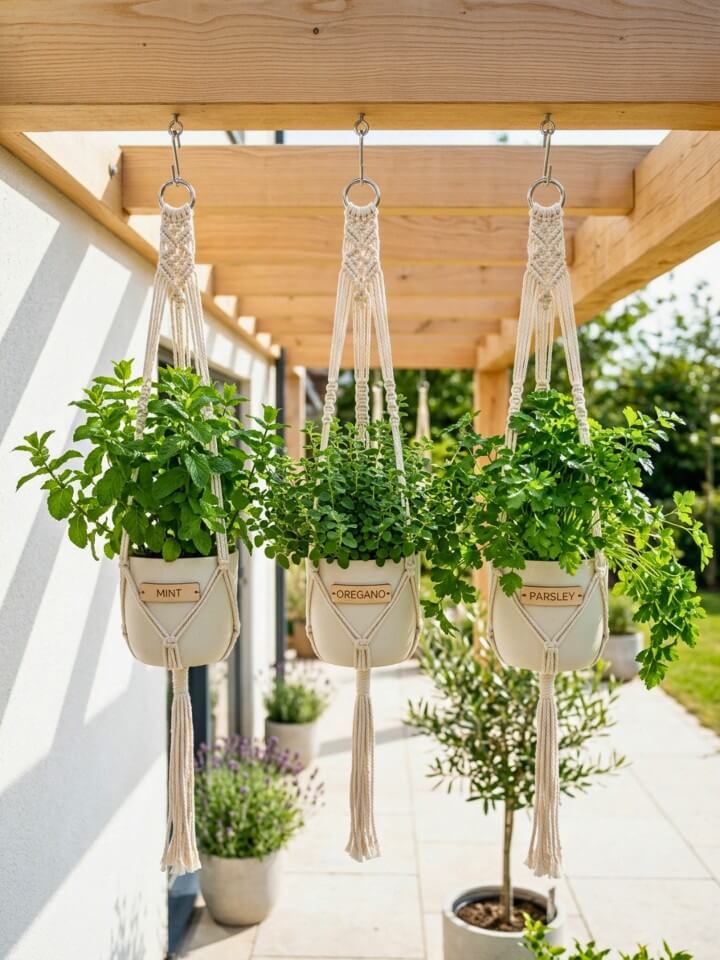
18. Hanging Macrame Herb Pots
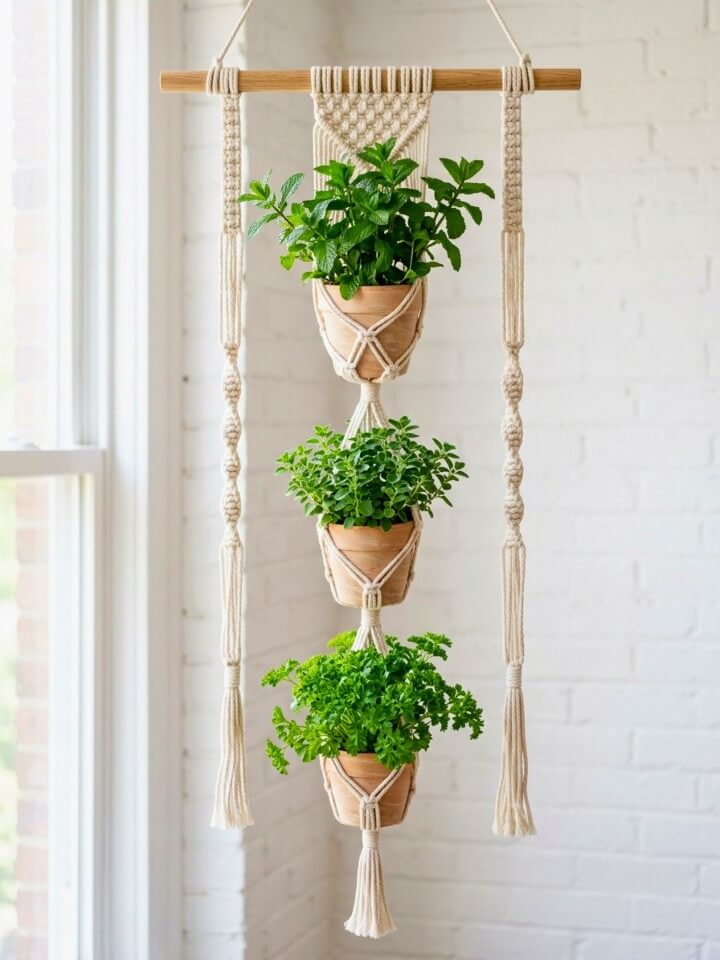
Macrame had its moment in the 1970s and it’s having another one now, for good reason. Hand-knotted plant hangers add warmth and texture that ceramic pots alone simply can’t match.
Use small terracotta pots (4–6 inches) rather than heavier ceramic — your ceiling hooks will thank you. Each pot needs a saucer beneath to catch water drips, because nothing ruins a wooden deck or floor faster than constant moisture.
Trailing herbs absolutely shine in this setup. Creeping rosemary cascades dramatically, oregano spills over edges with abundance, and mint creates a living curtain of green if contained to its own pot.
Hang at varied heights for visual rhythm — some at eye level, others higher. Bright but indirect light works best; harsh afternoon sun through windows can scorch leaves quickly.
19. Indoor Terrarium Herb Garden

Open glass terrariums create a controlled environment that’s particularly forgiving for beginners who tend to over or under-water. The glass walls also amplify ambient light, helping herbs grow even in spots that seem too dim.
Skip closed terrariums for herbs — they create too much humidity and invite mold. Open-top globes or rectangular glass containers work perfectly.
Build the foundation in layers: an inch of pebbles for drainage, then activated charcoal to prevent odors, then quality potting mix on top. Plant small, slow-growing herbs that won’t quickly outgrow the space — thyme, small basil varieties, chives, and chervil all behave well.
Position near (but not in) a south-facing window. Direct sunlight magnified through glass can scorch leaves and overheat the entire setup within hours.
20. Raised Garden with Bamboo Edging
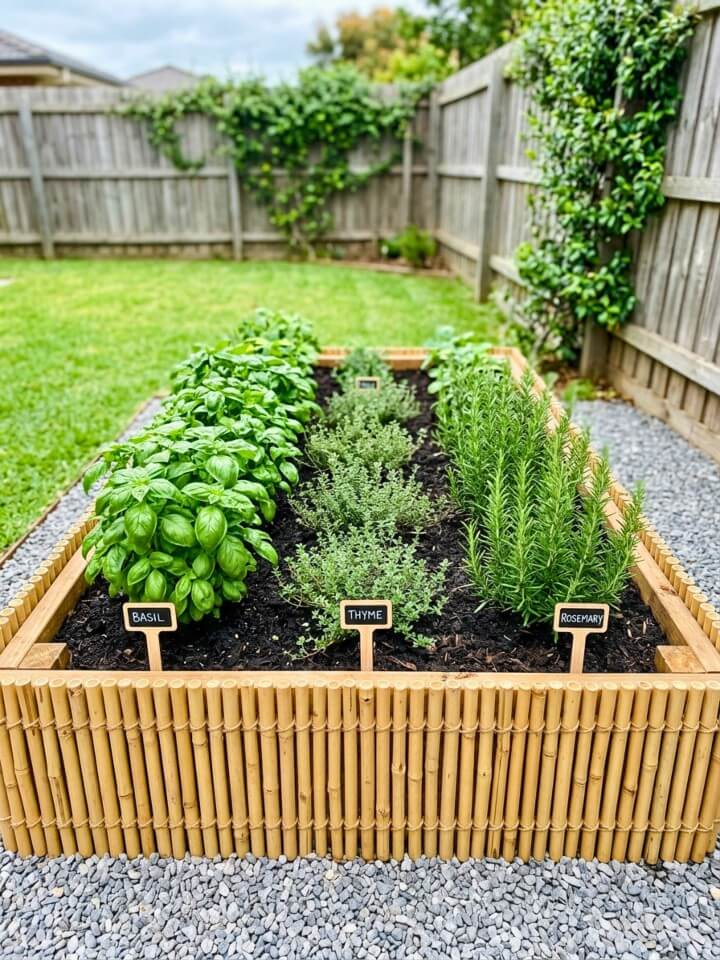
Bamboo edging brings a clean, almost zen quality to a raised bed that traditional lumber can’t quite achieve. Whole bamboo poles or rolled bamboo screening (around $25–$40 per 8-foot roll) attach easily to a standard wooden frame.
A few considerations make this design last. Bamboo weathers to silver-grey naturally within one season, which most people find attractive — but if you prefer the warm honey color, an annual coat of outdoor sealant preserves it. Make sure to use bamboo from sustainable sources; the species grows back within 3–5 years versus decades for hardwoods.
Inside the bed, plant herbs by sun preference rather than by type. Tallest sun-lovers north, medium herbs in the middle rows, shade-tolerant varieties along the south edge where taller plants cast afternoon shadow.
21. Herb Garden in a Repurposed Ladder
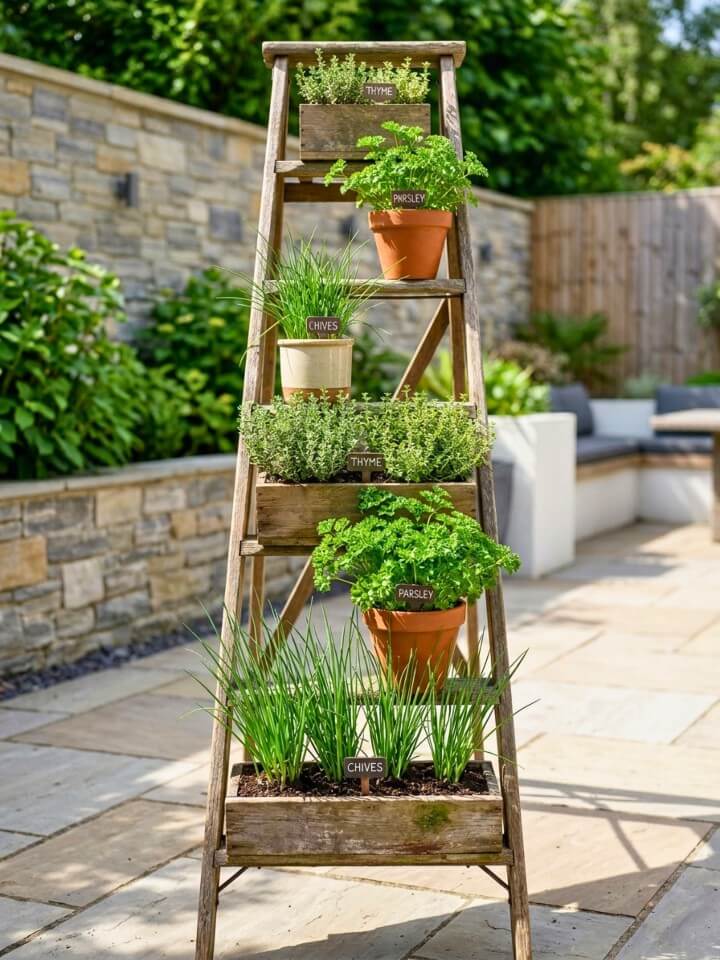
An old wooden ladder leaning against a sunny wall might be the most underrated herb garden setup out there. Estate sales and barn auctions regularly turn up beautiful weathered ladders for $20–$50 — and they instantly bring character that no store-bought planter can match.
Secure the ladder firmly against a wall or fence (a stiff wind will topple a loaded ladder fast). On each rung, set a wooden box or wide terracotta pot sized to fit. Stagger pot sizes for visual interest rather than going uniform.
Place sun-hungry herbs on the top rungs where light hits hardest. Working down, transition to herbs that tolerate or prefer less direct sun. The lower you go, the more shade those upper plants cast — use that to your advantage with chervil and parsley near the bottom.
22. Outdoor Herb Table with Built-In Planters
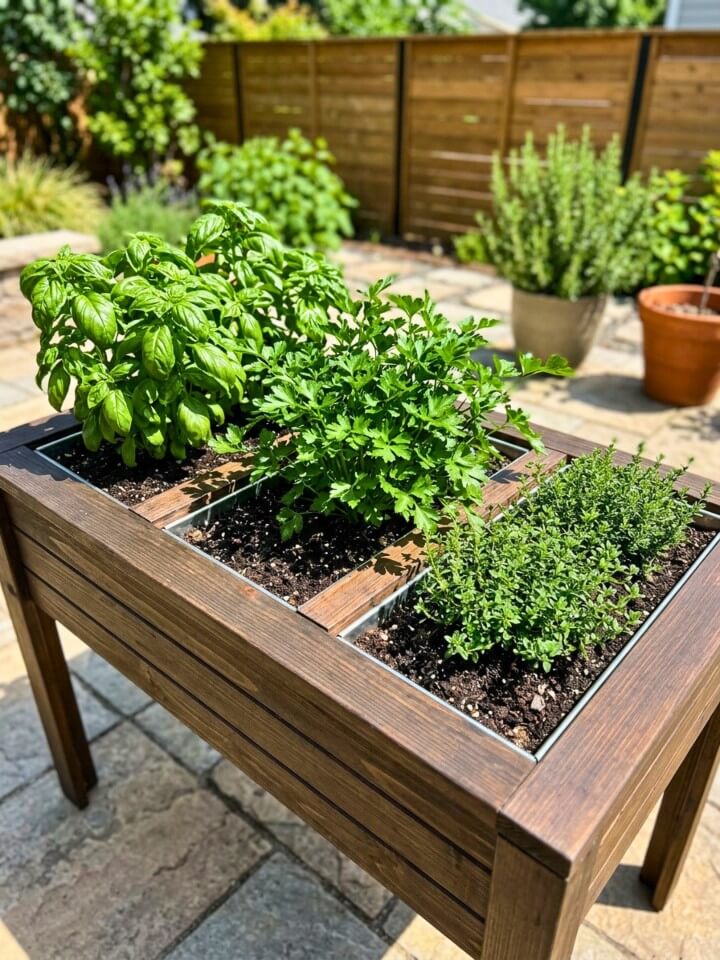
This one’s for people who actually cook outdoors. Picture a sturdy patio table with two long planter troughs built into the surface, running parallel to the outdoor prep area. You chop, you reach over, you snip exactly what you need. No trips back to the kitchen.
Building one yourself runs about $200–$400 in materials — pressure-treated lumber for the frame, food-safe sealant for the surfaces, and cedar or composite for the planter sections. Pre-made versions exist but typically cost $600 and up.
Plant your most-used cooking herbs here: basil, parsley, chives, oregano, cilantro. Save space-hogs like rosemary for separate containers nearby.
A small lip around the planters keeps soil from spilling onto your prep surface when you water.
23. Fairy Circle Herb Patch
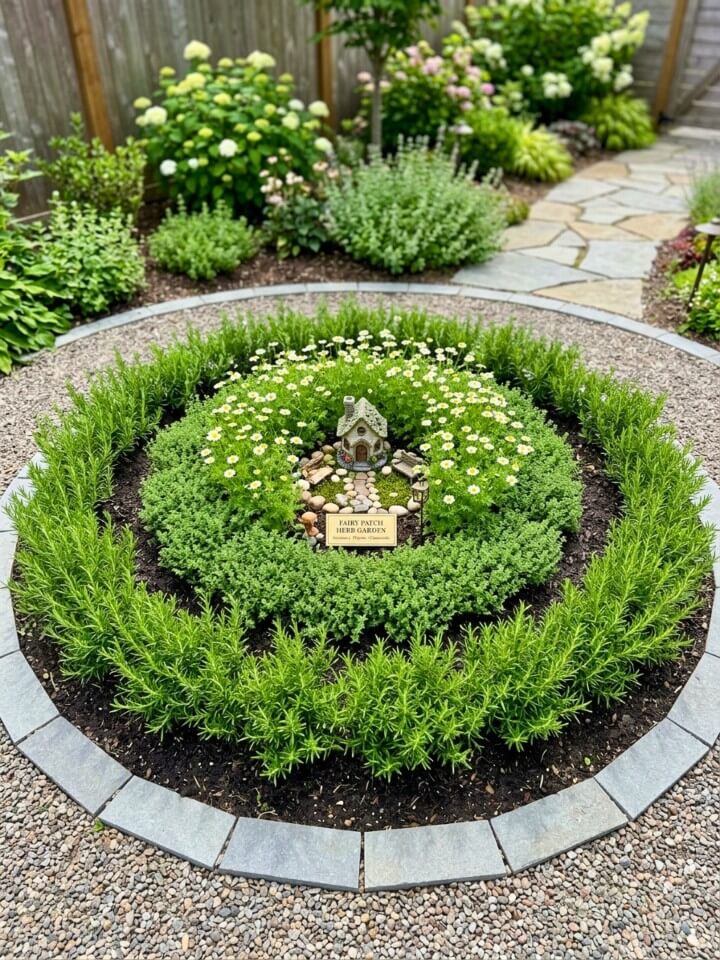
Elevate your yard with a stunning herb garden design that blends beauty, function, and fresh flavor. There’s an old folk belief that circular plant arrangements bring luck to a home. Whether you buy into that or not, a fairy circle herb patch creates an undeniable sense of intentional whimsy in any garden corner.
Mark out a circle roughly 4 feet across. In the very center, plant one statement herb — a mature rosemary bush or a tall purple sage works beautifully. Around it, plant a ring of medium-height herbs. The outer ring belongs to low-growing, fragrant varieties.
Pea gravel or small stones between plants creates clean visual separation and suppresses weeds. Small solar lights tucked among the plants make the circle glow softly after sunset — the kind of detail that turns a garden into an experience.
This works particularly well as a focal point at the end of a garden path.
24. Herb Garden in Vintage Teapots

Browse any thrift store and you’ll find orphaned teapots — the lids lost, the matching cups long broken. For $3–$10 each, they become some of the most charming herb planters imaginable.
The spout creates natural drainage if you tilt the pot slightly when arranging, which means you can skip the usual drilling required for closed containers. Just add a small layer of pebbles inside and plant directly.
Each teapot holds one small herb comfortably. Chives, parsley, small thyme, and oregano all behave well in this confined space. Mint will explode out of the pot within weeks — avoid it.
Cluster several teapots together on a wooden tray or stone bench for impact. A single teapot looks lonely; five or six grouped creates a collection that draws the eye.
25. Modular Cube Planter System
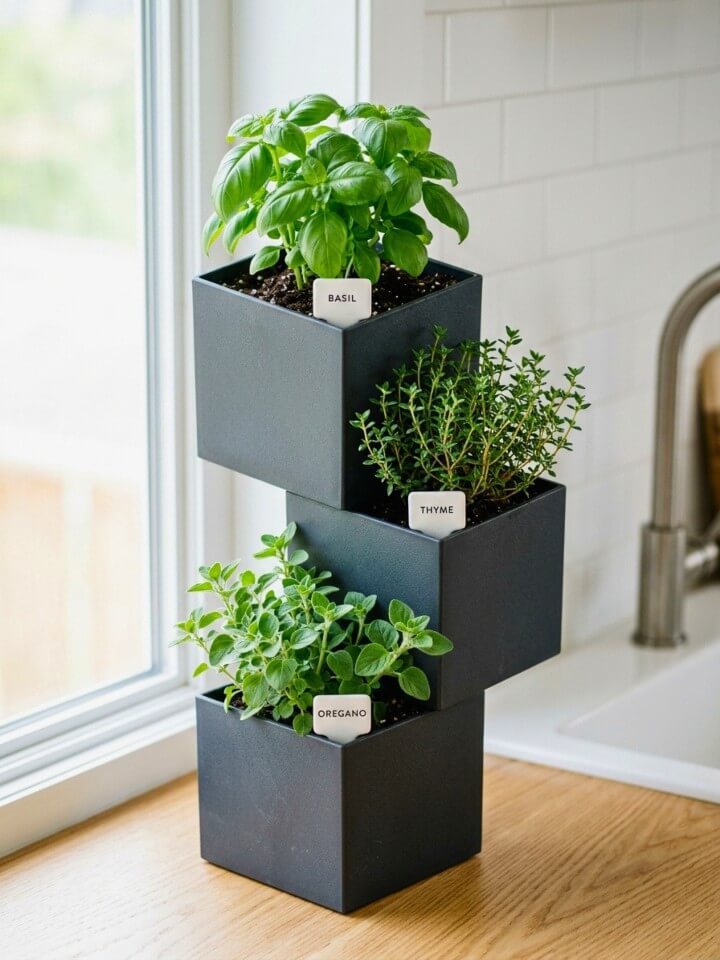
Wooden or composite cube planters (typically 12x12x12 inches) sold individually let you build a custom herb garden that grows with your ambitions. Start with three or four cubes, add more as your confidence builds.
Stack them in pyramid formations, line them up as a low wall along a patio edge, or scatter them deliberately around a deck for an organic feel. The flexibility is the whole point.
Each cube comfortably hosts 2–3 herbs depending on mature size. Group plants with similar water and sun needs in the same cube — mixing thirsty basil with drought-loving thyme means one will always suffer.
Price-wise, expect $25–$60 per cube depending on material. Cedar costs more but lasts 10+ years outdoors. Composite cubes never rot but lack the natural look some homeowners prefer.
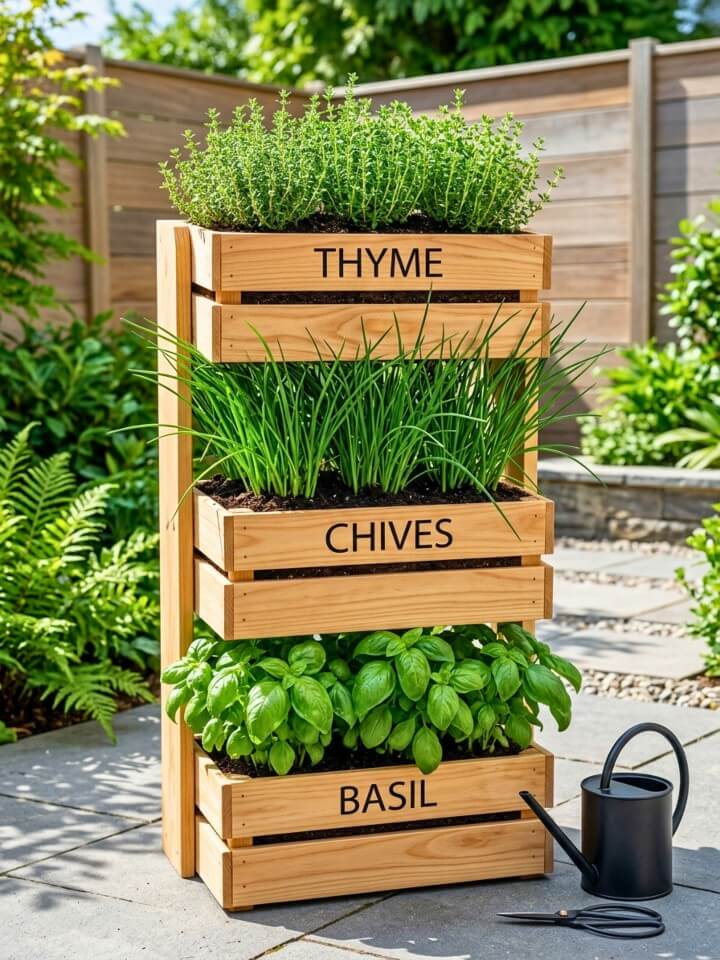
26. Herb Garden in Hanging Wooden Crates
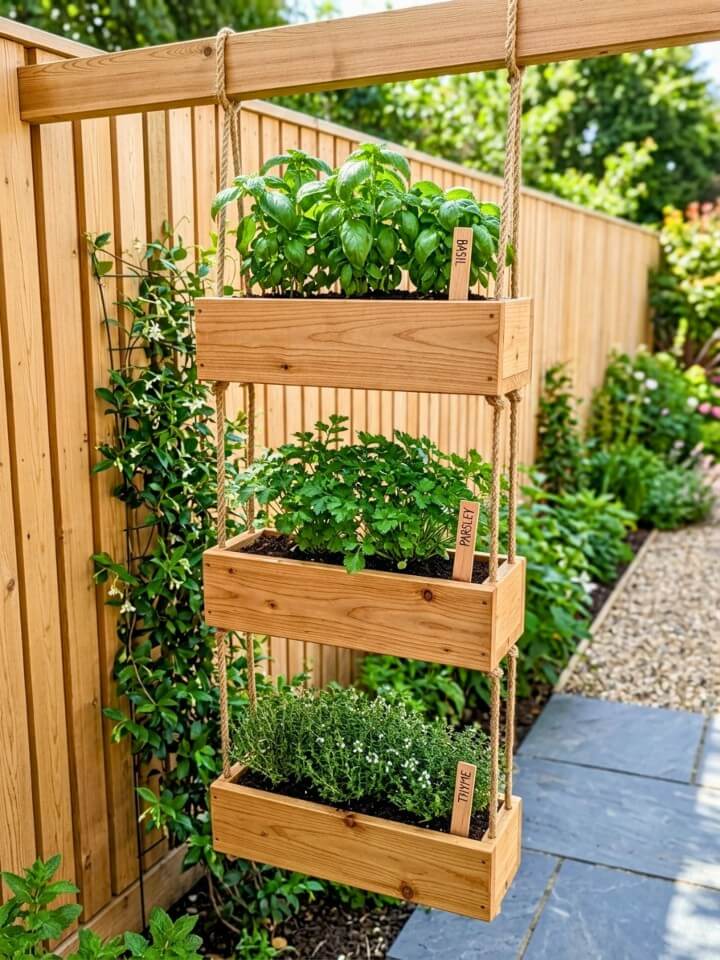
Vintage wooden crates — the kind that once held apples, milk bottles, or wine — make exceptional hanging planters when mounted horizontally to a wall or fence. Their built-in slats provide ventilation that helps prevent root rot, a common problem with solid-sided containers.
Before mounting, line the interior with landscape fabric or burlap, stapled tightly into corners. This holds soil in while still allowing water to drain through the slats. Use heavy-duty brackets rated for at least 30 pounds — wet soil is heavier than people realize.
Three crates mounted at staggered heights create a layered display that’s far more interesting than a single row. Plant taller herbs in the upper crates, trailing varieties in the lower ones.
Look for crates with stamps or vintage logos for extra character. They’re conversation starters as much as planters.
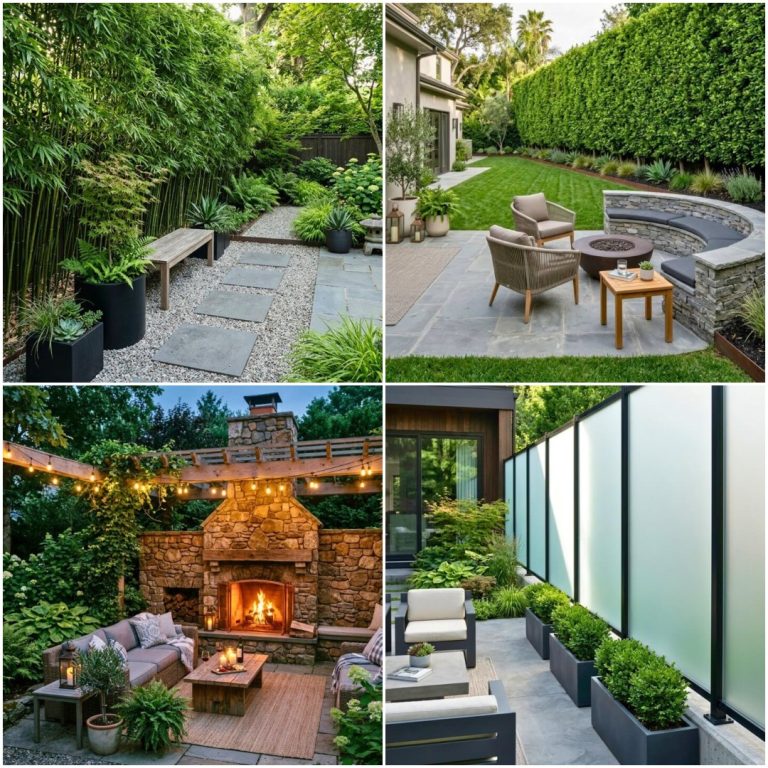
27. Corner Herb Planter with Seating
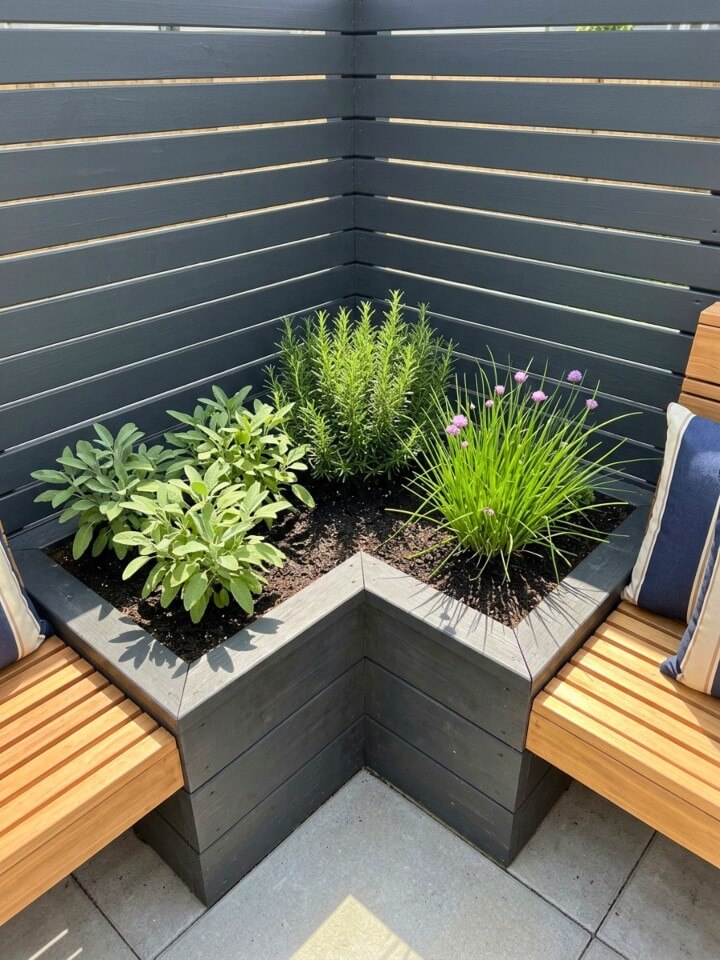
Grow more in less space with a raised herb garden that boosts drainage, soil health, and easy access. Wasted corners in backyards happen everywhere — those awkward 90-degree spots where the fence meets at a right angle. Building an L-shaped raised planter with attached bench seating transforms dead space into the most-used corner of the yard.
Construction is straightforward weekend work: a 4-foot by 4-foot L-shaped frame about 18 inches tall, with a 12-inch wide bench seat running along the front edge. Cedar runs about $200–$300 in lumber.
Plant the back rows with taller herbs that won’t get sat on — rosemary, sage, lavender. The front edges work for compact varieties.
The bench becomes the spot where you read with morning coffee, where guests gather, where kids play. The herbs growing inches away release fragrance with every breeze. Functional and quietly luxurious.
28. Spiral Metal Tower Herb Garden
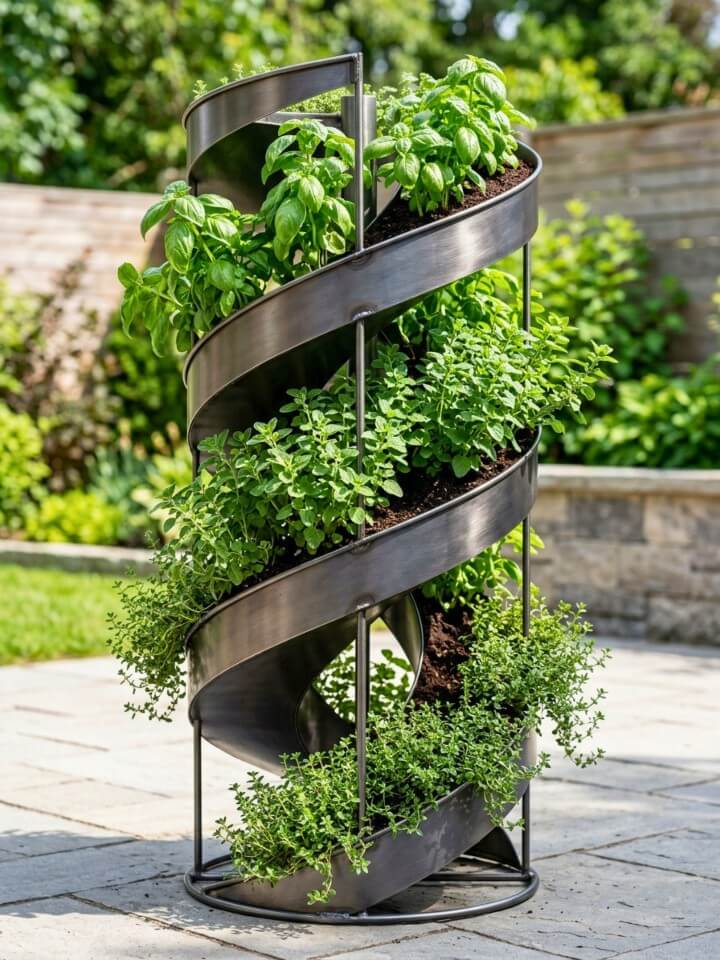
Powder-coated steel spiral towers ($80–$150) bring sleek industrial styling that suits modern home exteriors particularly well. Unlike wooden alternatives, they don’t rot, warp, or need annual sealing.
The continuous spiral design provides 6–8 planting positions in a footprint roughly 18 inches across. Each position holds about a quart of soil — enough for one well-established herb.
One drawback to know upfront: metal heats up significantly in direct summer sun, which can stress roots and dry soil quickly. Position towers where they get morning sun but afternoon shade. Alternatively, light-colored powder coatings reflect heat better than dark finishes.
Plant the top with herbs that tolerate heat and dryness — thyme, oregano, savory. Lower positions, naturally shaded by the upper plants, work for parsley and chives that bolt in heat.
29. Raised Herb Beds with Stone Borders
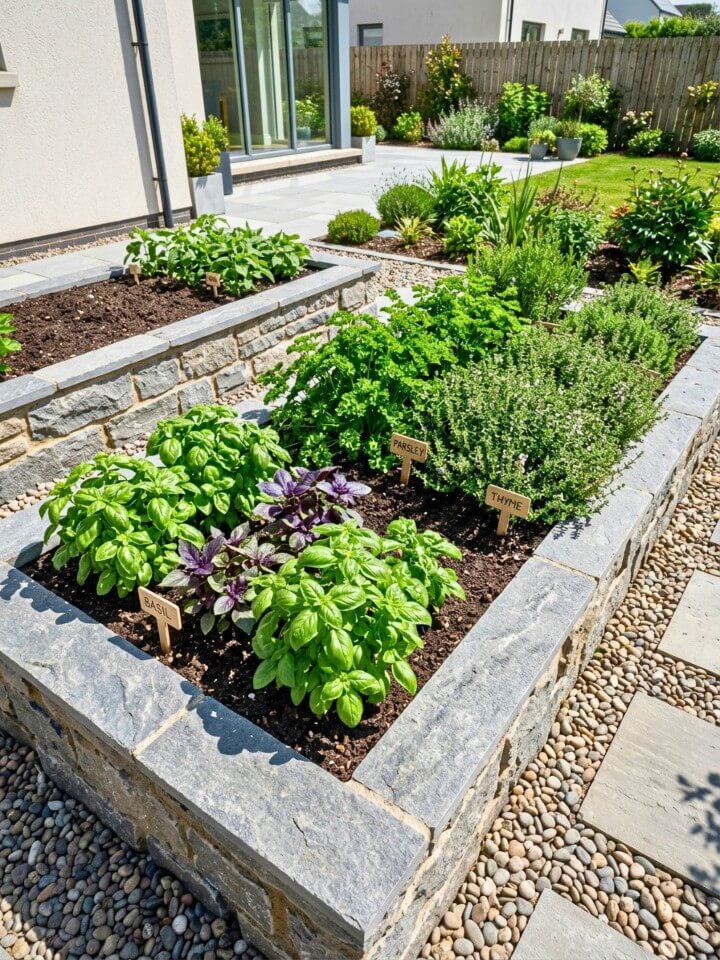
Stone-bordered raised beds blend into the landscape in a way that wooden beds simply can’t replicate. They look like they’ve always belonged, even on the first day after construction.
Dry-stack fieldstone works beautifully — no mortar needed, just careful stacking with stones interlocking naturally. Budget around $200–$500 depending on stone quality and bed size. River rocks create a softer aesthetic; granite slabs feel more formal.
Build walls 12–18 inches tall and at least 8 inches thick at the base for stability. The thickness also provides thermal mass that radiates warmth into the soil after sundown, extending growing seasons noticeably.
Inside, mix Mediterranean herbs that appreciate the warm microclimate — rosemary, sage, oregano, thyme, lavender. These plants originated in stony landscapes, so they’re literally coming home in this setup, and once established they reward you with very little fuss.
30. Indoor Kitchen Counter Herb Rack
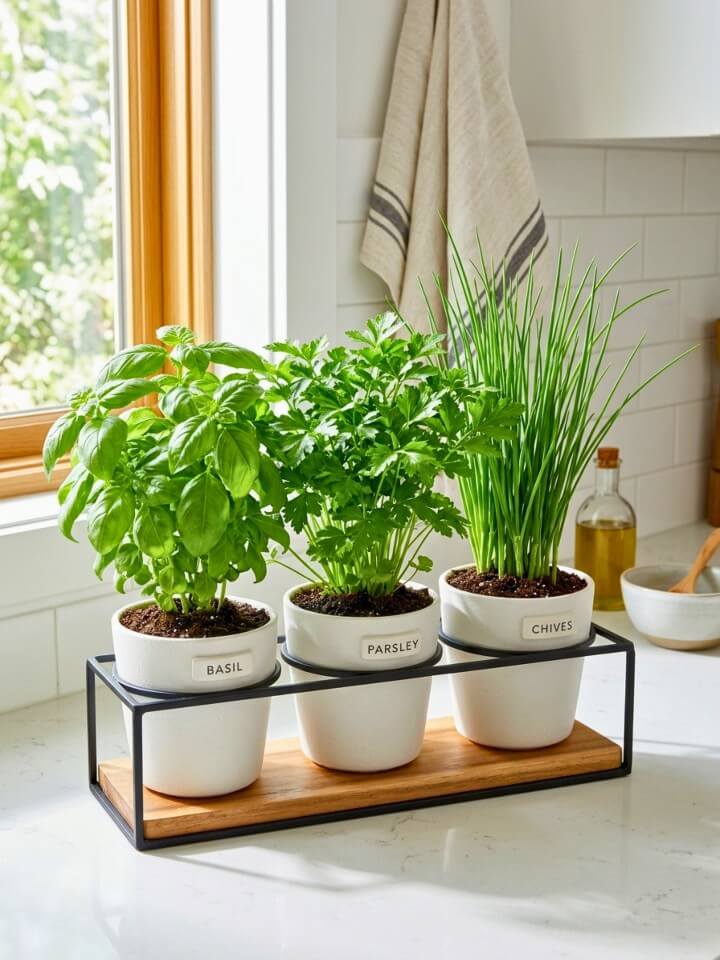
Multi-tier herb racks designed for indoor counters bring serious year-round value when sized and positioned right. Three-tier metal or wooden racks ($40–$120) typically hold 6–9 small pots while taking up about a square foot of counter space.
Position matters enormously. South or southeast-facing windows provide enough natural light for most herbs. North-facing kitchens almost always need supplemental LED grow lights ($25–$60), which clip onto the rack itself.
Choose pots with drainage and matching saucers — wet counters and water-damaged wood ruin both the look and your kitchen. Self-watering pots ($8–$15 each) reduce maintenance for busy weeks.
Stick to herbs that genuinely thrive indoors: chives, parsley, basil, mint (in its own pot to contain spreading), oregano, and thyme. Rotate the rack 180 degrees weekly so every plant gets equal light exposure.
31. Herb Garden in a Terracotta Pot Array
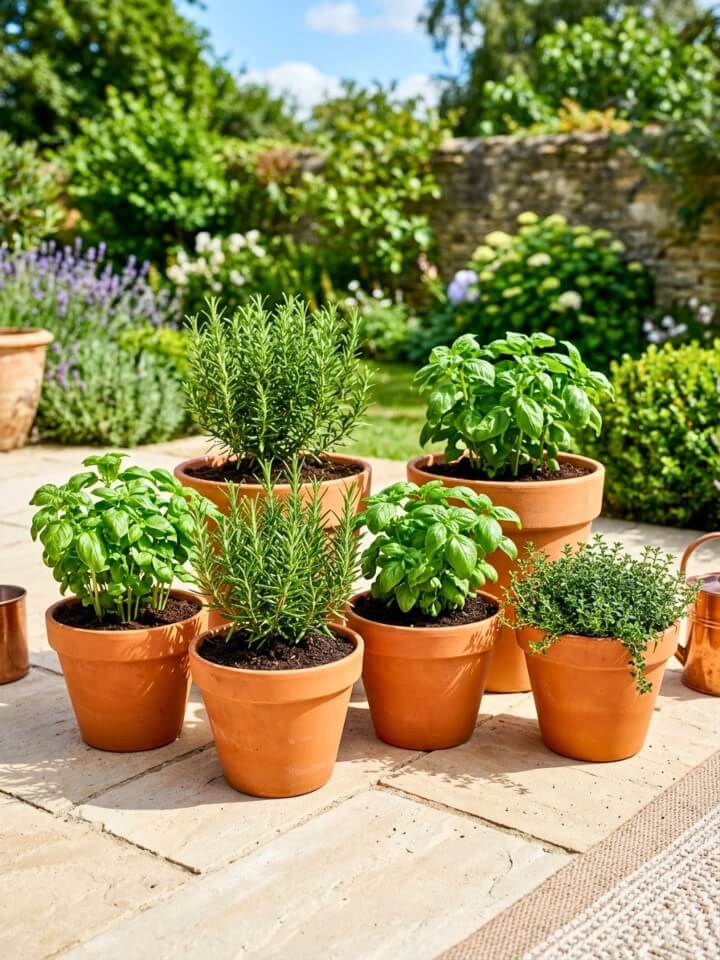
Terracotta has been used for plants for thousands of years, and for good reason. The unglazed clay breathes, allowing oxygen to reach roots while wicking away excess moisture. This natural regulation prevents the soggy soil that kills more potted herbs than any pest or disease.
Buy pots in graduated sizes — 6, 8, 10, and 12 inches — for roughly $5–$25 each. Arrange them in clusters of odd numbers (groups of three or five look better than even numbers) on a patio or along steps leading to a back door.
One word of caution for colder climates: terracotta cracks when water inside the clay freezes and expands. Before the first hard freeze, either bring pots indoors or empty and store them upside down.
Match the herb to the pot size. Big rosemary in the 12-inch, parsley in the 8-inch, chives in the smallest.
32. Garden Wall Niche Planters
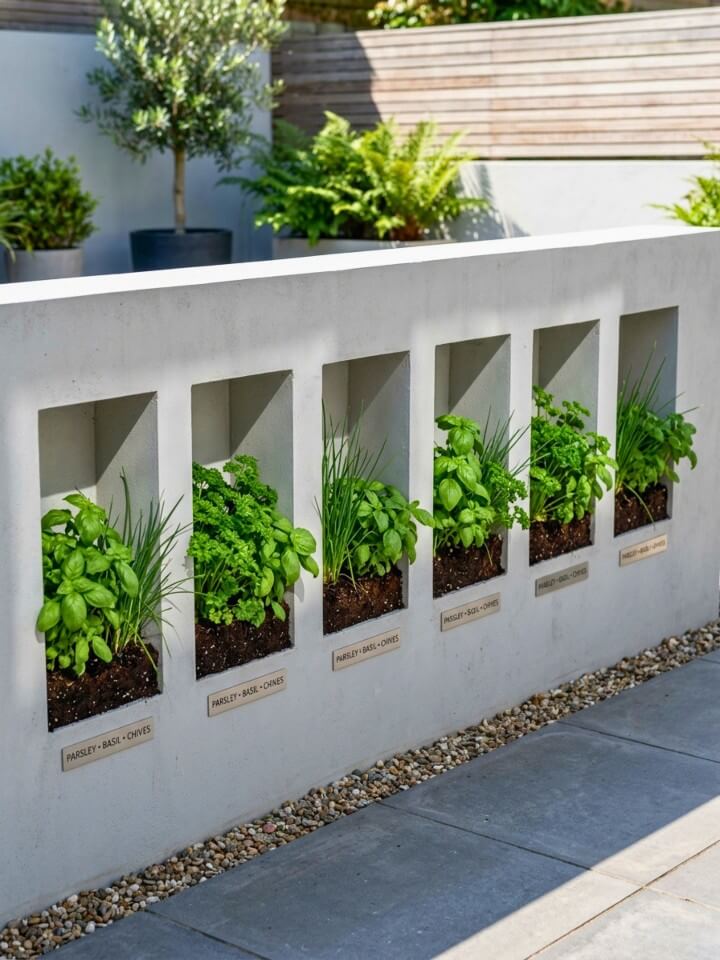
Cultivate a medicinal herbal garden at home for natural remedies, wellness, and timeless healing power. This idea takes more upfront work but creates something genuinely architectural. Built-in wall niches — small recessed pockets cut directly into a garden wall or retaining wall — display herbs like living artwork.
If you’re building a new retaining wall, ask your contractor to incorporate niches during construction. For existing brick or block walls, removing select bricks and lining the resulting cavities with mortar creates the same effect. Each niche should be at least 8 inches deep and equally wide.
Line the bottom with a small drainage tray to protect the wall behind, then plant compact herbs that won’t outgrow the space — small basil varieties, thyme, oregano, parsley.
33. Circular Patio Herb Ring
A circular ring of herbs surrounding a patio dining set creates the kind of outdoor room that feels like a destination rather than just a slab of concrete with furniture on it.
Lay out a circle 8–10 feet across with the patio centered inside. Build a low border — stone, brick, or pressure-treated timber works equally well — about 12 inches tall and 18 inches wide. The width matters; you need enough planting depth for herbs to thrive.
Plant in deliberate sweeps rather than mixing everything randomly. A section of lavender, a section of rosemary, a sweep of oregano, a curve of thyme. This approach reads as designed rather than chaotic.
During warm evening meals, the herbs release fragrance subtly all around you. It’s the kind of detail that makes guests ask what’s different about your patio.
34. Herb Garden on a Rolling Cart
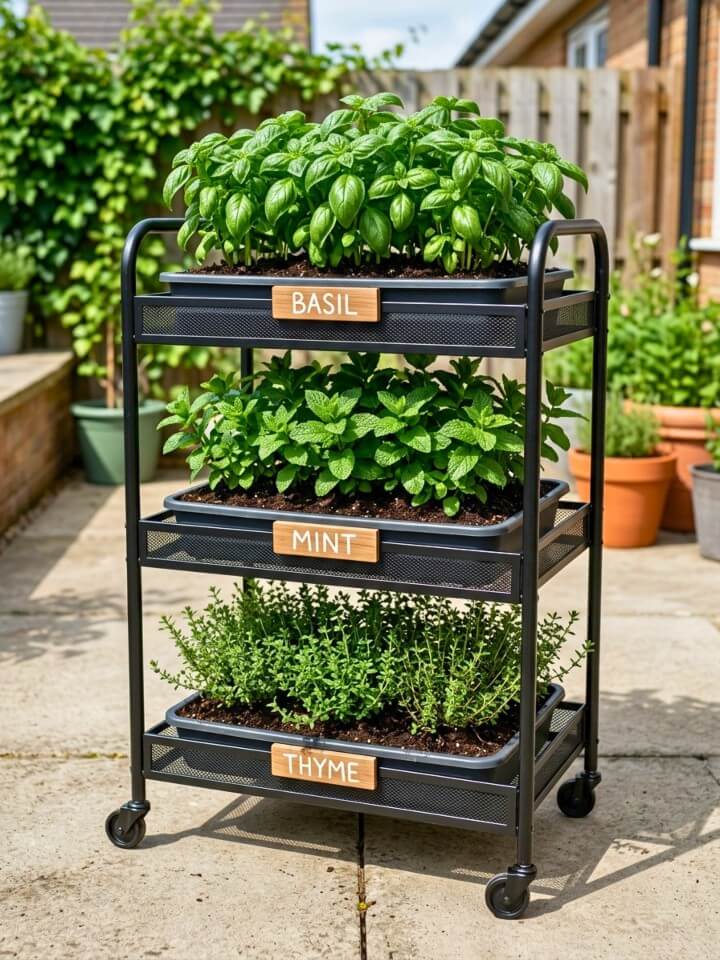
Three-tier rolling carts originally designed for kitchens or bars ($60–$150) make exceptional mobile herb gardens for renters, patio gardeners, or anyone whose sunlight patterns shift throughout the day.
The mobility is the killer feature. Morning sun on the east side of the house? Roll the cart there. Brutal afternoon heat coming? Wheel it to the shaded north side. Threatening thunderstorm? Push it under cover in seconds.
Each shelf typically fits 4–6 small pots comfortably. Use lightweight plastic or fiber pots rather than ceramic — your back will thank you when moving a loaded cart.
Look for carts with locking wheels (essential for windy days) and rust-resistant finishes if it’ll live outdoors. Powder-coated steel and stainless models hold up better than chrome-plated alternatives over multiple seasons.
35. Recycled Bottle Vertical Herb Wall
Learn how to plant an herb garden step by step and enjoy fresh, homegrown flavors all season long. Glass and plastic bottles destined for recycling get a second life as vertical planters in this eco-friendly design. The visual effect of dozens of bottles mounted on a wall — each holding a tiny garden — genuinely stops people in their tracks.
For plastic bottles (2-liter soda bottles work best), cut a rectangular opening along one side, leaving the bottle horizontal. Drill small holes in the opposite side for drainage. Glass wine bottles can be cut horizontally with a bottle cutter ($25 tool) and the cut edges sanded smooth.
Mount bottles on a wooden frame using wire, twine, or specialized brackets. Stagger them so water draining from upper bottles drips into lower ones — a built-in irrigation system.
36. Mini Herb Garden in a Wooden Crate Stack
Stacking three or four wooden crates at varying angles creates an asymmetrical tower that’s both functional and visually striking. Unlike a single tall planter, the staggered design ensures every plant gets direct sunlight from some angle throughout the day.
Look for sturdy crates at farm stores, restaurant suppliers, or online ($15–$30 each). Vintage wooden crates from antique shops cost more but bring undeniable character.
Stack them with the openings facing different directions. This prevents the bottom crates from getting completely overshadowed and creates planting surfaces facing all four cardinal directions.
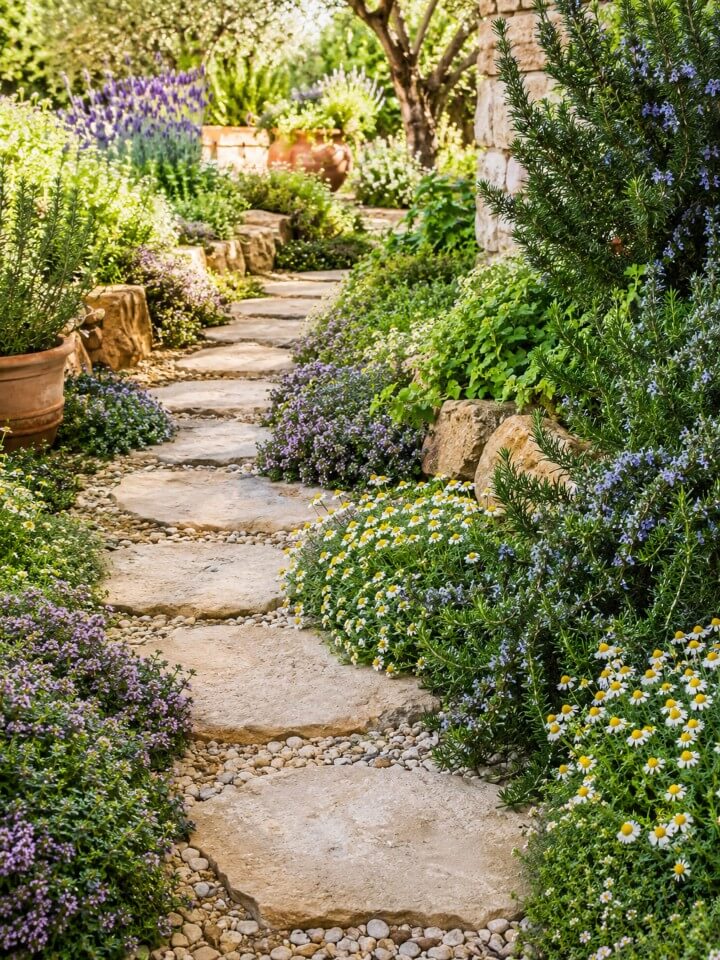
37. Herb Garden with Pathway Stones
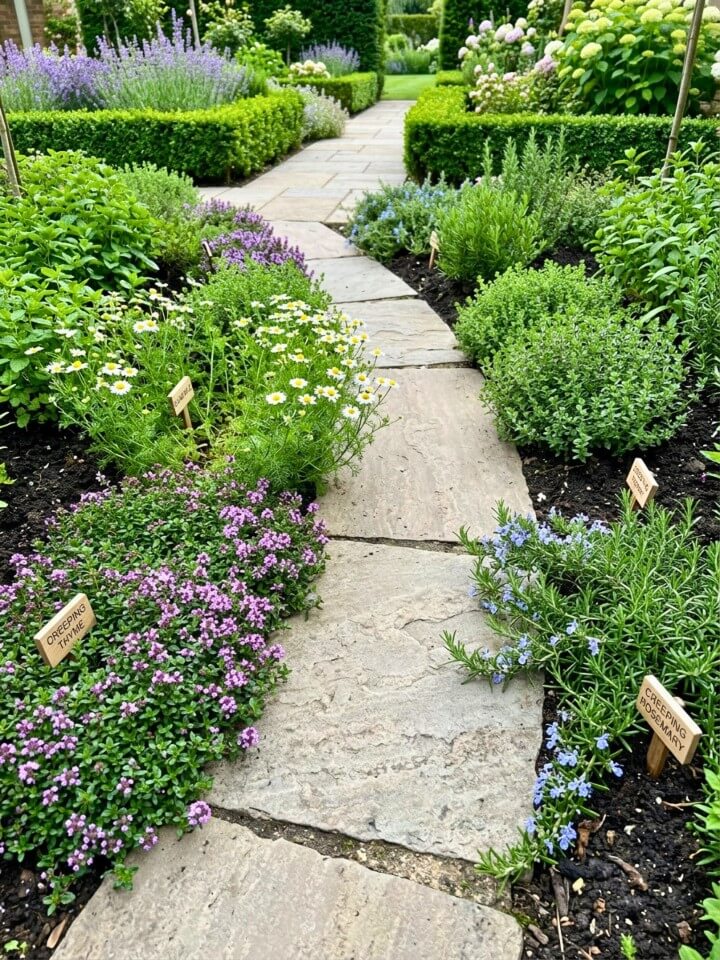
Embedding herbs between pathway stones takes the standard stone path and transforms it into a sensory experience that engages smell as much as sight.
Lay flagstone or large pavers with intentional 4–6 inch gaps between them. Fill those gaps with sandy, fast-draining soil — heavy clay won’t work here. The walking surface needs to drain quickly to prevent slippery moss buildup and root rot in the herbs.
Creeping thyme remains the top choice for between-stone planting. It tolerates being walked on, releases fragrance underfoot, and stays under 2 inches tall so it never becomes a tripping hazard. Roman chamomile and Corsican mint create similar effects with their own distinct scents.
Avoid this design for high-traffic paths used daily — even tough creeping herbs eventually wear out under constant heavy use. Garden paths leading to seating areas work perfectly.
38. Hanging Glass Globe Herb Planters
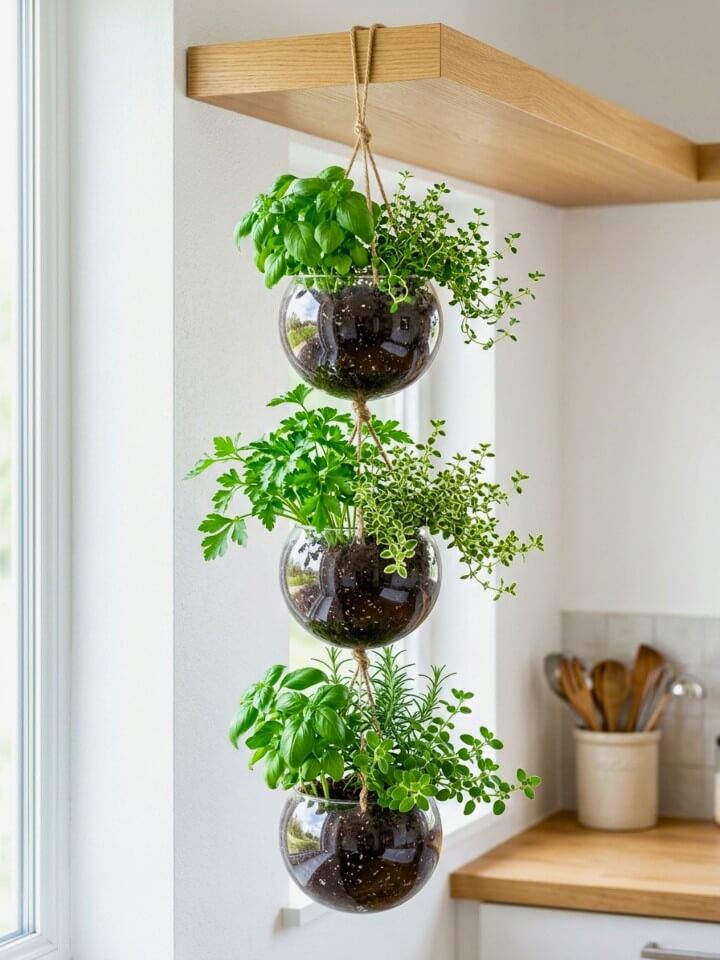
Glass globe terrariums suspended by leather cords or wire ($15–$40 each) bring an almost magical quality to indoor herb growing. Light passes through the glass and illuminates the plants from all angles, creating a luminous effect that solid planters can’t replicate.
Hang globes near a bright window but avoid direct, intense sun — magnified light through glass can cook plants quickly. East-facing windows offer the gentlest reliable light.
Inside each globe, layer fine gravel, a sprinkle of activated charcoal, and well-draining potting mix. Plant a single small herb per globe to prevent overcrowding. Microgreens and slow-growing varieties like thyme and small basil work best.
FAQs About Herb Gardens
Got a few lingering questions before you start planting? Below are honest answers to the everyday details most articles gloss over — the small timing tricks, common slip-ups, and fixes that quietly separate a flourishing herb patch from one that fizzles out by midsummer.
How Often Should I Fertilize My Herb Garden?
Less than you’d think. Feed potted herbs lightly every 4–6 weeks with diluted liquid fertilizer at half strength. Over-fertilizing actually weakens flavor by diluting essential oils. In-ground herbs usually need nothing beyond compost added once each spring.
When Is the Best Time to Harvest Herbs for Maximum Flavor?
Snip herbs mid-morning, right after dew dries but before the sun gets intense. That’s when essential oils peak. Always harvest before flowering for the strongest taste, and never cut more than one-third of the plant at once.
Which Herbs Should Never Be Planted Together?
Keep mint isolated in its own container — it’ll choke out neighbors within weeks. Fennel stunts most herbs around it, so plant it solo. Dill and cilantro cross-pollinate badly, and sage doesn’t play nicely with cucumbers or basil.
How Do I Keep Pests Away from My Herbs Naturally?
Spray aphids off with a strong water blast every few days. Plant basil near tomatoes to repel hornworms, and tuck chives around roses for aphid control. A weekly neem oil spray handles most stubborn pest problems without chemicals.
Can I Grow Herbs from Grocery Store Cuttings?
Absolutely. Basil, mint, and rosemary root easily from store-bought stems. Snip a 4-inch piece, strip the lower leaves, and place in water on a sunny windowsill. Roots typically appear within 10–14 days, ready for soil.
Conclusion:
The best herb garden isn’t the most Pinterest-worthy one — it’s the one you’ll actually walk past, water, and harvest. Start with two or three herbs you genuinely cook with, in whatever setup matches your space. A single thriving basil plant on the kitchen counter beats an ambitious raised bed that turns into a weed patch by August. Grow what you’ll use. Your future dinners will taste the difference.