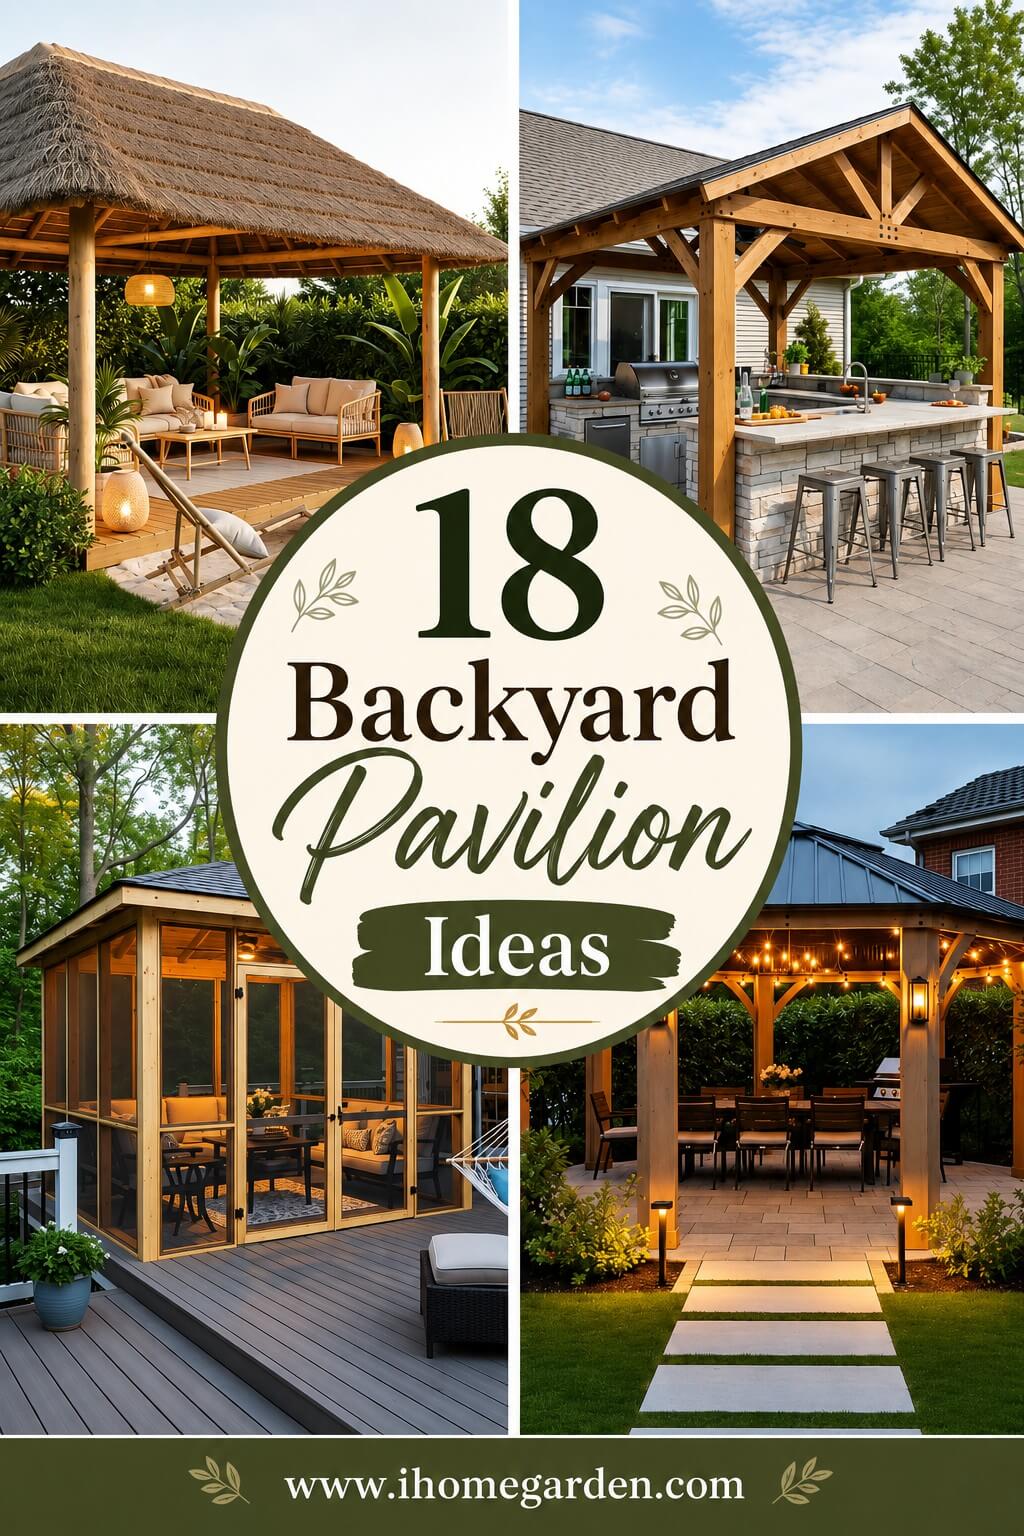
18 Backyard Pavilion Ideas for the Ultimate Outdoor Retreat
A backyard pavilion is one of those additions that quietly changes how a family uses their yard. Suddenly the patio gets used in July, dinners move outside on weekends, and that awkward back corner finally has a purpose. Unlike a gazebo (usually round and fully enclosed) or a pergola (open slats, partial shade), a pavilion gives you a solid roof with open sides — the sweet spot between shelter and openness.
Pavilions run anywhere from $3,000 for a basic DIY kit to $30,000+ for custom builds with utilities. Below are 18 breathtaking backyard pavilion ideas, grouped from classic to creative, with notes on cost, placement, and who each one really suits.
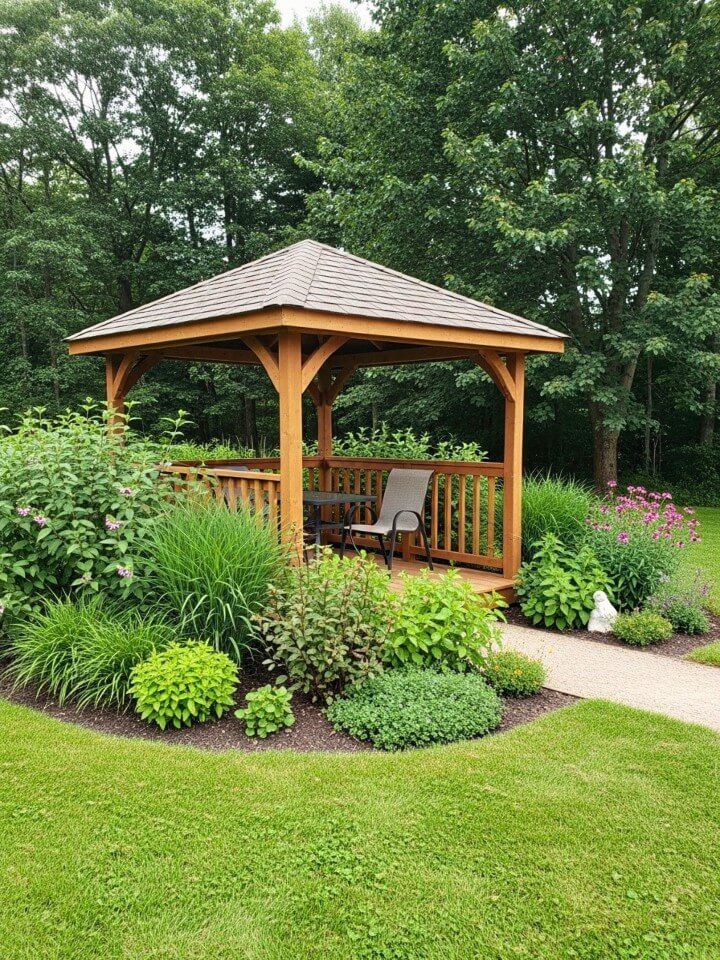
1. Classic Wooden Pavilion with Open Sides
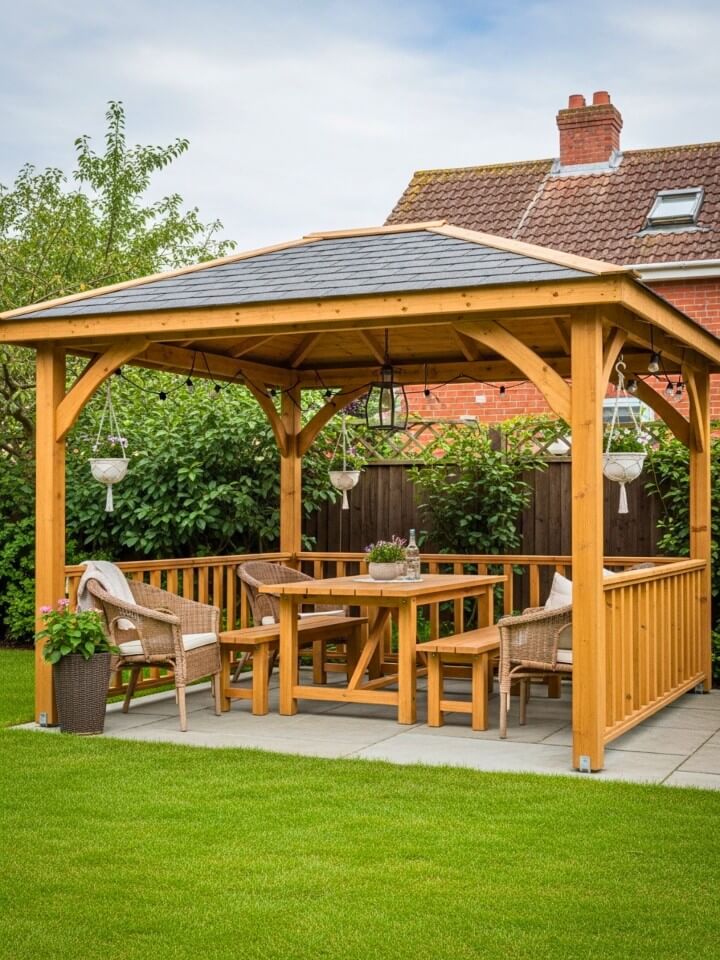
If you can’t decide what style fits your yard, start here. A classic open-sided wooden pavilion is the safe answer that almost never feels wrong — cedar, redwood, or pressure-treated pine, gable roof, four sturdy posts, done.
What most homeowners get wrong is the roof pitch. Anything flatter than 6/12 will trap leaves and shed water poorly. Get that right and the structure will easily outlive your deck.
Quick Specs:
- Typical size: 12×14 ft
- Cost range: $6,000 – $12,000
- Lifespan: 20–30 years with restaining every 2–3 years
- Best paired with: Adirondack chairs, a farmhouse-style dining table, warm Edison-bulb string lights, or comfortable seating inspired by desirable gazebo furniture ideas.
2. Modern Minimalist Pavilion with Clean Lines
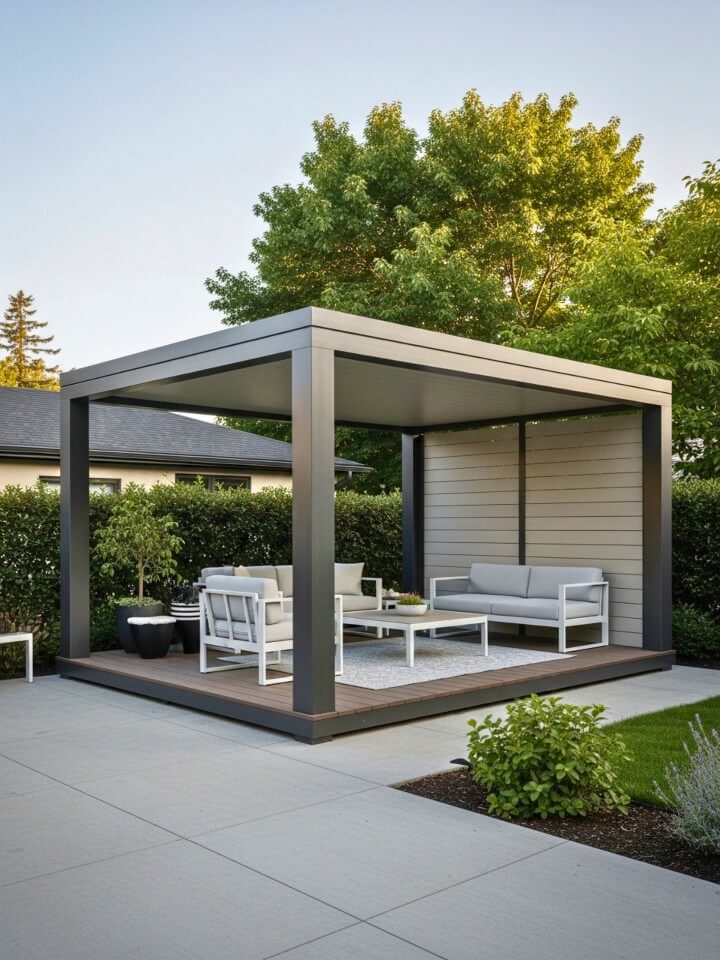
This is the pavilion for people who hate visual clutter. The whole point is restraint — flat or low-slope roof, black powder-coated steel posts, zero decorative trim, nothing that draws the eye away from the architecture itself.
What Works Underneath:
- Poured concrete slab or large-format porcelain tile flooring
- A low-profile sectional in charcoal or oatmeal
- One sculptural planter with an olive or fiddle leaf
- Recessed LED strip lighting tucked into the rafters
What Ruins the Look:
- String lights (they fight the geometry)
- Rustic flagstone underfoot
- Mixed wood tones
- Decorative throw pillows in busy patterns
Aluminum and steel builds start around $8,000 and climb past $20,000 with custom fabrication.
3. Rustic Stone Pavilion with a Shingled Roof
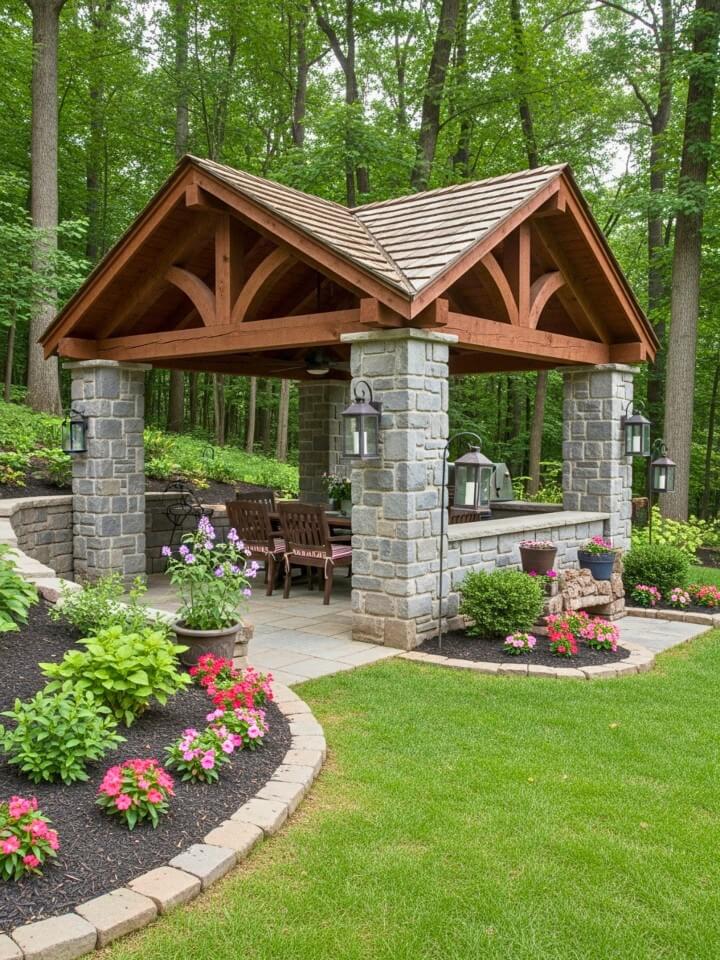
Explore stunning backyard pavilion ideas that blend style, comfort, and smart design for every yard. Honestly, only if you’re staying in the house long-term. These aren’t weekend projects or budget builds. Real stonework starts around $15,000, and a fully custom build with an integrated fireplace can push past $40,000.
But here’s the trade-off: nothing else gives you that “this has always been here” quality. Stone pavilions don’t feel built — they feel grown into the land.
A Budget Workaround: Cultured stone veneer over a steel frame gives you nearly identical looks from a few feet away for roughly 40% less. Most guests will never know the difference.
These work best in yards with mature trees or natural elevation changes. Add a wood-burning fireplace on one end and the space becomes a four-season retreat instead of a summer-only spot.
4. Pergola-Style Pavilion with Climbing Vines
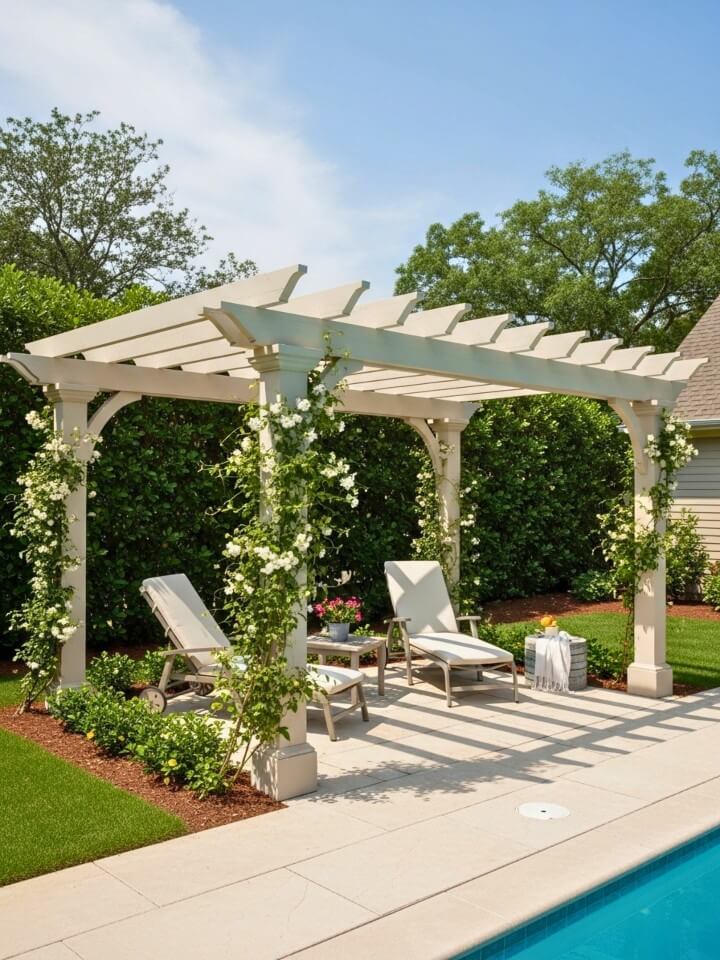
Technically a hybrid — slatted or partially covered roof rather than a full solid top — but the open structure changes the entire feel. Lighter, breezier, more garden than building.
The Honest Pros and Cons:
| Pros | Cons |
|---|---|
| Dappled, shifting shade | Less rain protection |
| Lower cost ($3,000–$9,000) | Vines take 3–4 years to fill in |
| Easier DIY installation | Requires ongoing vine maintenance |
| Better airflow | Falling leaves and petals are a daily sweep |
Choosing the Right Vine:
Wisteria gives spring blooms but grows aggressive and heavy — build with that weight in mind. Climbing hydrangea is slower but stays well-behaved. Grape vines deliver both shade and a small fall harvest if you want function with the form.
5. Screened-In Pavilion for Bug-Free Evenings
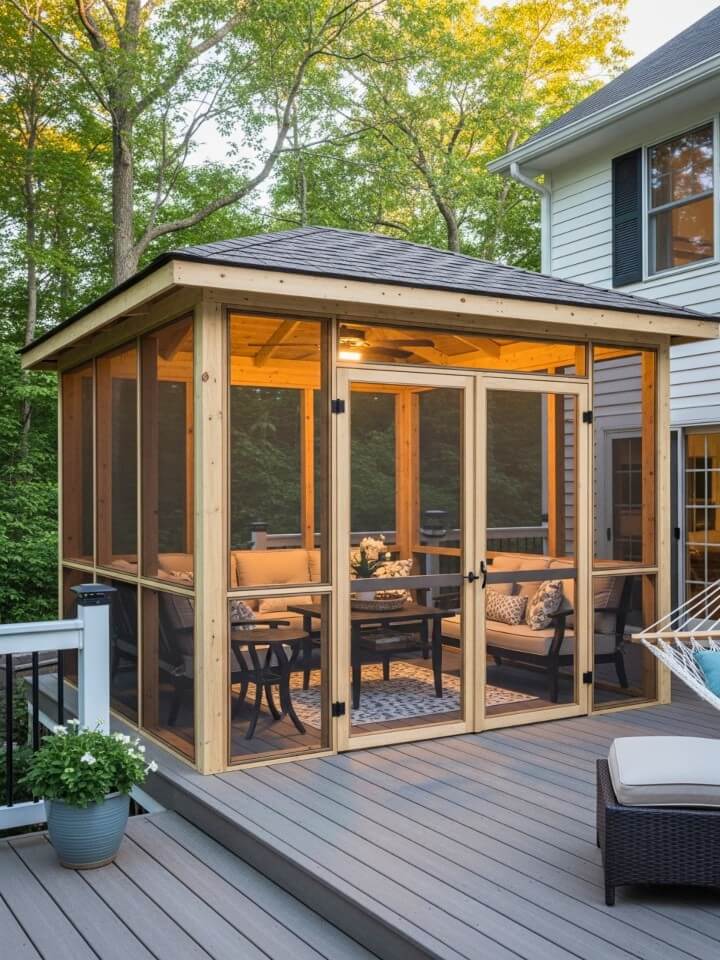
It’s 8:30 in the evening, the temperature has finally dropped, and you’d love to be outside — except the mosquitoes have other plans. That’s the moment screened pavilions earn their keep.
The screening itself matters more than people realize. Standard fiberglass mesh is cheap but tears the first time a branch falls on it. Aluminum mesh holds up for decades. Pet-resistant screens cost roughly three times more but won’t get destroyed by a curious dog.
Plan on adding $2,000–$5,000 onto a standard pavilion build for quality framing, screening, and a self-closing door.
The single best upgrade most homeowners report? A small ceiling fan inside. It moves enough air to keep the space comfortable on still summer nights, and it discourages any bugs that sneak through when the door opens.
6. Pavilion with Built-In Outdoor Kitchen
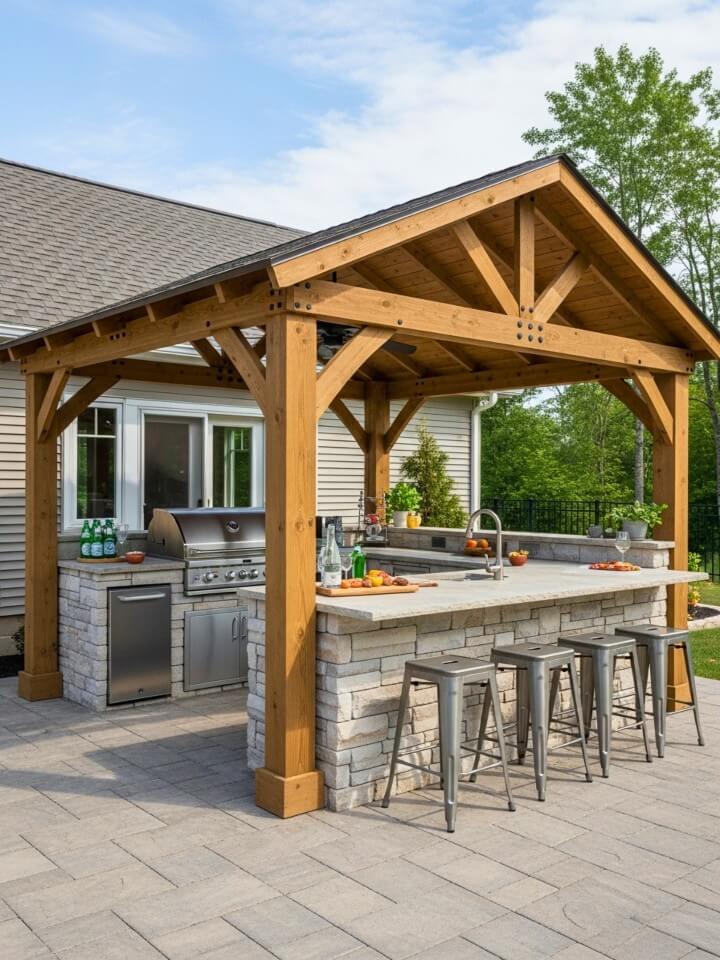
This is where pavilions stop being decoration and start replacing actual rooms in your house. Done right, an outdoor kitchen pavilion can absorb 60–70% of your summer cooking and entertaining.
The Four Zones Every Outdoor Kitchen Needs:
- Cooking zone — Grill, side burner, and ideally a pizza oven or smoker. Leave at least 24 inches of counter on each side.
- Prep zone — Solid counter space, a cutting board insert, and a small sink with hot water if you can run the plumbing.
- Storage zone — Stainless steel cabinets (anything else warps). Include a dedicated trash pull-out — it’s the detail people forget and regret.
- Serving zone — A bar counter or extended ledge where guests can sit without crowding the cook.
Budget realistically: $15,000 on the low end, $50,000+ for a full setup with appliances, gas line, water, and electrical. Position it near the house to keep utility runs short.
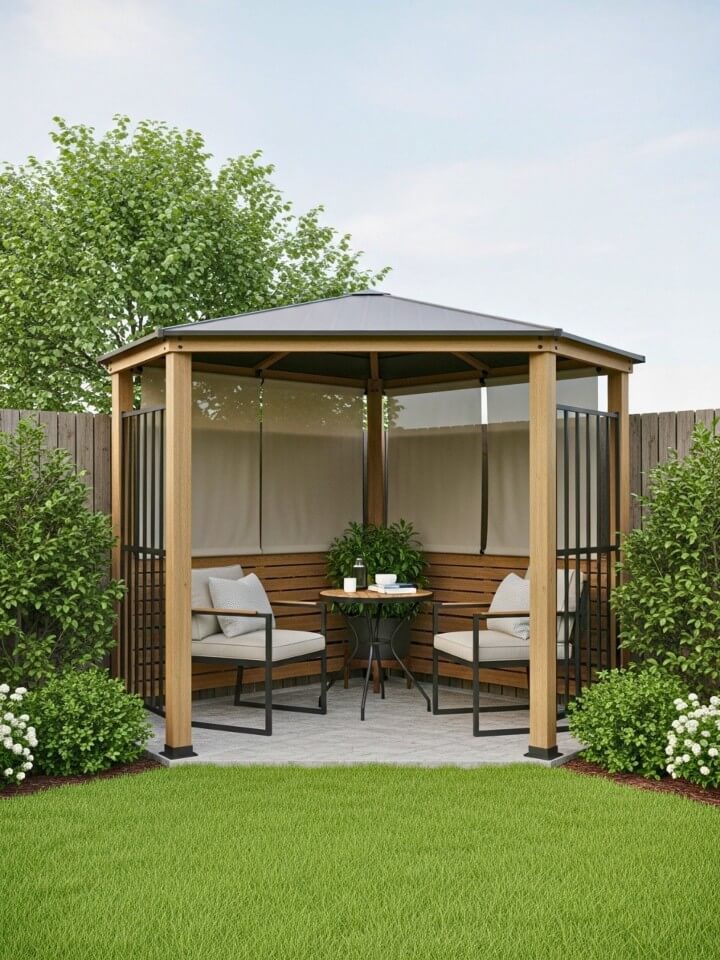
7. Curved Pavilion with a Thatched Roof
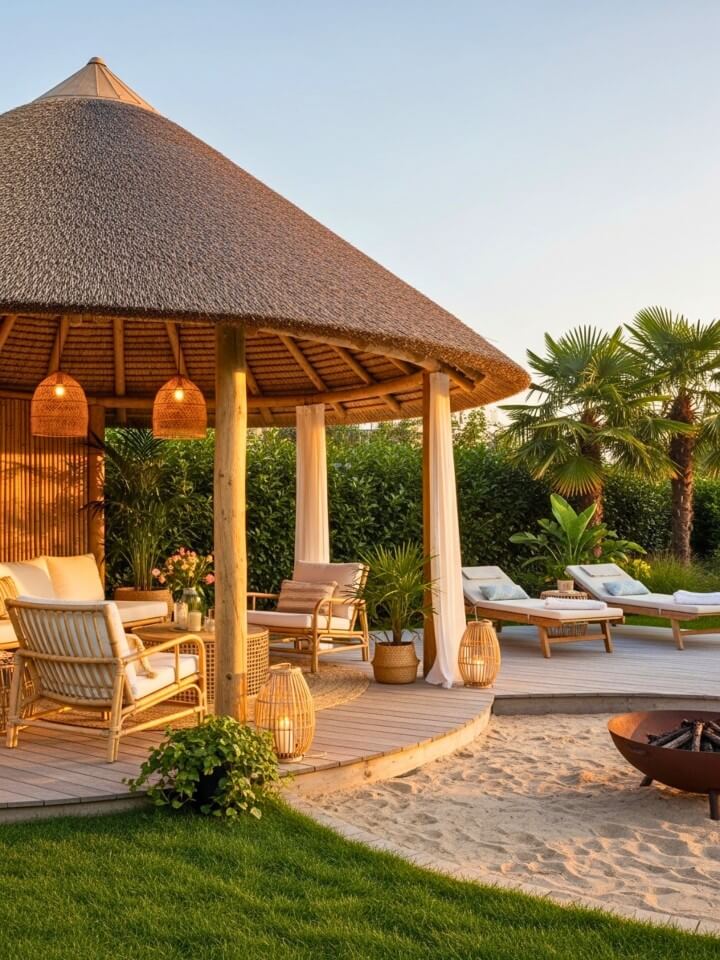
Picture a beachside resort, then bring that feeling home. Curved pavilions with thatched or synthetic palm roofs deliver an instant vacation vibe — and they look stunning in photos.
Now the Reality Check Most Blogs Skip:
Real thatch (palm leaves, reed, or straw) needs replacement every 7–15 years depending on climate. Humid regions shred it faster. It can also be a fire concern, which is why many municipalities require synthetic thatch panels instead. Synthetic options last 20+ years, resist fire, and honestly look nearly identical from ground level.
These pavilions belong near water features — a pool, a koi pond, even a built-in sandbox fire pit. Drop them in a dry suburban lawn and they look out of place. Pair with bamboo, rattan loungers, and warm uplighting on nearby palms or banana plants.
8. Glass-Enclosed Pavilion for Year-Round Use
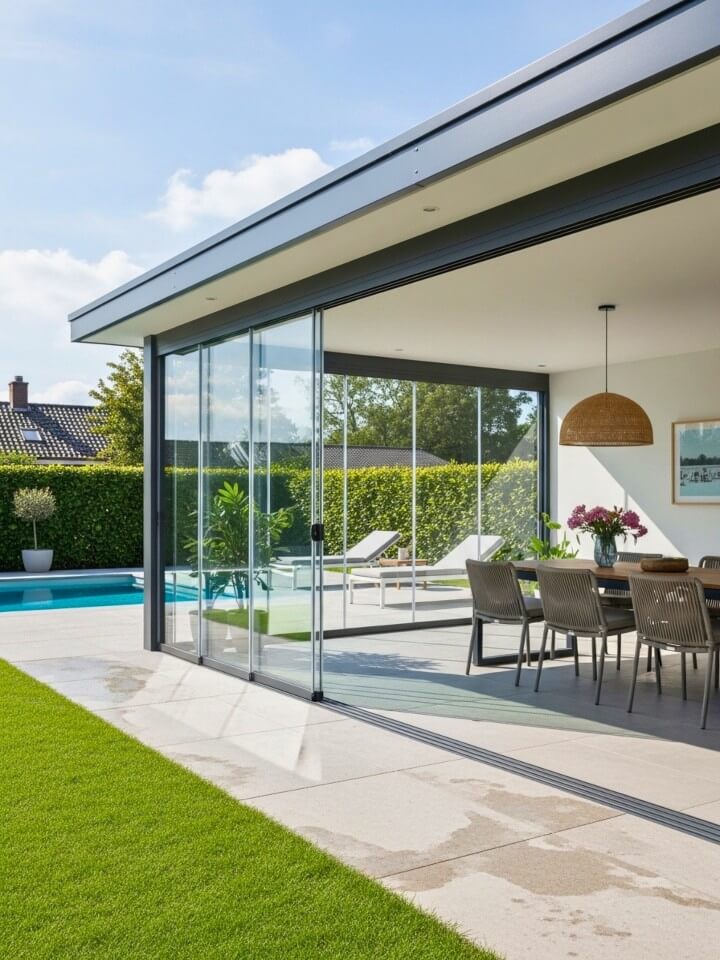
If you want true four-season use without committing to a full sunroom addition, a glass-enclosed pavilion is the closest thing.
Who This Is Actually For:
- Homeowners in regions with real winters who still want garden views
- Anyone working from home who wants a separate “office pod”
- Families who entertain regularly and want a weather-proof space
- People who garden and want a year-round potting and reading room
Who Should Skip It:
- Anyone on a tight budget — these start around $25,000 and climb fast
- Yards with poor views (you’re framing whatever’s out there)
- Homeowners in extreme heat zones without planned AC and tinting
The single most important spec is the glass itself. Low-E coated, double-pane, tempered glass is non-negotiable. Cheaper single-pane will turn the space into either an oven or a freezer depending on the season, and you’ll stop using it within a year.
9. Pavilion with a Fire Pit Centerpiece
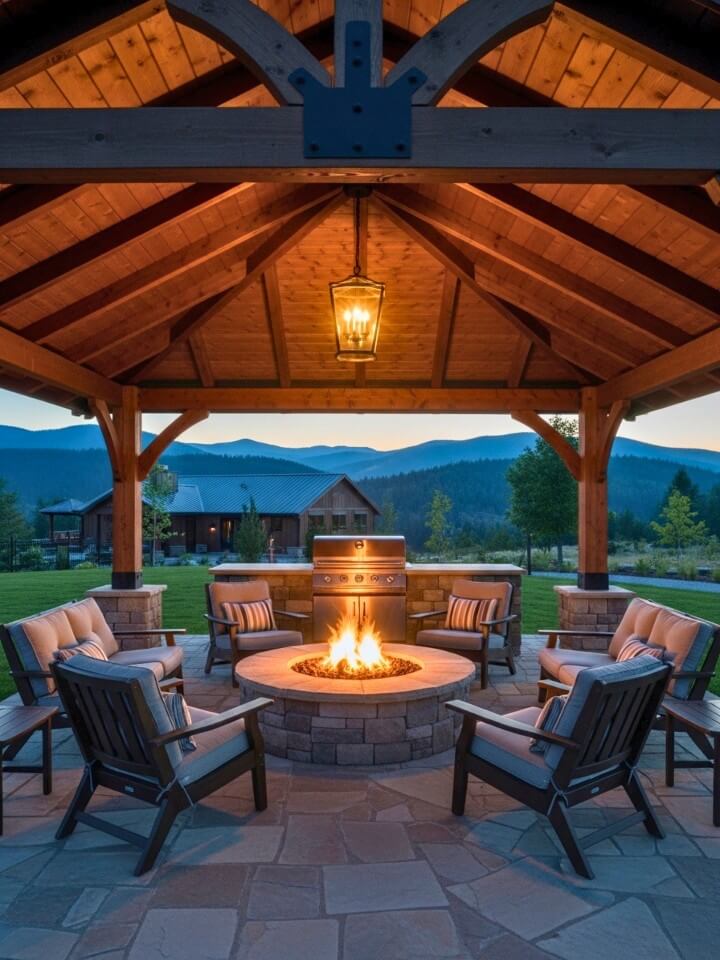
Discover creative outdoor pavilion ideas with stylish layouts, smart materials, and budget-friendly tips. There’s a reason humans have been gathering around fire for thousands of years — it pulls people in and slows them down. A pavilion built around a central fire pit captures that pull while keeping the experience comfortable in any weather.
But this design has more rules than any other on the list, and ignoring them gets dangerous.
Non-negotiables for fire pit pavilions:
- Roof clearance — Minimum 8 feet from fire to ceiling, 10 feet is safer
- Ventilation — A vented cupola or open peak so smoke can escape
- Non-combustible flooring — Stone, concrete, or pavers within a 6-foot radius
- Distance from posts — At least 3 feet between fire and any wooden structural element
- Local code check — Many areas require permits or restrict wood-burning entirely
Gas fire pits sidestep most of these concerns and turn on with a switch. Wood-burning gives you the crackle and smell but demands more from the design.
10. Pavilion with Hanging Swing Seats
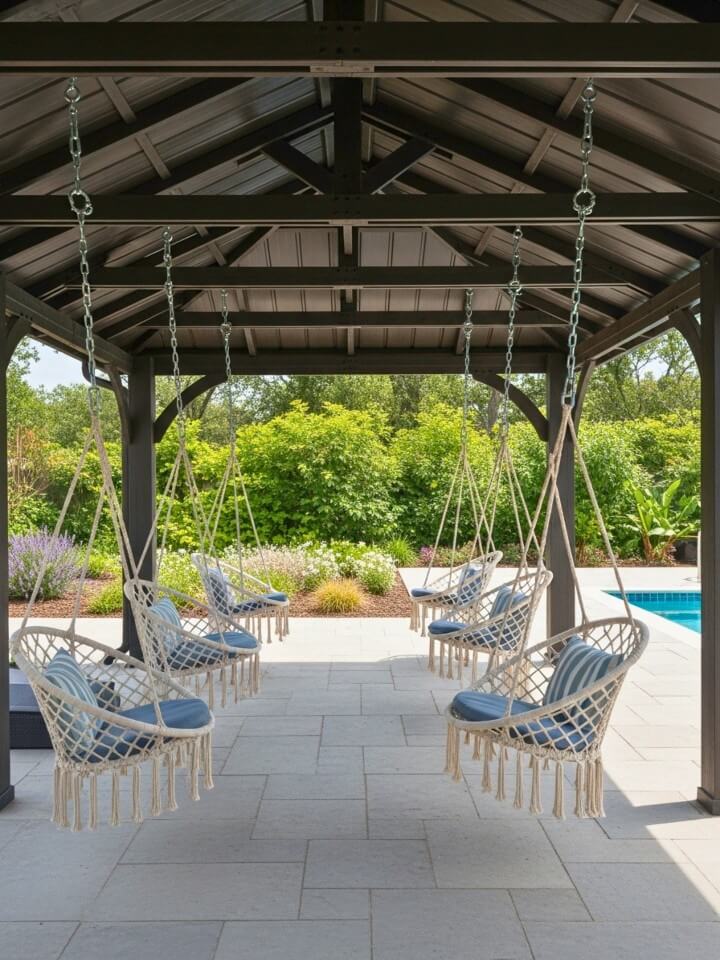
Replace the standard chairs with hanging swing beds or porch swings and the pavilion transforms from a sitting area into something kids and adults actually fight over.
The structural side matters here. A standard pavilion roof beam isn’t engineered to hold dynamic swinging loads — you can’t just screw an eye bolt into any rafter and call it done.
What You Actually Need:
- Doubled-up 4×6 or larger beams specifically rated for hanging loads
- Heavy-duty swing hangers rated for 500+ lbs per point
- At least 4 feet of clearance on each side of each swing
- Marine-grade rope or steel chain (skip nylon — it stretches and degrades in UV)
Two swings facing each other with a small coffee table between them is the layout that gets used most. A single daybed swing works beautifully for solo reading corners or napping spots. Add weatherproof cushions in linen-look outdoor fabric and the space starts feeling like a coastal Airbnb people pay $400 a night for.
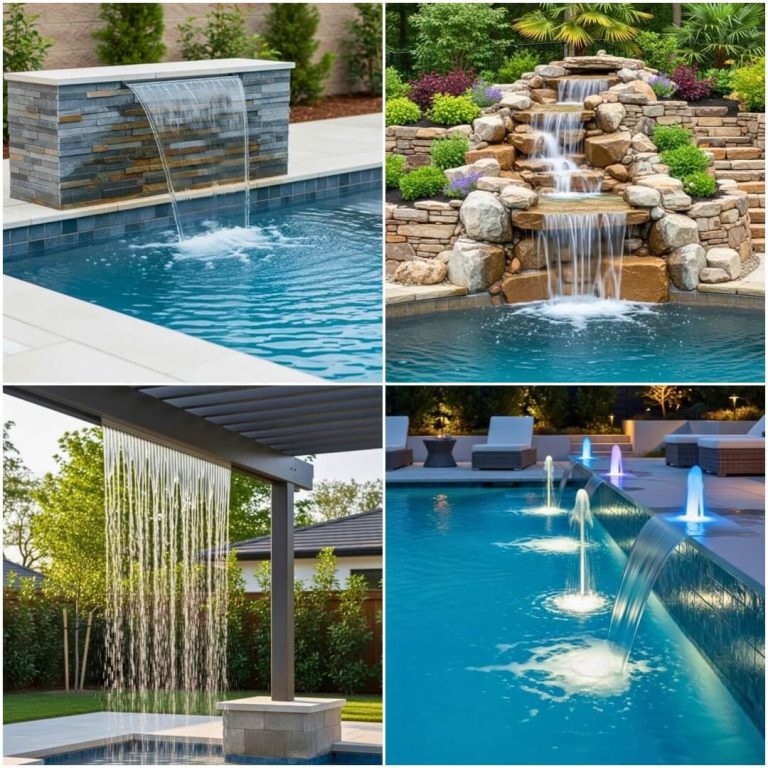
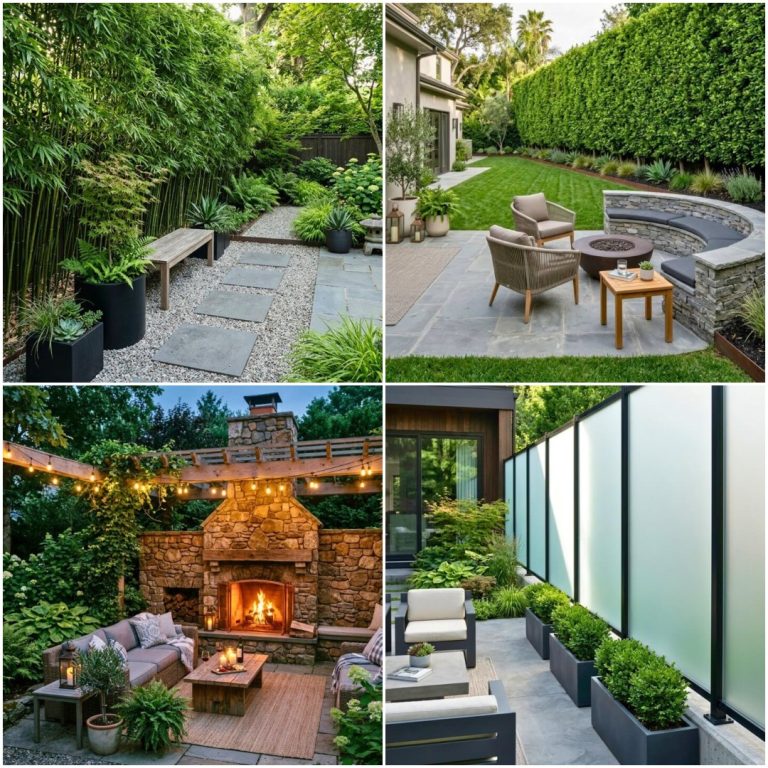
11. Pavilion with a Water Feature Wall

Sound changes a space more than most homeowners realize. Add moving water to a pavilion and the entire mood shifts — traffic noise fades, conversations soften, and the space starts feeling like somewhere you’d pay to visit rather than somewhere you built.
Three Water Feature Styles that Work:
- Sheet waterfall — Water sheets down a flat stone or stainless steel panel. Modern, clean, and surprisingly quiet (more of a hush than a splash).
- Cascading basin wall — Water flows between stacked stone basins. More visual movement, slightly louder, leans rustic or Mediterranean.
- Pondless waterfall — Water disappears into a hidden gravel basin underneath. Safer around children and pets, no standing water to maintain.
Budget $2,500–$8,000 for a built-in feature, plus an outdoor GFCI outlet for the pump. The pump itself is the part most DIYers undersize — get one rated 1.5x your actual flow needs so it has headroom and runs quieter.
12. Pavilion with Retractable Canopy
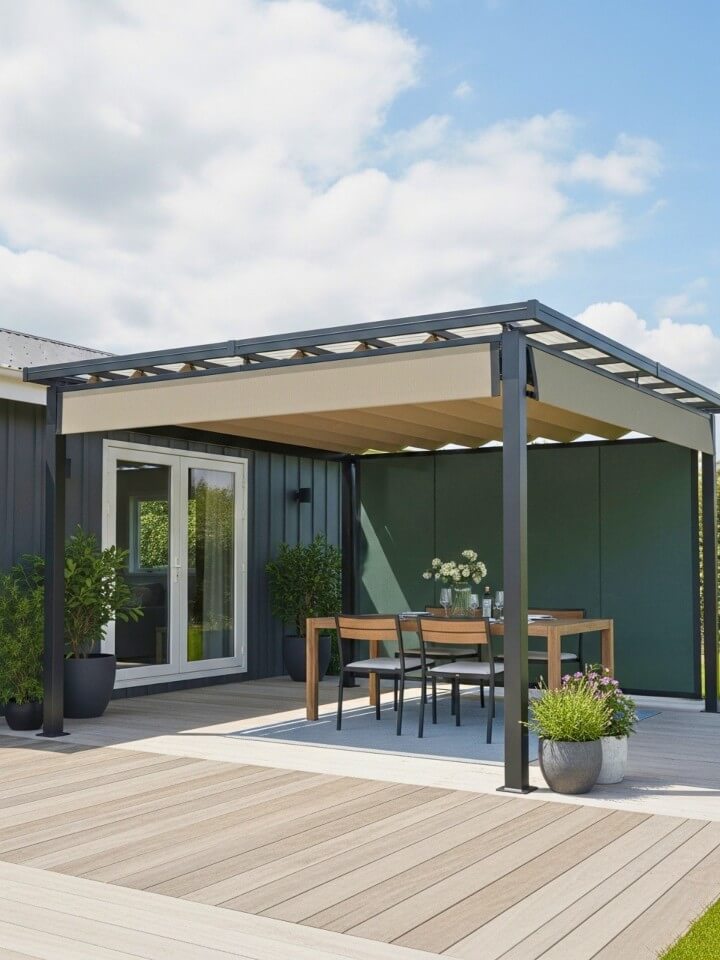
Most pavilions commit to one shade situation forever. A retractable canopy gives you the freedom to change your mind — full shade at 2 PM, open sky for evening stargazing, instant cover when clouds roll in.
The mechanism is what separates a $2,000 disappointment from a $12,000 system that actually lasts. Manual crank canopies are fine for small spans but become a chore. Motorized systems with wind and rain sensors automatically retract when storms approach, which sounds like marketing fluff until you’ve lost a fixed canopy to a surprise gust.
Fabric matters too. Look for solution-dyed acrylic (Sunbrella is the household name, but several competitors match the quality now). It resists fading, mildew, and the kind of slow ugliness that cheap polyester develops by year three.
Best placement: over decks and dining areas that catch hard afternoon sun.
13. Pavilion Surrounded by Native Plants
A pavilion dropped onto a lawn looks like a piece of furniture. The same pavilion surrounded by layered native planting looks like it belongs there.
Beyond aesthetics, native plants do real work. They need a fraction of the water turf grass demands, support local pollinators and birds, and once established, mostly take care of themselves. The pavilion becomes a viewing platform for an actual ecosystem.
A Simple Layering Approach that Works in Most Regions:
- Tall background layer — Native grasses like little bluestem, switchgrass, or feather reed grass
- Middle flowering layer — Coneflower, black-eyed Susan, bee balm, or whatever blooms locally
- Low groundcover layer — Creeping thyme, native sedges, or wild ginger
- A single specimen tree or large shrub — Serviceberry, redbud, or oakleaf hydrangea as an anchor
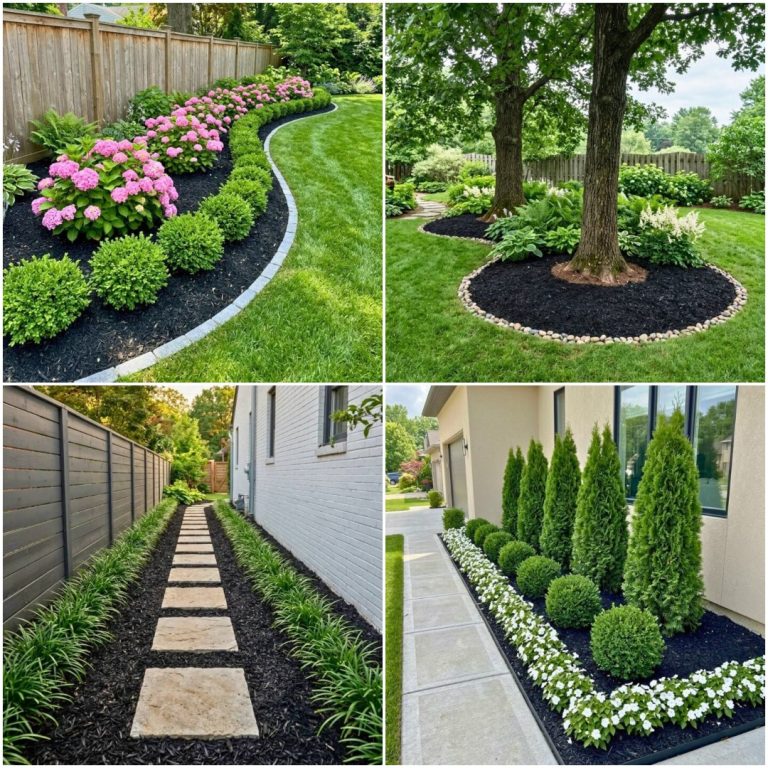
Skip the impulse to over-plant in year one. Native plants spread; what looks sparse in May will be full by August of year two. If the pavilion sits near neighbors or a street, layered planting can also double as screening, especially when paired with flawless privacy landscaping ideas.
14. Pavilion with Outdoor Lighting Accents
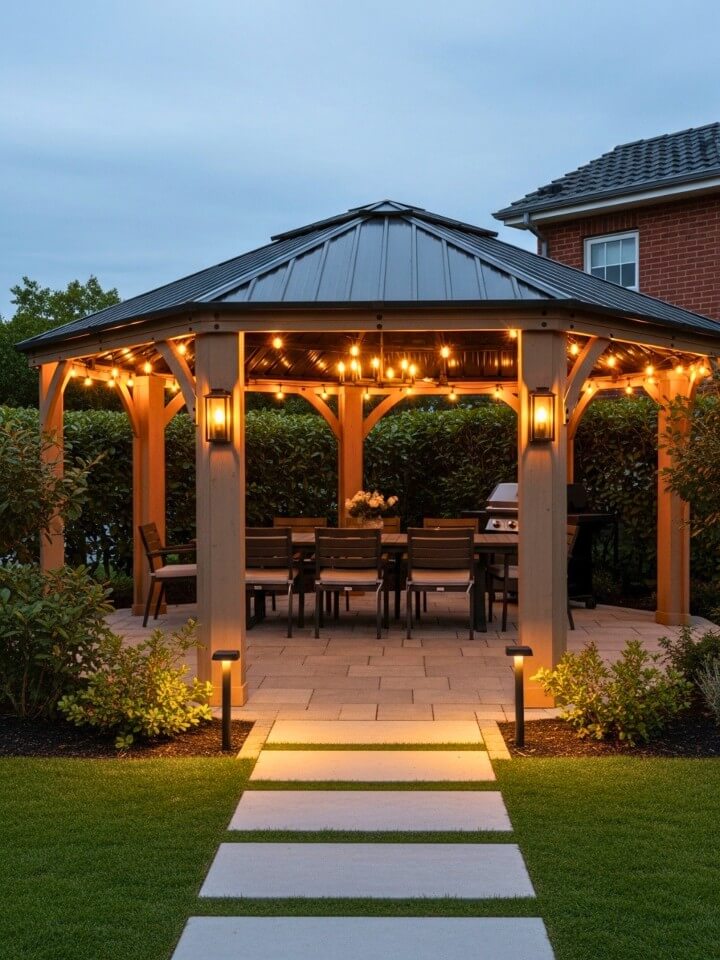
A pavilion lit only by a single overhead fixture looks like a parking lot. The trick to outdoor lighting that actually feels good is layering — multiple low-output sources at different heights rather than one bright fixture trying to do everything.
The Four-Layer Lighting Recipe:
- Ambient layer — Soft overall glow. String lights along the rafters or a dimmable overhead fixture.
- Task layer — Brighter, focused light for cooking surfaces, prep counters, or reading nooks.
- Accent layer — Uplights on nearby trees, spotlights on a water feature, or wash lighting on stone columns.
- Path layer — Low ground-level lights guiding people to and from the pavilion.
Always choose warm white bulbs (2700K–3000K). Anything cooler turns the space clinical and kills the mood instantly. Put everything on dimmers, and budget for a smart controller if you’ll use the space year-round — being able to dim from your phone changes how often the pavilion actually gets used.
15. Pavilion with Built-In Benches and Storage
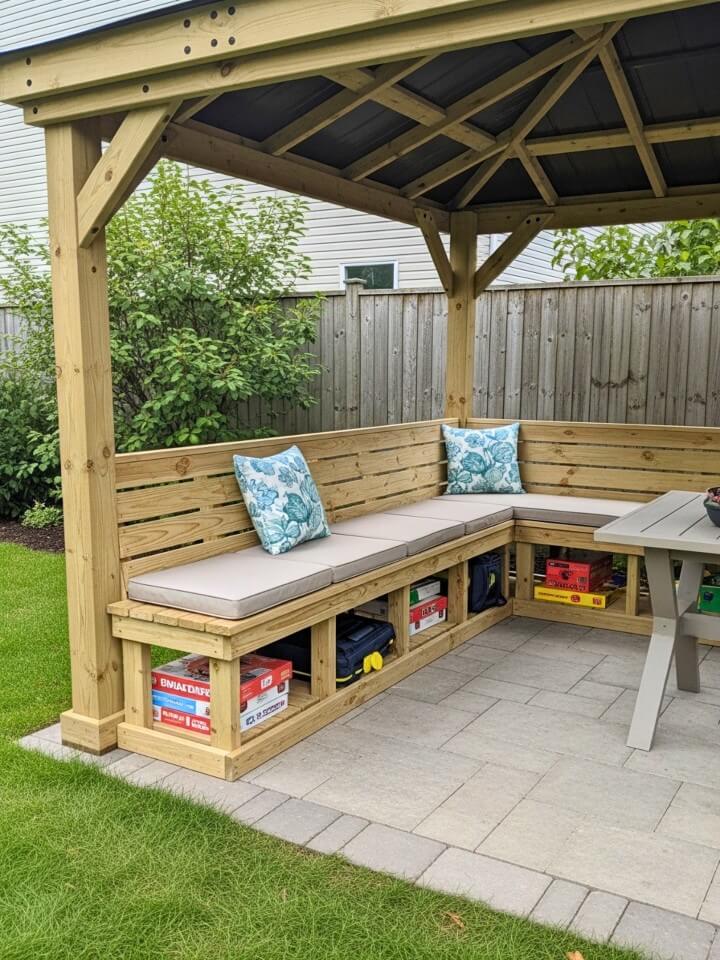
In smaller yards, every piece of loose furniture eats space and creates visual clutter. Built-in bench seating solves both problems while quietly adding storage you didn’t know you needed.
Lift the hinged seat tops and suddenly you have homes for cushions during winter, pool toys, kids’ outdoor games, gardening tools, and the citronella candles that always end up scattered everywhere.
A few details that make built-ins actually comfortable rather than punishingly hard:
The seat depth should land between 18 and 20 inches — any deeper and shorter people can’t put their feet down. Back angle should sit at 100–105 degrees from the seat, not a straight 90. Cushion thickness matters more than fabric quality — splurge on 4-inch foam, even if the cover is cheap.
Drill drainage holes in the storage compartments. Water finds its way in regardless of how well-sealed the lids seem.
16. Poolside Pavilion with Lounge Seating
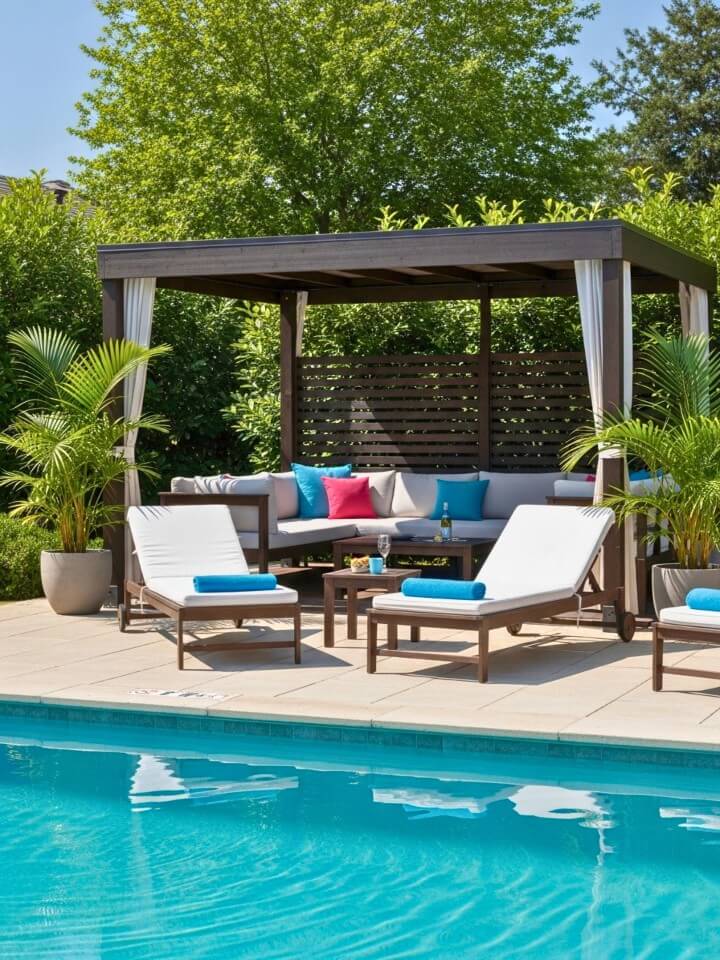
Wondering what does a pavilion look like? Picture an open-sided roofed structure built for shaded comfort. The hours between swimming actually outnumber the hours spent in the water. A poolside pavilion is what makes those in-between hours comfortable instead of forcing everyone back inside dripping wet.
Materials have to handle constant moisture, chlorine splash, and sunscreen residue — three things that destroy normal outdoor furniture within a couple seasons. Powder-coated aluminum frames with quick-dry foam cushions in solution-dyed fabric are the proven combination. Wicker should be all-weather resin, never natural.
Floor surface matters too. Standard wood decking gets dangerously slick when wet. Travertine pavers stay cool underfoot and grip even when soaked. Composite decking with a textured finish is the modern alternative.
Position the pavilion so afternoon shade falls across the loungers — that’s when people actually use them. A morning-shaded pavilion sits empty during the hottest hours, which defeats the entire purpose.
17. Small Corner Pavilion for Compact Backyards
Not every backyard has room for a 14×14 ft centerpiece structure. Corner pavilions — sometimes called L-shaped or triangular pavilions — tuck into spots that would otherwise sit unused.
Why Corner Placement Actually Works Better in Small Yards:
- Two sides are already defined by fencing or walls, so the pavilion feels grounded
- Floor footprint can shrink to as little as 8×8 ft without feeling cramped
- The opposite corner of the yard stays open for kids, pets, or a small lawn
- Material costs drop significantly with smaller spans
- DIY becomes genuinely realistic (most kits in this size install in a weekend)
Furnish lightly. Two chairs, a small bistro table, maybe a narrow console along the back wall. The mistake most people make is trying to fit full-size patio furniture into a small footprint — apartment-scale or café-style pieces look intentional rather than crammed.
A small corner pavilion paired with a privacy screen of bamboo or climbing jasmine creates a surprisingly secluded retreat in even the most overlooked urban lots.
18. Garden Pavilion with a Dining Table
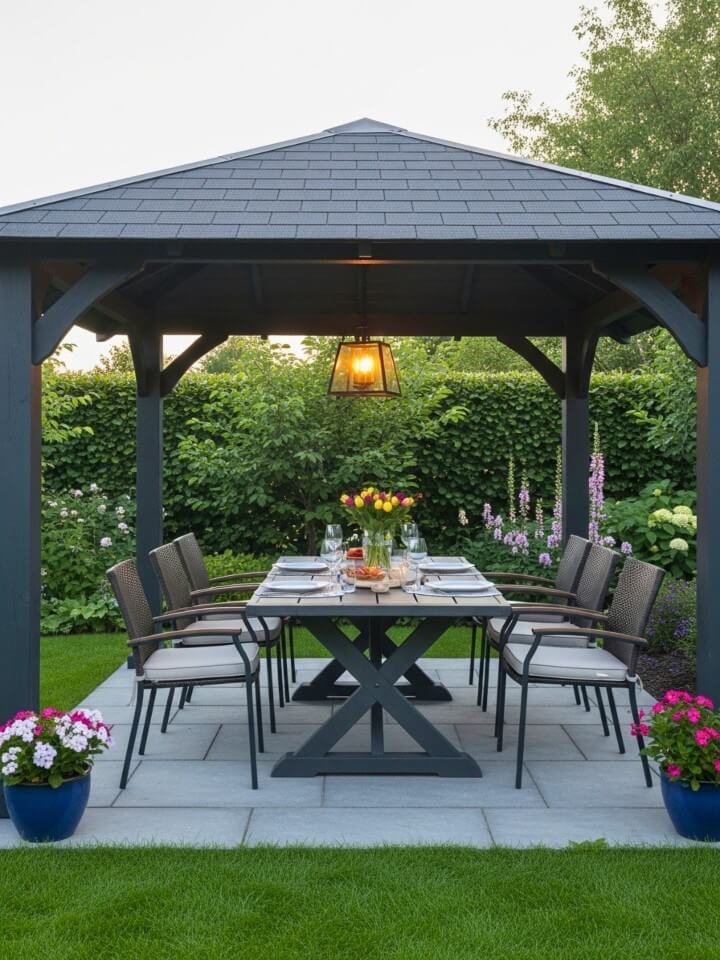
Some pavilions are built around fire, some around water, some around views. This one is built around a table — and specifically, around the kind of meals that go on for three hours.
The table itself is the entire design decision. Get it right and the pavilion works. Get it wrong and people perch awkwardly and leave early.
Sizing Guide that Actually Works:
- 6 people: 72″ x 36″ table, minimum 12×12 ft pavilion
- 8 people: 84″ x 40″ table, minimum 12×14 ft pavilion
- 10–12 people: 96″+ x 42″ table, minimum 14×16 ft pavilion
Leave 36 inches of clearance behind chairs so people can actually get up without performing a chair ballet. An overhead light fixture centered above the table — pendant, chandelier, or a row of bistro bulbs — anchors the space and signals “this is where dinner happens.”
Surround the pavilion with herbs, lavender, or low flowering shrubs. The scent drifts through during meals and turns dinner into something memorable rather than something routine.
FAQs About Backyard Pavilion Ideas
Before building a pavilion, homeowners usually have the same questions about cost, permits, and design differences. Here are the most common ones answered.
How Much Does a Backyard Pavilion Cost on Average?
Most homeowners spend between $5,000 and $15,000 for a standard wooden pavilion installed. Custom builds with stone, glass, or full outdoor kitchens can run $25,000 to $50,000+.
Do I Need a Permit to Build a Backyard Pavilion?
Usually yes, especially for structures over 100–200 square feet, anything attached to the house, or builds with electrical, gas, or plumbing. Always check local zoning and HOA rules before purchasing materials.
Pavilion vs Gazebo vs Pergola — What’s the Difference?
A pavilion has a solid roof and open sides. A gazebo is typically smaller, round or octagonal, and often fully roofed with railings. A pergola has an open slatted roof providing partial shade rather than full cover.
How Long Does a Backyard Pavilion Last?
A well-built wooden pavilion lasts 20–30 years with regular maintenance. Metal and stone pavilions can last 50+ years. Roof shingles typically need replacement every 20–25 years regardless of the structure underneath.
Can I Build a Pavilion Myself?
Kit pavilions in the 10×10 to 12×12 ft range are realistic weekend projects for handy homeowners. Anything larger, anything with utilities, or anything involving stonework is usually worth hiring out.
Choosing the Right Pavilion for Your Yard
The best pavilion isn’t the most expensive one or the one with the most features — it’s the one that matches how you actually live. Cooks should look hard at the outdoor kitchen option. Entertainers gravitate toward dining or fire-centered designs. Quiet homeowners thrive with water features, native plantings, or a tucked-away corner build.
Before committing, spend a full weekend sitting in the proposed spot at different times of day. Watch where the sun lands, where the wind comes from, and how sound carries from the street. The pavilion you build around real observations will outperform any design copied from a catalog.