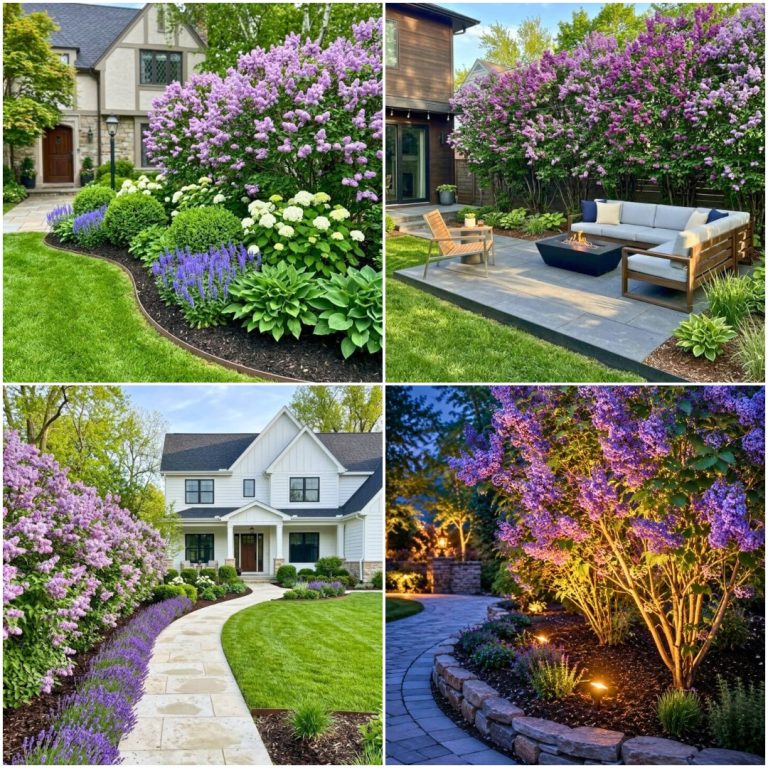
31 Fenced Vegetable Garden Ideas That Work for Any Budget
Walk out back, coffee in hand, and your tomatoes are still on the vine. Not half-eaten by a rabbit. Not trampled by the neighbor’s dog. These 31 amazing fenced vegetable garden ideas exist for exactly that reason — to quietly protect everything you’ve worked for while making the whole space feel like it actually belongs in your yard.
The thing is, a fence doesn’t have to mean ugly wire stretched between metal posts. It can be pretty, productive, or both. Some pull double duty as trellises. Others hide your beds behind bamboo or living willow. A few cost almost nothing if you’re willing to hunt down pallets or branches.
Every style here fits a different budget, yard size, and gardening personality – so you can find one that matches the way you actually grow, not the way a catalog says you should.
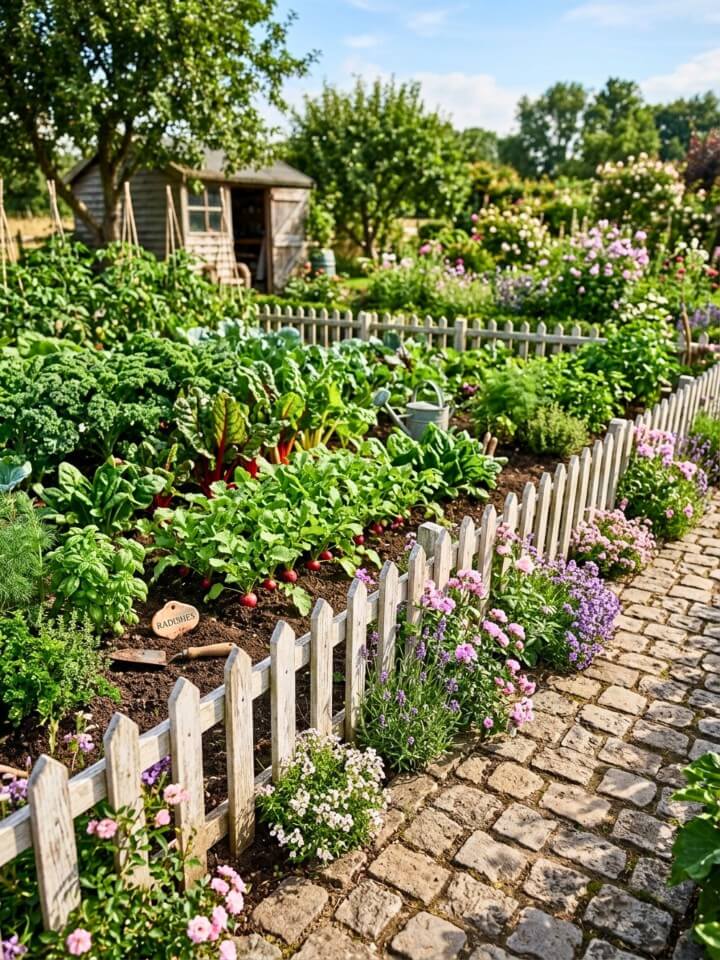
1. Classic White Picket Fence – Timeless Garden Charm
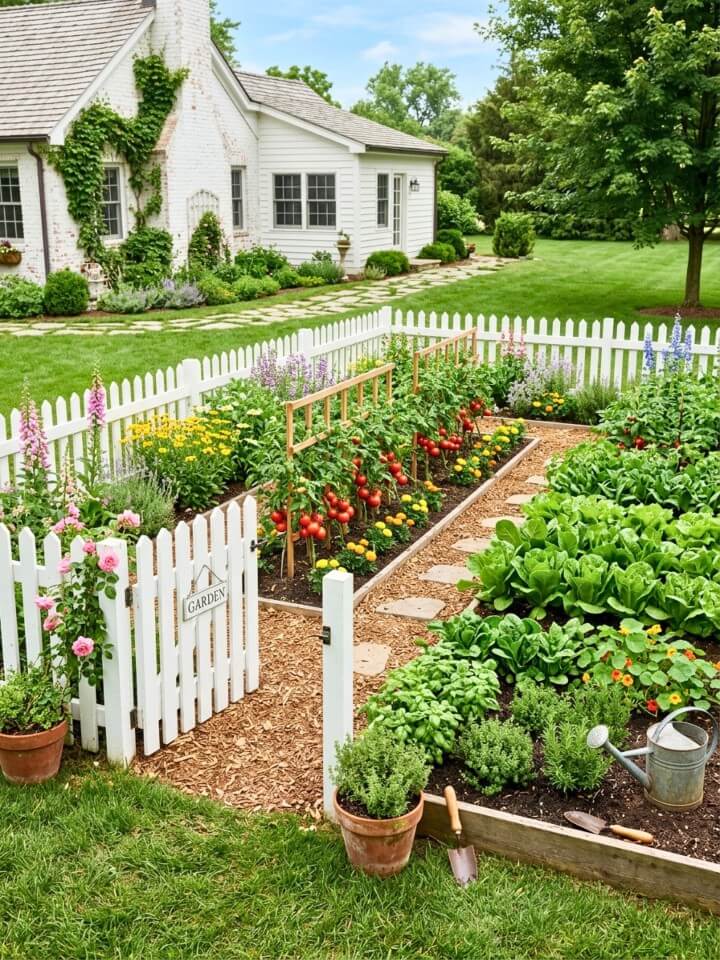
A white picket fence gives your vegetable garden a clean, welcoming structure. It works best around medium-sized plots where appearance matters as much as function. Pair it with tomatoes, herbs, or climbing beans for a classic cottage feel. Install it around four feet high with closely spaced pickets to block rabbits. Add a small gate for easy access. The fence becomes part of the garden’s character, not just a boundary.
Build the Picket Look Without Overspending
- Choose pre-primed pine or cedar pickets
- Space pickets 2–3 inches apart to block small animals
- Use exterior white paint rated for outdoor wood
- Set posts at least 2 feet deep in concrete
- Train climbing beans along the inside edges for added function
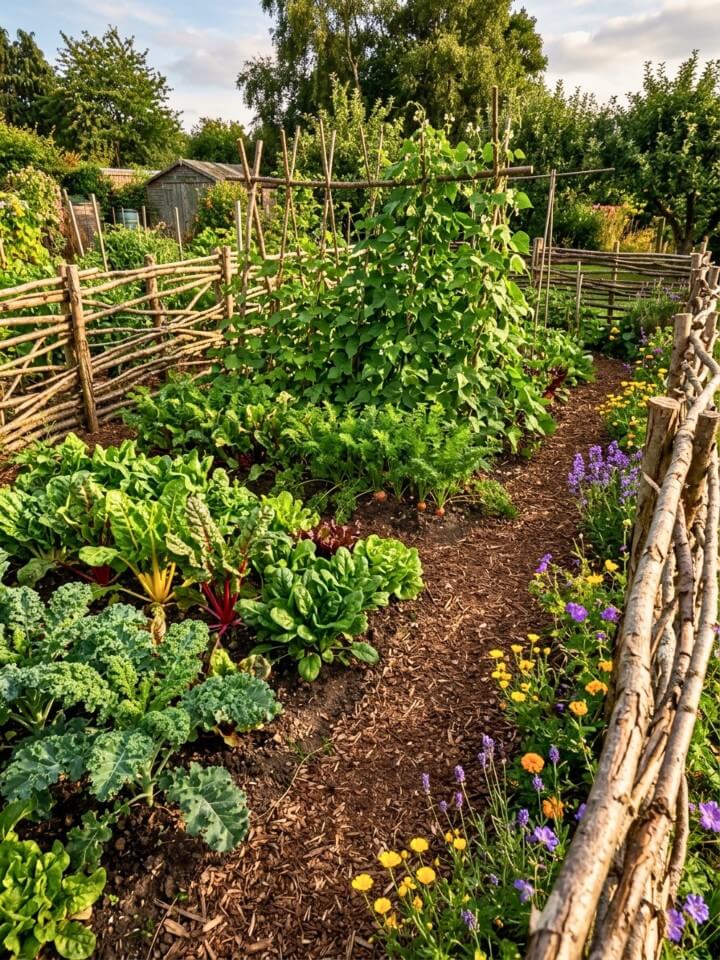
2. Post and Rail Fence – Rustic Countryside Boundary
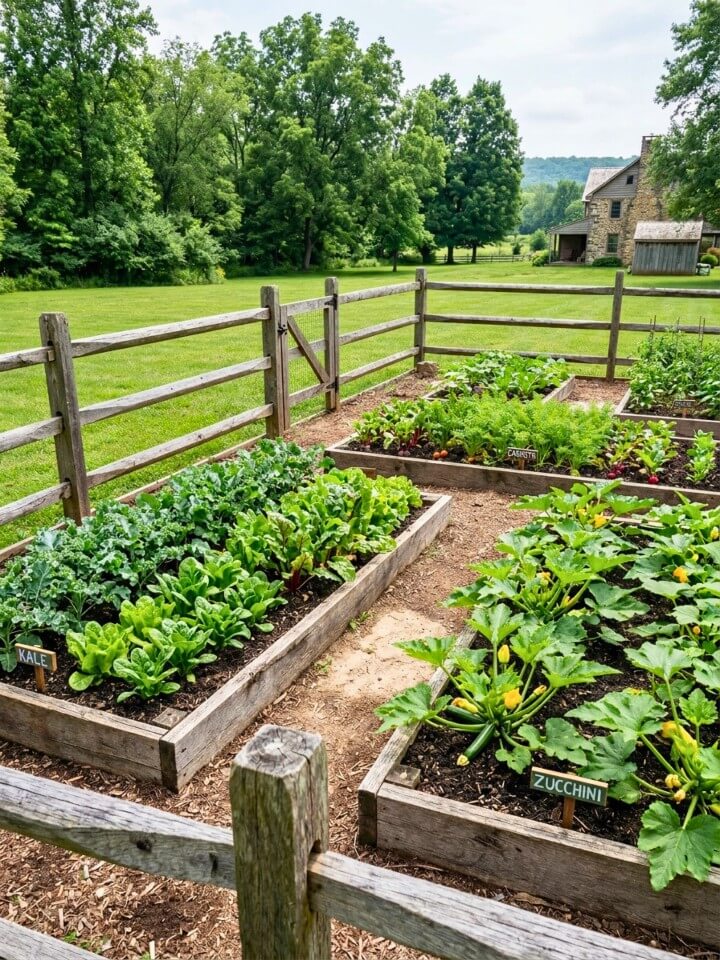
This style suits open backyards near fields or wooded areas. It feels natural and grounded without looking overly polished. Use lightly stained or untreated wood for an authentic weathered appearance. Set posts at least 2 feet deep so they stay firm over time. If small pests are a concern, add galvanized mesh behind the rails. Root vegetables and squash grow beautifully inside this kind of enclosure.
Getting That Farmhouse Fence Aesthetic Right
Start with rough-cut cedar or pine rails — they weather better than treated lumber in garden settings. Keep post spacing between 8 and 10 feet for structural stability. Use 2 to 3 horizontal rails depending on how much pest protection you need. A light wood stain is optional but adds a few years of life. Leave the base open or bury mesh 6 inches underground to stop digging animals.
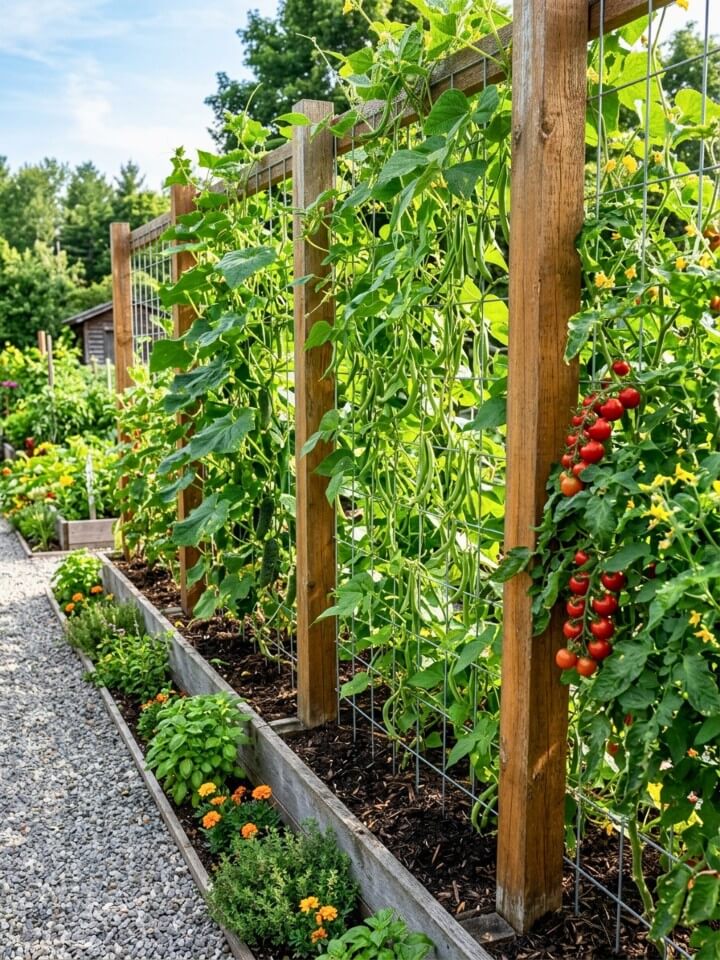
3. Metal Mesh Around Raised Beds
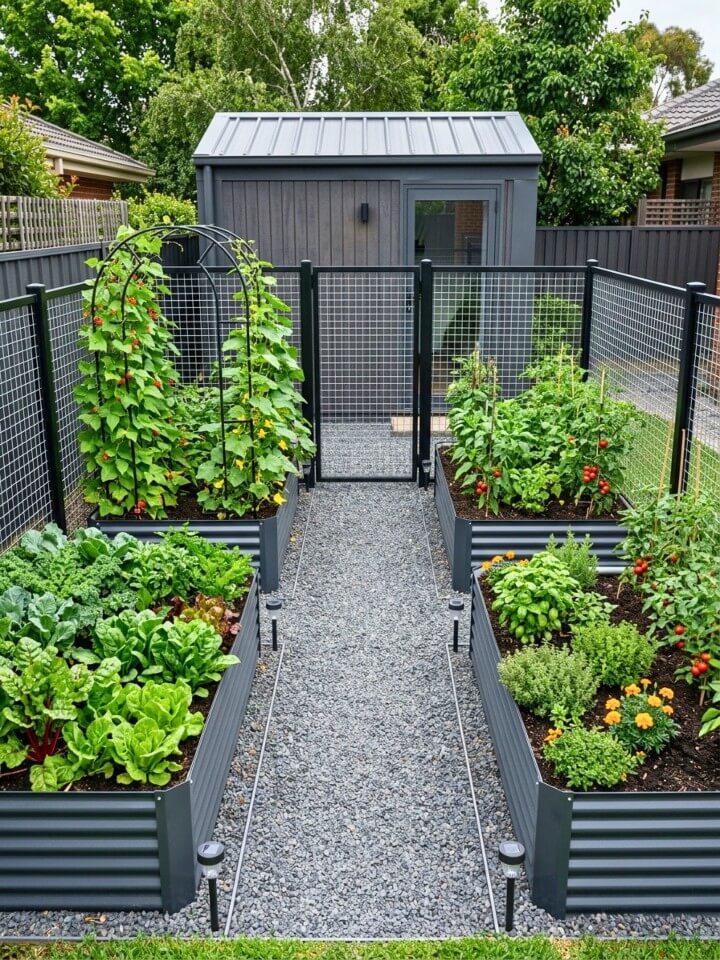
Galvanized or powder-coated metal mesh gives raised beds a sharp, modern look. It works especially well in compact or urban yards where space is tight. The mesh keeps rabbits and small deer out without blocking sunlight or airflow. Attach a trellis section along one side so cucumbers or peas can grow vertically. Everything stays organized and visible. It’s a low-maintenance setup that lasts for years, especially when paired with smart small patio landscaping ideas in tight outdoor spaces
What You Need to Put This Together
- Measure the perimeter of each raised bed before buying mesh panels
- Choose galvanized welded wire — it resists rust better than basic steel
- Secure panels with metal T-posts or wooden corner posts
- Add a simple hook-and-eye latch for a removable access panel
- Attach trellis wire or a wooden frame on one side for climbing crops
Price Range: Welded wire mesh runs $15–$30 per 50-foot roll depending on gauge.
Where to Buy: Garden centers, hardware stores, and online farm supply retailers carry suitable mesh in multiple heights.
4. Cottage-Style Flower-and-Vegetable Fence

This style blurs the line between ornamental and edible gardening. It works beautifully along pathways or garden edges where you want color alongside practicality. Mix low picket or lattice fencing with edible blooms like nasturtiums or calendula, then let beans and peas weave through. The result is a boundary that attracts pollinators and looks inviting at the same time. Informal gardens especially benefit from this soft, layered approach.
Pulling Off the Cottage Garden Fence Look
The key is intentional informality. Use a low picket or simple lattice fence as your base — nothing too rigid or uniform. Plant nasturtiums, calendula, or sweet peas directly at the fence line so they spill naturally. Let climbing beans or peas grow up and through the structure. Avoid straight rows inside. The more relaxed the planting arrangement, the more authentic this style looks.
5. Bamboo Privacy Fence – Natural Screen for Your Garden
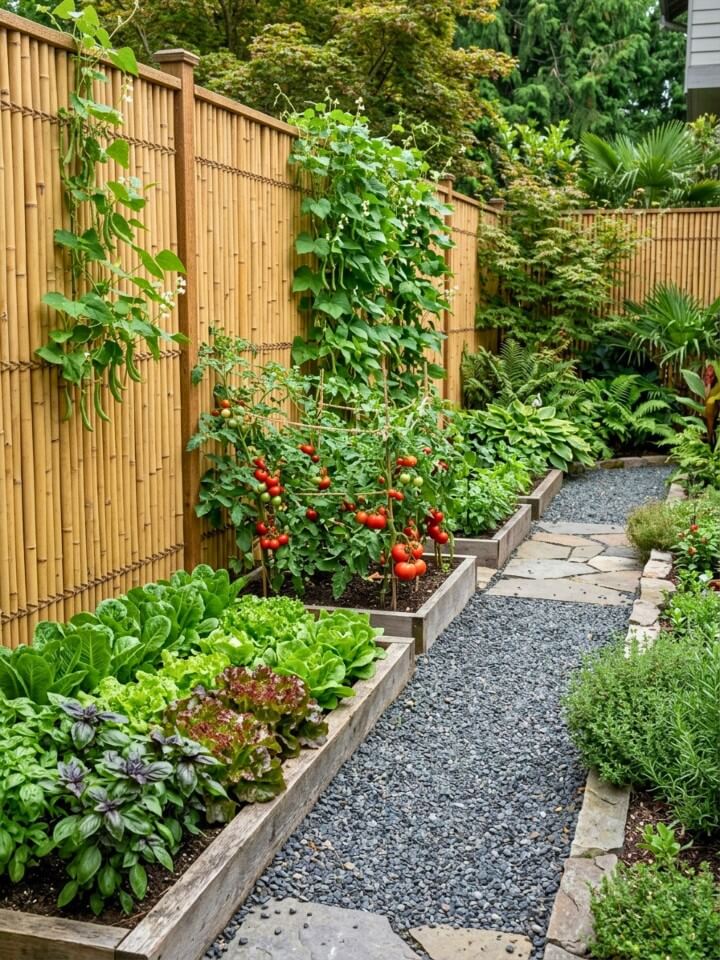
Bamboo fencing creates a tall, calm backdrop that hides your vegetable beds from view. It works best along patios or property edges where privacy is a priority. The dense poles block wind, which actually helps leafy greens and herbs thrive. Over time, bamboo weathers to a warm golden tone that blends naturally with outdoor surroundings. Grow pole beans up the fence to use every inch of vertical space, or combine it with layered privacy landscaping ideas for even more screening.
How to Install Bamboo Fencing That Actually Lasts
Most bamboo fencing comes in pre-made rolls, which makes installation straightforward. Unroll against existing posts or a wooden frame — never rely on bamboo alone to bear structural load. Secure with galvanized wire ties every 12 inches. Seal the cut ends with exterior wood sealant to slow moisture damage. Avoid ground contact where possible; elevate the base slightly to prevent rot at the bottom.
Price Range: Bamboo roll fencing typically costs $1.50–$4 per square foot.
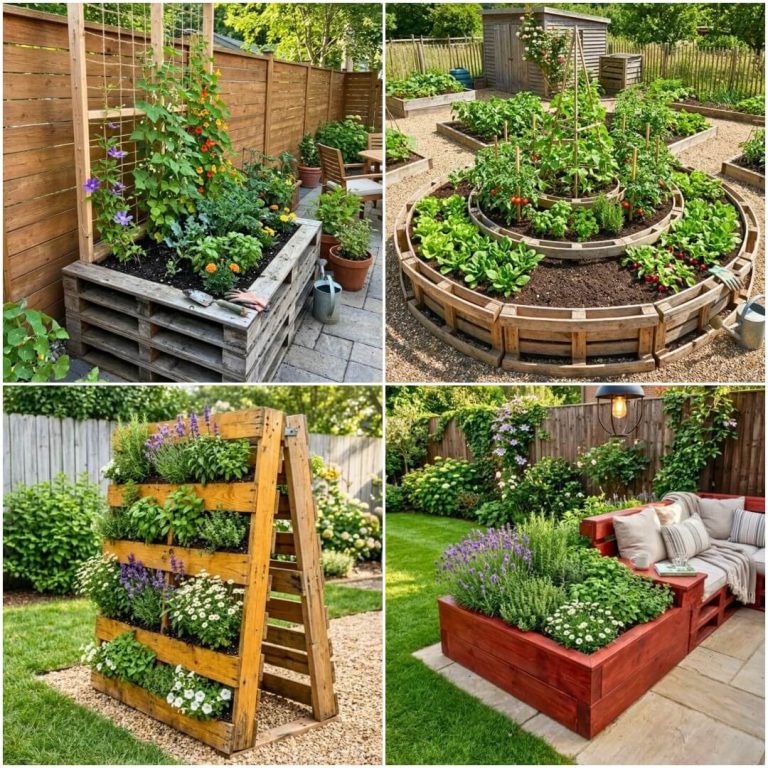
6. Budget-Friendly Reclaimed Pallet Fence
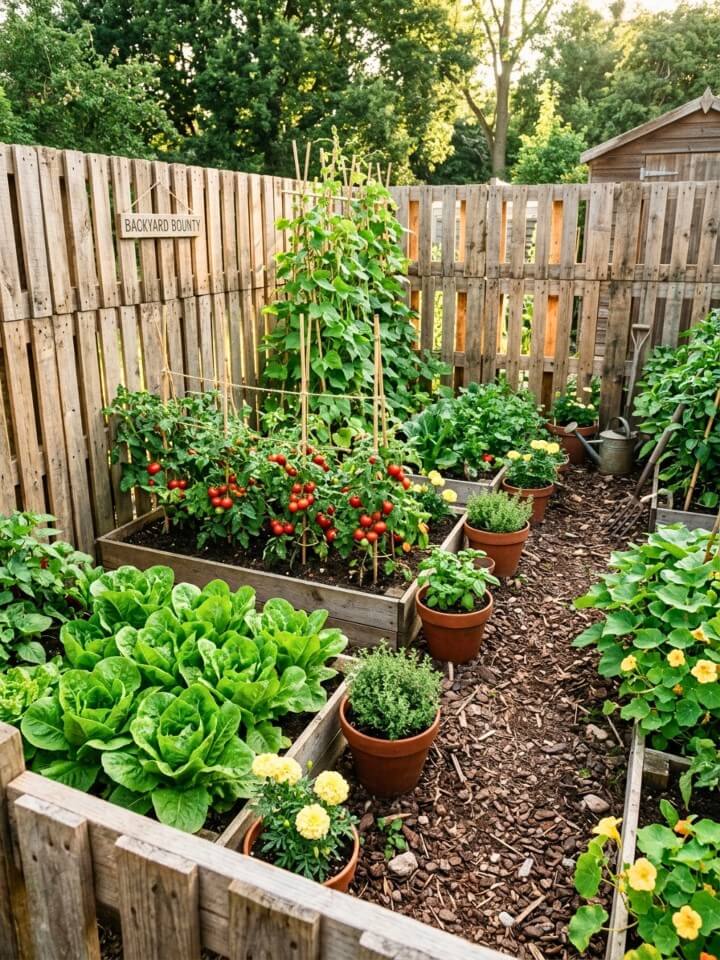
Pallets are free or nearly free, which makes this one of the most cost-effective fencing options available. It suits small to medium garden beds where a casual, handmade look fits in. Stand pallets vertically and secure them together with screws and wooden stakes. Fill large gaps with chicken wire to stop rabbits from squeezing through. You can paint or stain them to match your yard. Inside, quick-growing greens and climbing beans make the most of the space.
Steps to Build a Pallet Fence Properly
- Source heat-treated pallets only — look for the “HT” stamp to confirm they’re safe
- Check for protruding nails and remove or hammer them flat before handling
- Stand pallets upright and anchor each one with two wooden stakes driven into the ground
- Connect adjacent pallets with wood screws or metal brackets
- Staple chicken wire across any gaps wider than 2 inches
- Sand rough surfaces lightly if children will be working nearby
Note: Pallets are often free from local businesses; chicken wire costs around $20–$35 per roll.
7. Living Hedge Fence – Edible Plants as a Natural Barrier

A living hedge made from edible shrubs does two things at once. It creates a dense, natural boundary and provides food or herbs throughout the season. Rosemary, lavender, and thornless blackberries all work well. Plant them close together along the garden’s perimeter and trim regularly to maintain shape. The thick growth deters wildlife and creates a lush, windbreaking backdrop for tomatoes, lettuce, and peppers planted inside.
Choosing and Establishing Your Edible Hedge
Rosemary and lavender are the easiest starting points — both are drought-tolerant once established and deer tend to avoid them. Thornless blackberries need more management but reward you with fruit. If you want a softer ornamental layer near the edible hedge, these eye-opening lilac bush landscaping ideas can help you blend flowers, fragrance, and structure. Plant in early spring, spacing shrubs 18 to 24 inches apart for a dense fill. Water consistently for the first season. Expect the hedge to reach a useful height within 2 to 3 growing seasons. Trim twice a year to keep airflow moving through the interior beds
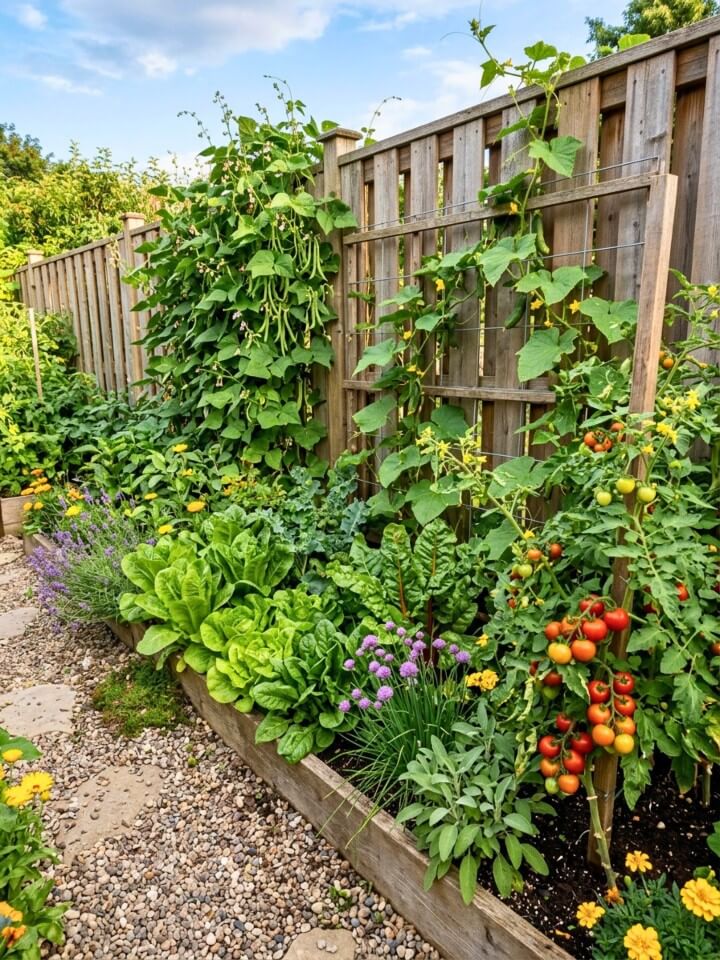
8. Wire Trellis Fence – Vertical Support for Climbing Crops
This is one of the most practical fencing options for narrow garden strips or long raised beds. Stretch sturdy galvanized wire horizontally between wooden or metal posts, creating 3 to 4 levels for peas, beans, cucumbers, or gourds. Plants grow upward instead of sprawling across the ground, which reduces rot and makes harvesting easier. The open structure also keeps the garden feeling spacious even in tight areas.
Building a Wire Trellis Fence Step by Step
- Drive posts into the ground every 6 to 8 feet along the garden edge
- Use 14-gauge galvanized wire for the horizontal runs — it holds crop weight without sagging
- Start the first wire run 12 inches from the ground
- Space additional runs 10–12 inches apart going upward
- Tighten each wire with a tensioning clip or by wrapping around the post twice
- Guide young plant stems toward the wire early in the season
9. Stone and Timber Mixed Border
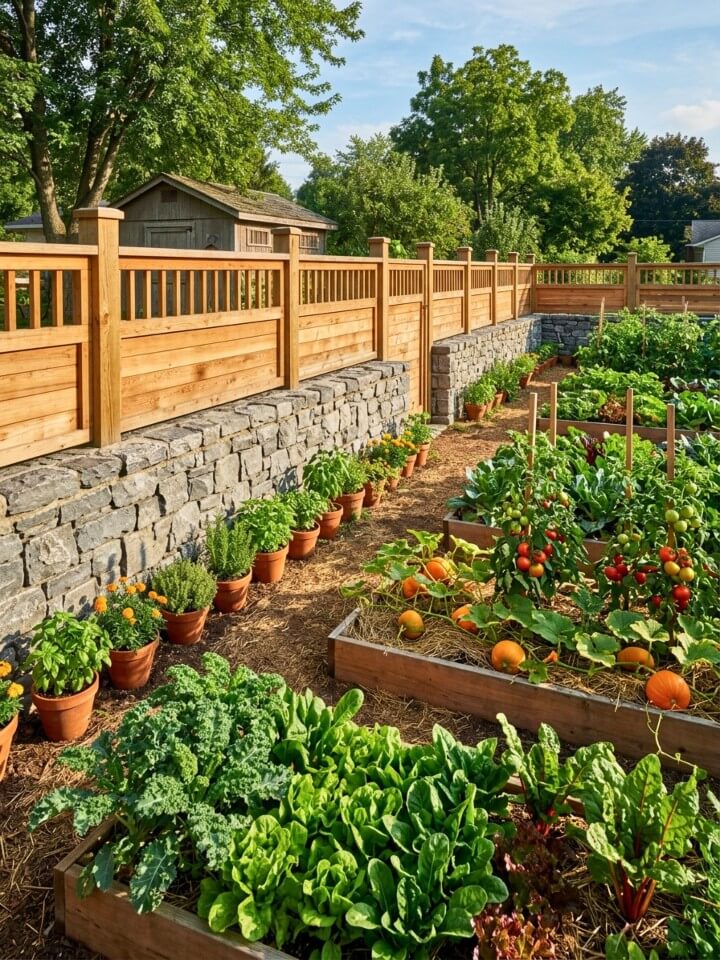
Few fencing styles feel as permanent and grounded as stone combined with timber. Stack flat stones for a low base of 12 to 18 inches, then attach timber panels or posts on top to bring the height up. This combination adds genuine texture and contrast to the garden. Plant root vegetables and leafy greens near the stone base where soil stays naturally cooler. The structure protects crops from foot traffic and small animals while looking like it belongs in the landscape.
Making the Stone-and-Timber Combination Work
The stone base does most of the heavy lifting here — both structurally and visually. Use flat fieldstone or stacked limestone for the base. Mortar is optional; dry-stacked stone holds well in most climates. Anchor timber posts directly behind the stone line rather than on top of it. Cedar or pressure-treated pine both work for the upper section. Keep the timber height between 2 and 3 feet above the stone base for balanced proportions.
Where to Buy: Stone from local quarries or landscape suppliers; timber from lumber yards or home improvement stores.
10. Colorful Painted Fence
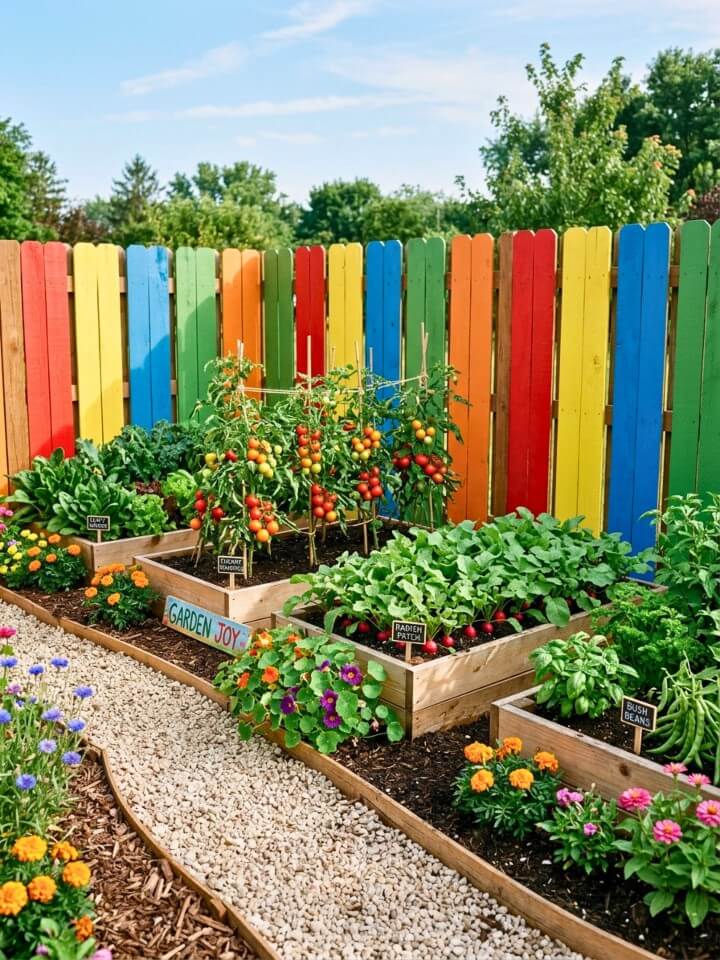
A brightly painted fence brings energy to a dedicated vegetable space and works especially well when children are involved in the garden. Paint each picket or panel in weather-resistant colors and consider labeling sections for different vegetables. Cherry tomatoes, radishes, and carrots grow quickly here, keeping young gardeners engaged. The fence marks a clear boundary that keeps pets and wildlife out while making the whole space feel like it belongs to the family.
Turning an Ordinary Fence Into a Garden Feature
Pick 3 to 4 colors that work together rather than painting every board a different shade — too many colors can feel chaotic. Use exterior-grade paint with a built-in primer for wood surfaces. Allow full drying time between coats, especially if the fence gets direct afternoon sun. Write vegetable names directly on the fence with outdoor chalk markers — these wash off easily if you want to repaint seasonally. Let kids choose the color scheme; ownership builds enthusiasm for garden chores.
Pro Tip: Exterior paint runs $25–$45 per gallon, enough to cover roughly 350–400 square feet.
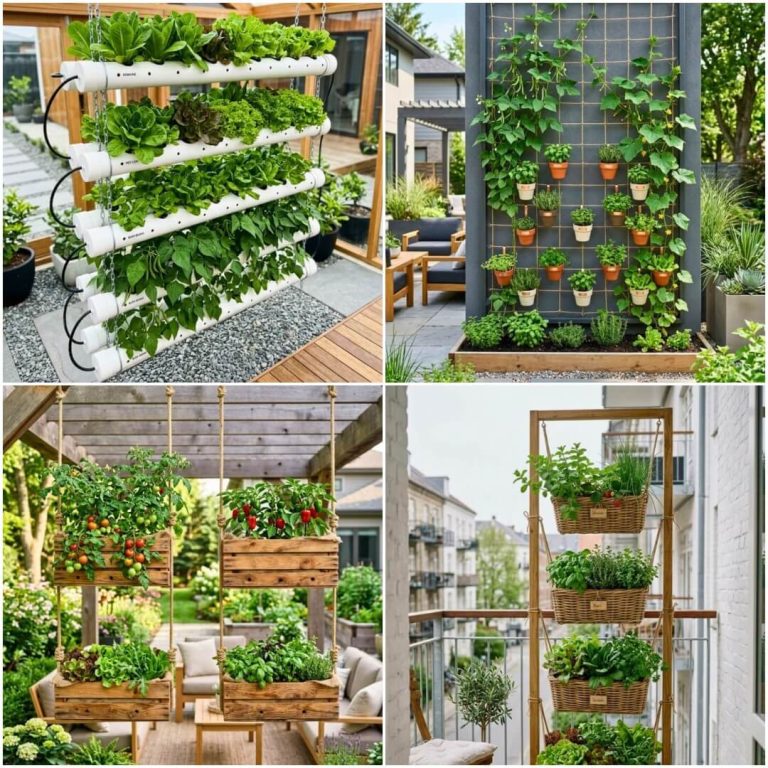
11. Vertical Planter Fence – Growing Up When Space Is Limited
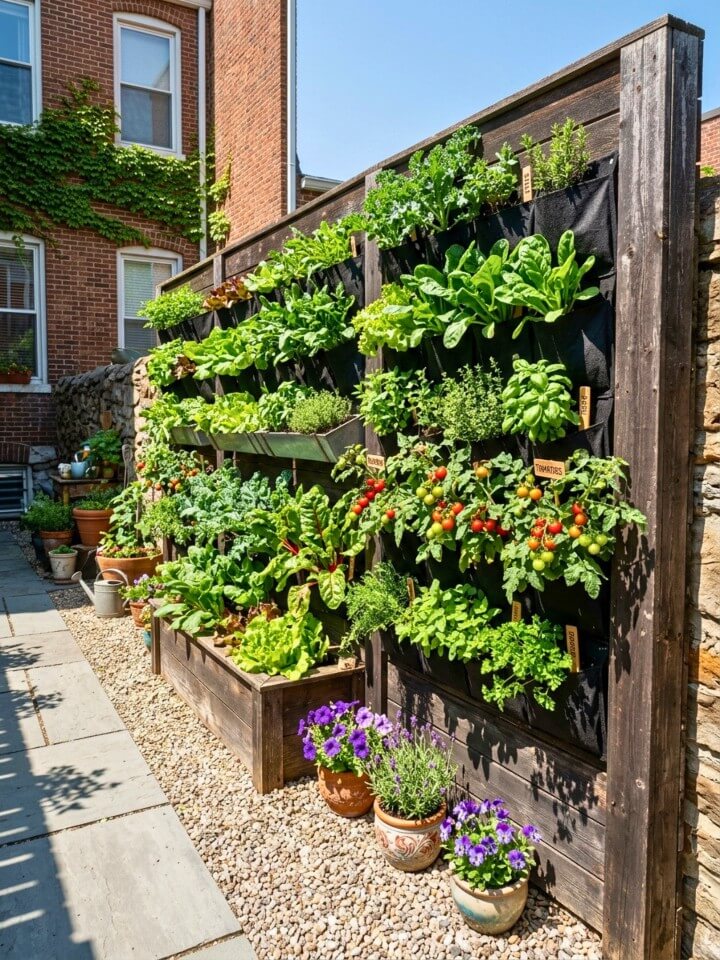
Wall space is often wasted in small gardens. A vertical planter fence changes that by turning the fence itself into a growing surface. Attach sturdy fabric pockets, wooden crates, or metal planters directly to a solid frame. Leafy greens, cherry tomatoes, and herbs all do well in this setup. Watering becomes simpler because everything is at eye level. For patios and balcony gardens, this approach is genuinely transformative.
Mounting Planters on a Fence That Actually Supports Them
The frame needs to be solid before anything gets attached. Use 4×4 posts with horizontal crossbars spaced every 12 inches. Fabric pocket systems work well for herbs and lettuce — they’re lightweight and drain naturally. For heavier crops like tomatoes, use wooden boxes with drainage holes screwed directly into the crossbars. Avoid overloading one section; distribute weight evenly across the frame. Check moisture daily since vertical planters dry out faster than ground beds.
12. Chicken Wire Enclosure – Simple Pest Protection That Works
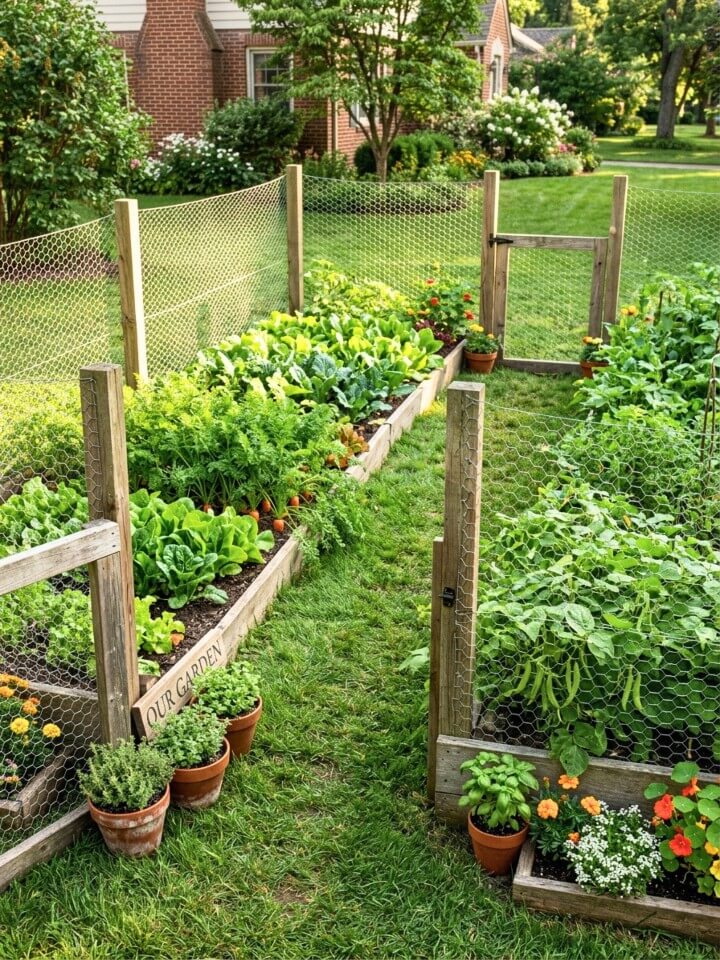
Sometimes the most straightforward solution is the best one. Chicken wire is affordable, flexible, and surprisingly effective against rabbits and small animals. It works around raised beds or open garden plots where pest pressure is high. The setup is simple enough for a beginner to complete in a single afternoon. Inside, leafy greens, beans, and root vegetables stay protected through the entire growing season.
Installing Chicken Wire the Right Way
Don’t just staple it to posts and call it done — that approach fails quickly. Here’s what actually works:
- Use wooden posts or metal T-posts driven at least 18 inches into the ground
- Choose 1-inch hex mesh rather than 2-inch — smaller holes block more pests
- Bury the bottom 6 inches of wire in an L-shape underground to stop digging
- Pull the wire taut before stapling to prevent sagging over time
- Add a simple wooden frame gate using the same mesh for the door panel
- Check and repair small holes at the start of each growing season
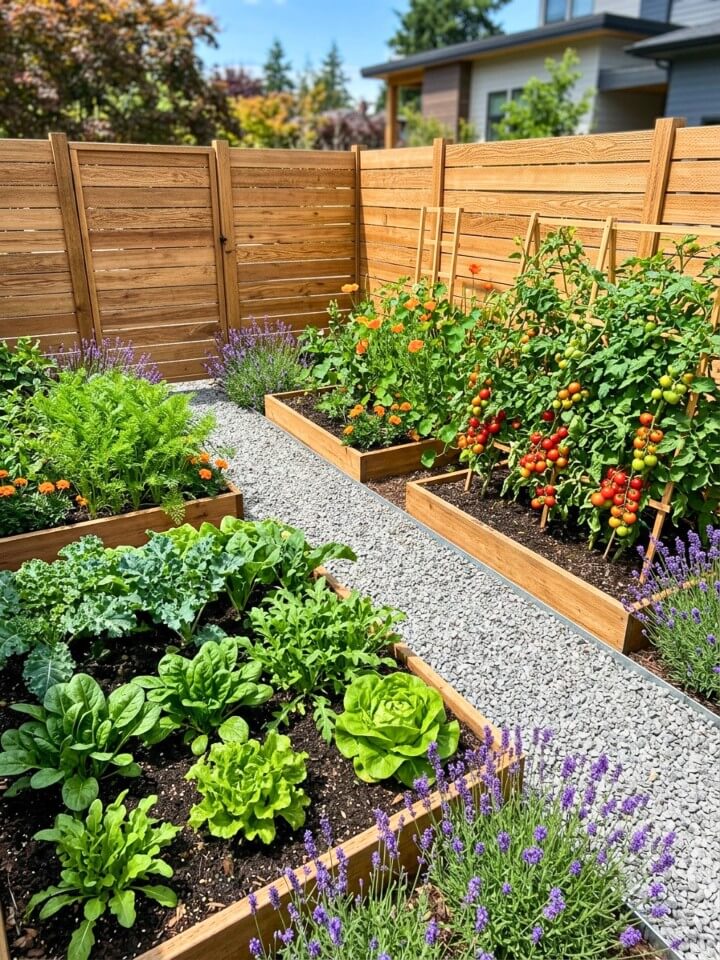
13. Horizontal Slat Fence with Veggie Beds
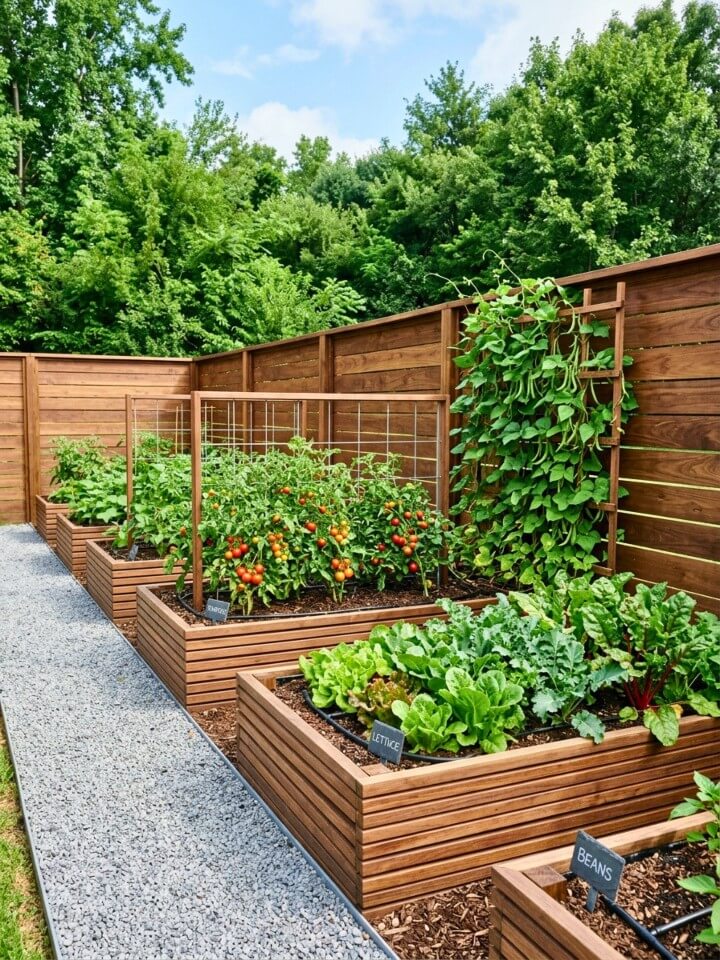
Clean horizontal lines give a vegetable garden a polished, intentional appearance. This style works best along patio edges or long garden borders where a contemporary aesthetic matters. Evenly spaced timber slats let air and light through while still forming a visible boundary. Plant lettuces, peppers, and herbs in raised beds along the base. The linear design keeps everything looking organized without feeling sterile or industrial.
Getting the Spacing and Proportions Right
Gap width between slats matters more than most people realize. Too narrow and airflow suffers. Too wide and the fence loses its visual presence. A 1.5 to 2-inch gap between 1×4 timber slats hits the right balance. Use cedar or composite boards — both handle outdoor moisture well. Attach slats to vertical posts rather than a solid backing so air moves freely behind the fence. Keep the overall height between 4 and 5 feet for good proportion against standard raised beds.
14. Vintage Iron Gate – Character and Security at the Garden Entrance
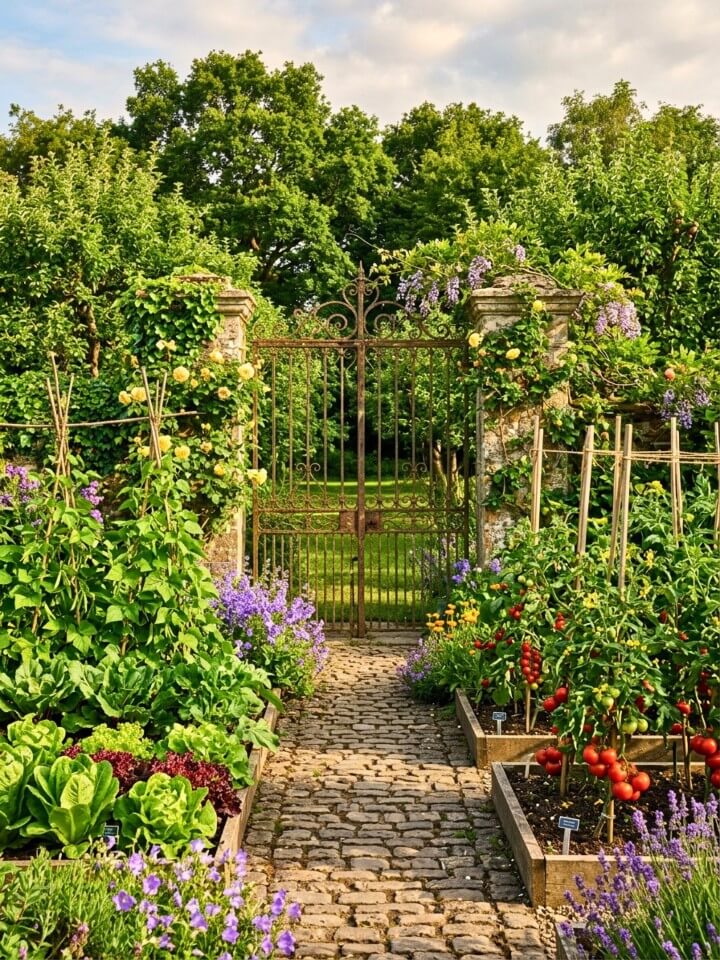
An iron gate brings a sense of arrival to a vegetable garden. It works best as a focal point at the entry rather than as full perimeter fencing. Pair it with low stone walls, wooden posts, or simple wire fencing on either side. Climbing peas, sweet peas, or beans soften the metal beautifully as they grow. The gate announces the garden as something worth entering — and keeps unwanted animals firmly outside.
Finding and Installing a Vintage-Style Iron Gate
Salvage yards and architectural antique dealers are the best sources for genuine vintage pieces. Reproduction gates are widely available at garden centers if authenticity isn’t essential. Check that hinges are solid and not corroded before buying secondhand. Set the gate posts in concrete at least 24 inches deep — iron gates are heavy and loose posts cause sagging quickly. Apply a rust-inhibiting primer and touch up annually to prevent corrosion in humid climates.
Where to buy: Architectural salvage yards, antique dealers, or garden specialty retailers carry both vintage and reproduction iron gates.
15. Raised Bed Fence with Built-In Seating
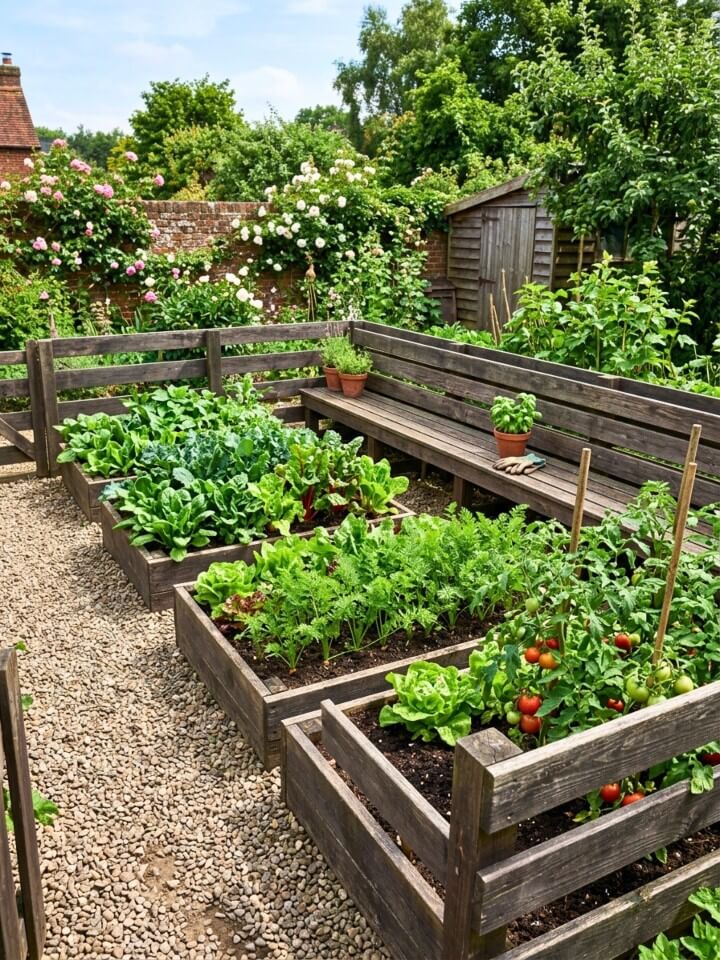
A fence that doubles as seating changes how you use the garden. This design works well in backyards and community gardens where people want to spend time, not just tend and leave. Build a low wooden enclosure around the raised beds and extend one side into a bench. The sitting height works best around 17 to 18 inches. Inside, grow a mix of greens, herbs, and root vegetables. Harvesting becomes something you sit down and enjoy rather than rush through.
Building the Seating Section Into the Fence Frame
The bench and fence need to share the same structural posts — don’t treat them as separate builds. Use 4×4 posts as the anchors for both. The bench seat can be two 2×6 boards laid side by side with a small gap for drainage. Sand all seating surfaces well to avoid splinters. Apply an exterior wood finish to the bench top specifically since it takes more wear than the fence panels. Keep the bench section on the side that gets afternoon shade if possible. For a more relaxed backyard gathering zone nearby, these awful gazebo furniture ideas.
16. Trellis Archway Entry – Where the Garden Begins
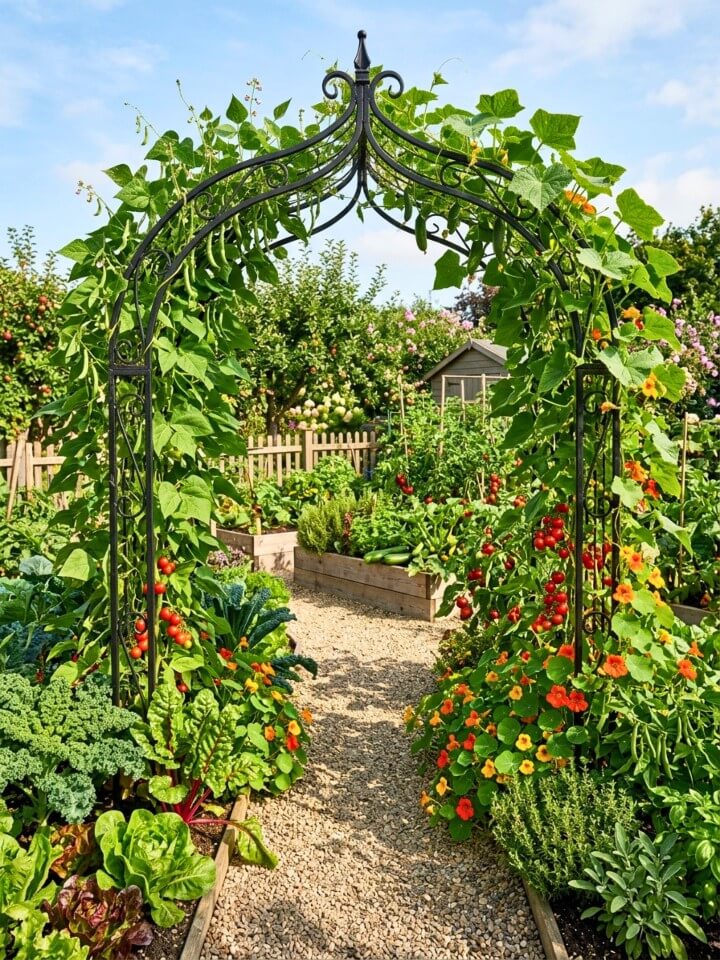
An arch at the garden entrance does more than look beautiful. It gives climbing vegetables a strong vertical framework right at the entry point. Beans, peas, and cucumbers grow up both sides naturally, eventually meeting overhead to form a living tunnel effect. The arch directs foot traffic, signals where the garden starts, and creates a sense of arrival. Small plots especially benefit because the height makes the whole space feel larger.
Choosing the Right Arch and Getting It to Last
Wooden arches look warm but need annual sealing to prevent rot at the base. Metal arches — powder-coated steel or aluminum — last significantly longer with almost no maintenance. Drive the legs at least 18 inches into the ground and set in concrete if the arch will support heavy crops like gourds. Attach trellis mesh or horizontal wire runs along the sides so plants have something to grip. Plant at the base in spring and guide the first few stems manually onto the structure.
Price range: Metal garden arches range from $40–$150 depending on width and material quality.
17. Stone Pillars with Wooden Panels
This combination brings genuine permanence to a vegetable garden boundary. Stone pillars handle the structural load while timber panels fill the space between them. The contrast of materials creates visual depth that a single-material fence rarely achieves. Tomatoes, peppers, and leafy greens planted along the panels get partial shade and wind protection as a bonus. Once built, this fence essentially lasts indefinitely with minimal upkeep.
How the Two Materials Work Together Structurally
Place stone pillars every 6 to 8 feet and pour concrete footings at least 24 inches deep. The timber panels slot or bolt between pillars rather than bearing weight independently. Use cedar, redwood, or pressure-treated pine for the panels since they’ll be exposed to soil moisture and weather year-round. Pre-drill all bolt holes to prevent wood splitting. Leave a half-inch gap between panel boards for drainage and airflow. Seal timber ends before installation — cut ends absorb moisture fastest.
18. Spiral Vegetable Tower – A Focal Point That Also Produces Food
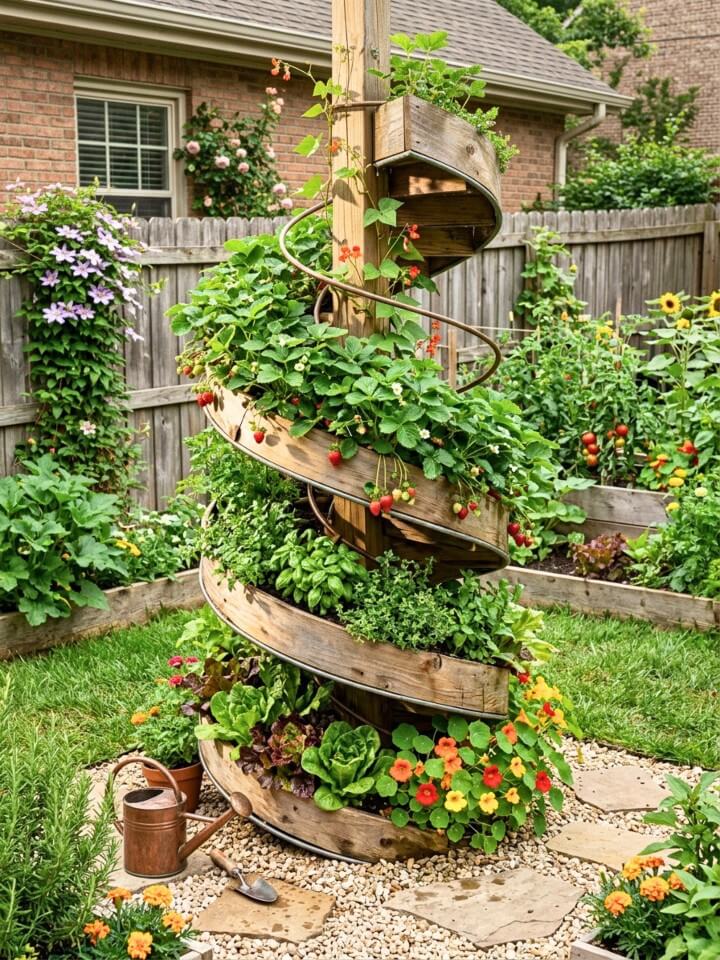
A spiral tower turns a tiny corner of the yard into productive vertical growing space. Herbs, lettuces, strawberries, and compact flowers all thrive in the tiered pockets along the spiral. The structure draws the eye naturally and becomes the most interesting feature in the garden. It works particularly well on patios or in corners where a traditional fence line doesn’t make sense. The footprint is small but the growing capacity is surprisingly generous.
Building or Buying a Spiral Tower That Holds Up Outdoors
Metal spiral frames made from galvanized steel or powder-coated iron hold up best outdoors. Wooden versions work too but need annual sealing. If building from scratch, construct a circular base roughly 5 feet in diameter and wind the growing path upward at a gradual incline. Fill each tier with well-draining potting mix rather than heavy garden soil. Plant moisture-loving herbs like basil at the bottom where water collects and drought-tolerant herbs like thyme near the top where it drains quickly.
Price Range: Pre-made spiral herb towers run $80–$200; DIY builds using stone or reclaimed brick cost less.
19. Log Stack Fence for Natural Look
Stacked logs create one of the most natural-looking garden boundaries possible. This style works best in larger backyards or properties near woodland where the materials are accessible. Beyond aesthetics, the logs retain soil moisture along the fence line and provide insulation for nearby root crops during temperature swings. Beetles and beneficial insects colonize the wood over time, which actually supports the surrounding garden ecosystem.
Sourcing and Stacking Logs That Stay in Place
Freshly cut logs shift as they dry and shrink — use seasoned wood where possible. Hardwood logs last longer than softwood before decomposing. Stack horizontally in a stable interlocking pattern, alternating the direction of each layer like a log cabin wall. Drive wooden stakes behind the stack every 3 feet to prevent rolling. Keep the stack at least 18 inches from the nearest vegetable bed to allow airflow and reduce slug habitat directly against plants.
Pro Tip: Local tree services often provide logs free or cheaply after removal jobs; timber yards sell seasoned cordwood by volume.
20. Corrugated Metal Fence with Planter Boxes
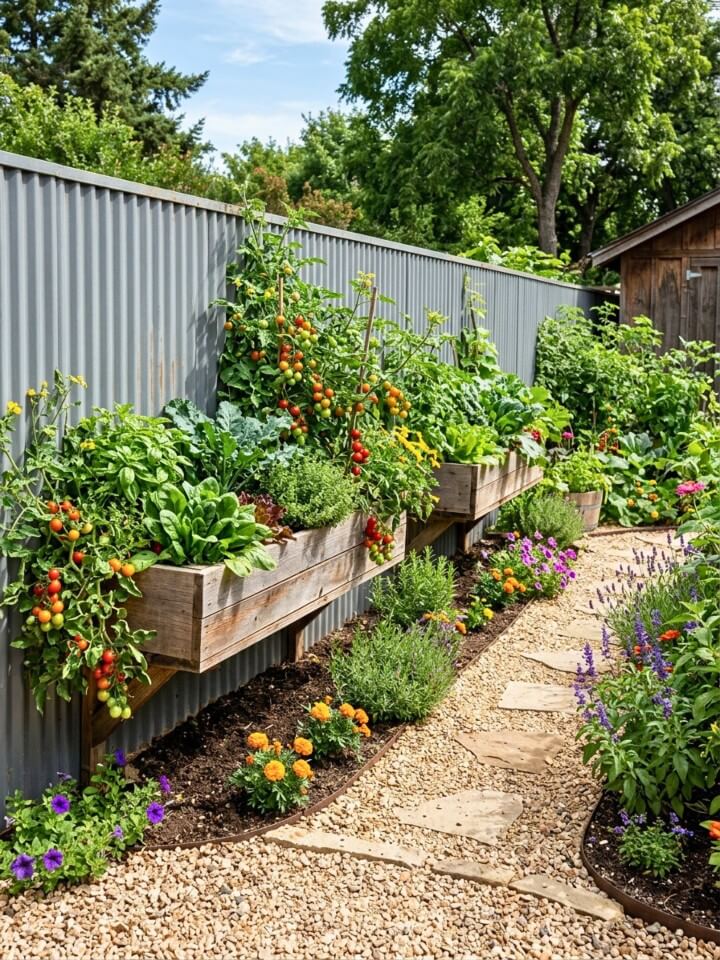
Corrugated metal panels are durable, weather-resistant, and increasingly popular in modern backyard designs. Attached planter boxes at various heights turn the fence into additional growing surface. Leafy greens, herbs, and compact fruiting plants all do well in wall-mounted boxes. The metal reflects light into shaded areas of the garden, which is a genuine practical benefit beyond aesthetics. Urban gardens and contemporary backyards suit this style particularly well.
Putting Together a Corrugated Metal Fence With Planters
Corrugated panels need a solid timber or steel frame — they’re not structural on their own. Build a rectangular frame from 4×4 posts and attach horizontal rails at top, middle, and base. Screw panels directly to the frame using hex-head roofing screws with rubber washers to prevent leaking at the holes. For planter boxes, use cedar or galvanized steel containers mounted on heavy-duty shelf brackets bolted through the panel. Drill drainage holes in every box before planting.
21. Split-Rail Fence with Climbing Vines
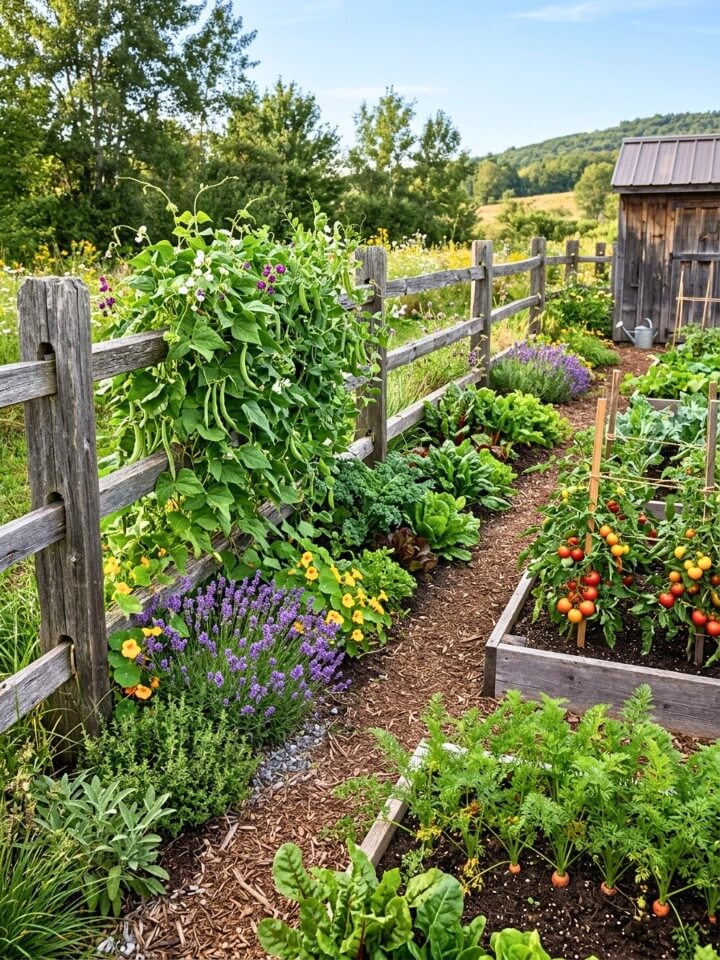
A split-rail fence paired with climbing vegetables has an effortless, lived-in quality that suits larger garden plots beautifully. The open structure lets sunlight and air move freely, which benefits crops on both sides of the fence. Beans, peas, and cucumbers weave through the rails naturally as they grow. Over a full season, the vines soften the wood completely. What starts as a bare fence gradually becomes a productive, green wall.
Letting the Vines Do the Work
Don’t fight the natural growth direction — guide it early and then step back. Plant climbers directly at each post base in spring. As stems reach the first rail, loosely tie them with garden twine rather than plastic clips. The split-rail gaps are wide, so fast-growing crops like pole beans fill them quickest. By midsummer, the fence essentially disappears behind foliage. Avoid heavy gourds on older rails — the weight causes sagging over time.
Price range: Split-rail fencing typically runs $3–$8 per linear foot for materials.
22. Recycled Window Frame Fence
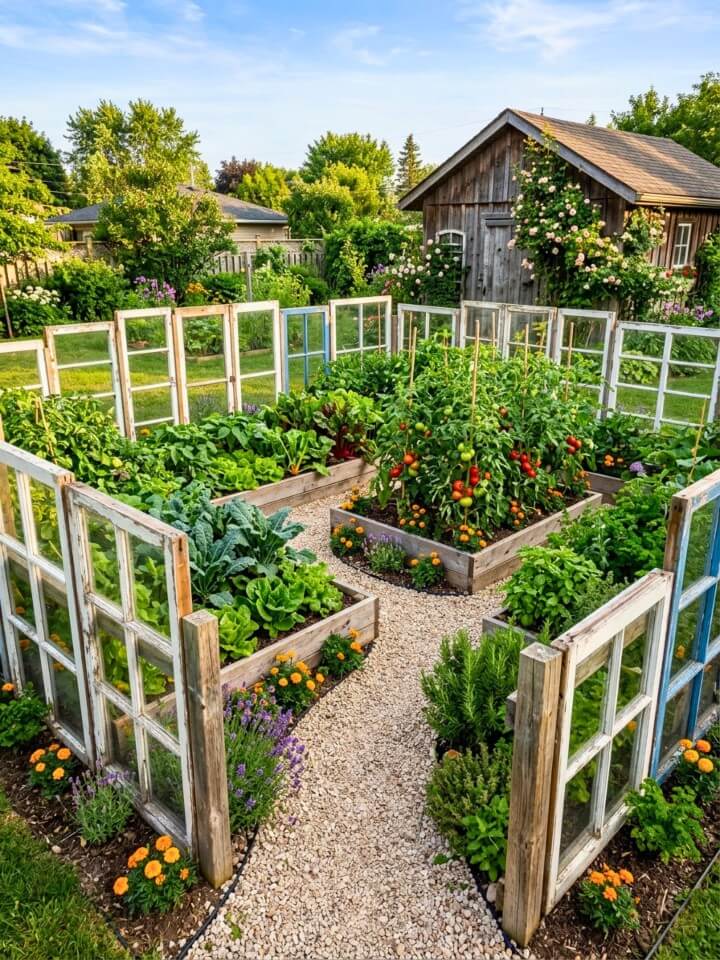
Old window frames standing upright create one of the most visually distinctive garden boundaries possible. Each frame brings its own shape, color, and patina. The glass or open panes allow sunlight through while still defining the garden edge clearly. Climbing plants like peas or morning glories thread through the frames over time, blurring the line between structure and garden. It looks curated and artistic without requiring significant investment.
Finding Frames and Making Them Structurally Sound
Architectural salvage yards are the best source for interesting frames in varied sizes. Check all frames for broken glass before transporting — replace panes or remove glass entirely for safety in active gardens. Drive a wooden stake into the ground behind each frame and attach with galvanized wire ties. Alternate tall and shorter frames for a naturally staggered silhouette. Seal any raw wood edges with exterior primer to slow weathering. Connect adjacent frames with wire or short timber sections to prevent toppling in wind.
Where to buy: Architectural salvage yards, estate sales, and building deconstruction companies often sell old window frames cheaply or in bulk.
23. Gabion Stone Fence with Herb Beds
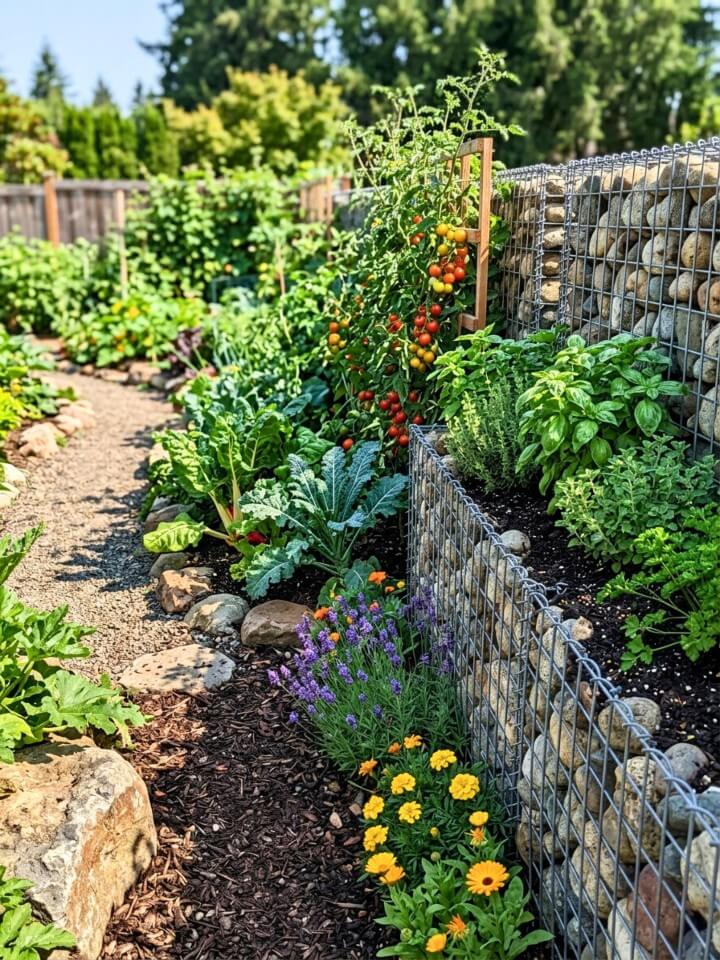
Gabion walls — wire cages filled with stones — bring serious visual weight to a garden boundary. They look striking and require almost no maintenance once built. The stone mass absorbs heat during the day and releases it slowly at night, creating a slightly warmer microclimate for nearby herbs and vegetables. Leave the top layer of cages partially open or unfilled to plant creeping thyme, sedums, or low herbs directly into the gaps. The fence genuinely earns its space.
Filling and Assembling Gabion Cages Correctly
Wire cage quality matters enormously here. Use galvanized or PVC-coated welded wire cages — plain steel rusts through within a few seasons. Fill with angular stones rather than rounded river rock since flat surfaces interlock and stay tightly packed. Wear gloves throughout the filling process. Stack no more than two cage units high without professional engineering advice — the weight accumulates quickly. Cap the top with a flat stone layer for a finished edge that also works as a narrow seating ledge if needed.
24. Low Decorative Fence – Subtle Border That Defines Without Dominating
Not every vegetable garden needs a tall perimeter fence. A low decorative border at 18 to 24 inches high does the job for smaller beds planted with lettuces, radishes, and herbs. It keeps foot traffic out, discourages small animals, and frames the planting area without creating a visual barrier. Along pathways or garden edges, this approach feels gentle and intentional rather than defensive. The garden remains open and inviting while still being clearly defined.
Picking Materials That Match the Garden’s Personality
Wood, metal, and composite materials all work at this height. Simple options include:
- Scallop-top picket panels for a traditional cottage look
- Flat-top cedar boards for a cleaner contemporary edge
- Powder-coated metal hoops for a minimal, almost invisible border
- Woven willow or hazel hurdle panels for a natural, textured feel
Keep the height consistent around the full perimeter for a tidy appearance. Anchor posts at least 12 inches deep even for low fencing — shallow posts rock and loosen quickly in soft garden soil.
25. Mixed Material Fence with Wood and Metal Accents
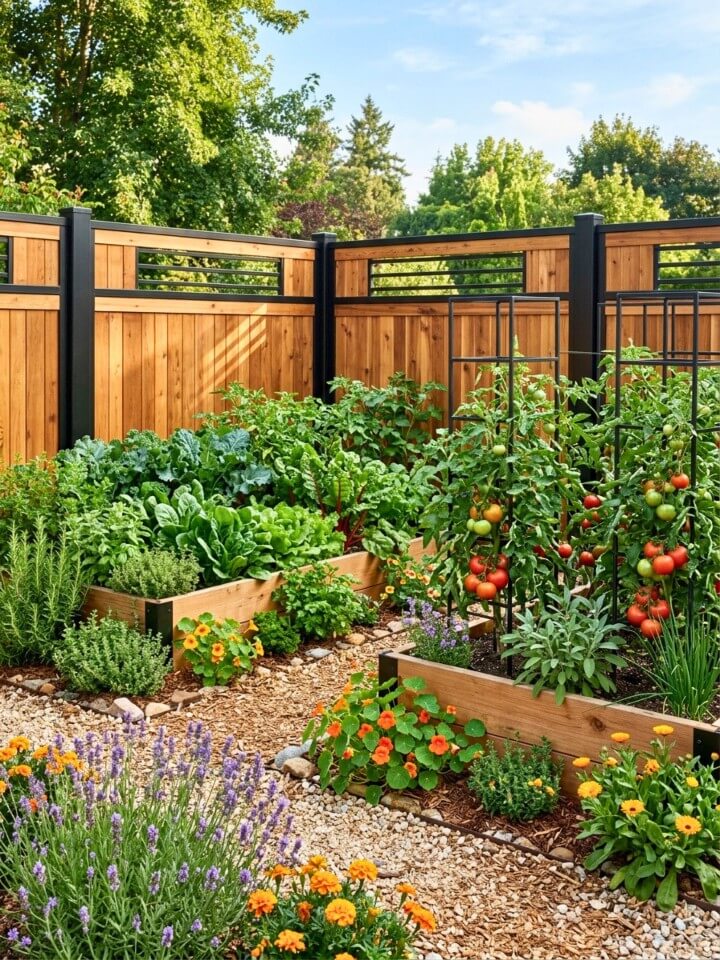
Combining timber and metal in a single fence creates a layered, textured boundary that neither material achieves alone. Wood brings warmth and a natural feel while metal adds structure, contrast, and longevity. This works well around medium to large garden plots where both style and durability matter. Tomatoes and beans grown against the wooden sections get good support. The metal elements handle the structural load so the timber doesn’t need to be as heavy.
Combining the Two Materials Without It Looking Forced
The key is proportion — let one material dominate and use the other as an accent. A mostly timber fence with metal mesh infill panels reads cleanly. Alternatively, metal posts with horizontal timber boards between them works equally well. Stick to one metal finish throughout — mixing raw steel with powder-coated black looks unfinished. Use stainless or galvanized hardware exclusively so fasteners don’t rust and stain the wood over time.
Price range: Expect $15–$40 per linear foot depending on the ratio of metal to timber used.
26. Living Willow Fence – A Boundary That Keeps Growing
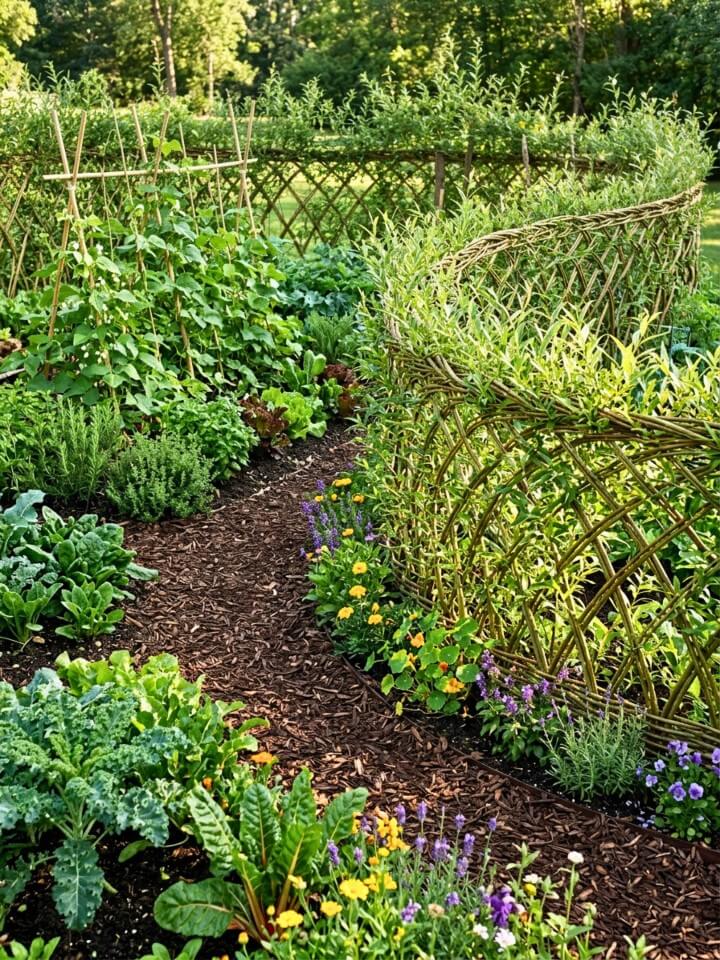
Willow is one of the fastest-growing plants available for garden fencing. Young stems planted close together and woven as they grow form a dense, flexible barrier within a single season. The living structure gets stronger and fuller each year. It provides wind shelter, filters light, and creates a genuinely soft backdrop for vegetable beds. Leafy greens and climbing beans planted along the inside benefit from the microclimate the willow creates. In warm, humid regions, it also pairs well with impressive low-maintenance Florida landscaping ideas that favor durable, easy-care outdoor structure.
Planting and Weaving Willow the Right Way
Use fresh willow rods — also called withies — cut in late winter before buds open. Push them directly into moist soil at a 45-degree angle in two rows, forming a diamond pattern. Where rods cross, tie loosely with natural twine. As growth begins, weave new shoots horizontally through the upright stems. Trim side shoots regularly to encourage the main structure to thicken. Keep the base well-watered through the first summer – willow roots fast but needs consistent moisture to establish firmly.
27. Modular Panel Fence for Easy Expansion
Gardens change from season to season — beds move, crops rotate, layouts shift. A modular panel fence accommodates that naturally. Individual panels connect with simple brackets and can be added, removed, or repositioned without tools in most systems. This works well for gardeners who are still figuring out their ideal layout or who share space with changing uses. Tomatoes, peppers, and beans grow against the panels comfortably while the system remains adaptable.
Choosing a Modular System That Actually Stays Put
Not all modular fencing is equally stable — cheaper systems loosen at connection points after one winter. Look for these features when selecting:
- Interlocking steel or aluminum connectors rather than plastic clips
- Post stakes that drive at least 12 inches into the ground
- Panel widths between 6 and 8 feet for good rigidity
- Compatibility with corner and gate add-on pieces
- Powder-coated or galvanized finish to resist rust
Avoid systems that rely entirely on tension between panels for stability. In open garden settings, wind resistance depends on proper anchoring at each post point.
28. Chalkboard Fence – Interactive Garden Boundary for Families
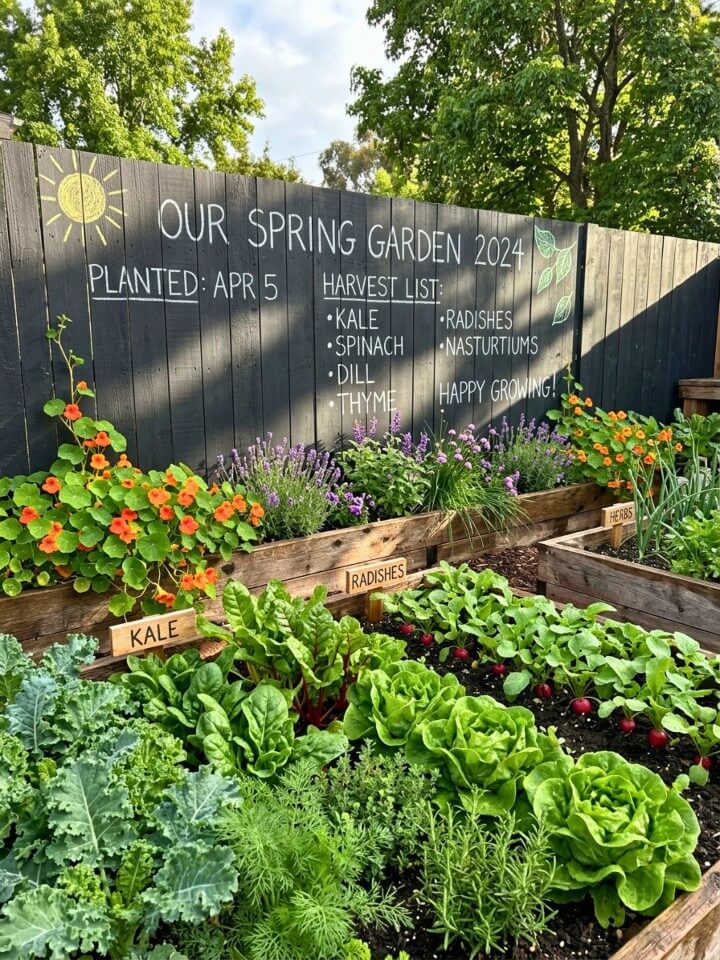
Painting a wooden fence with chalkboard paint transforms it into a functional surface for planting notes, vegetable labels, and seasonal reminders. It works especially well in family gardens where children are involved. Mark planting dates, track germination, or let kids draw and label their own sections. The fence keeps small animals out while keeping the whole family engaged with what’s growing. Radishes, lettuce, and herbs are ideal inside — they grow fast enough to hold a child’s attention.
Applying Chalkboard Paint to an Outdoor Fence Properly
Interior chalkboard paint fails quickly outside — use only exterior-grade formulas specifically designed for outdoor surfaces. Sand the fence boards smooth before painting for the best writing surface. Apply two full coats, allowing 24 hours of drying time between each. Before first use, season the surface by rubbing the flat side of a chalk stick across the entire painted area and then wiping clean — this prevents permanent ghosting from early marks. Reapply paint every one to two seasons depending on sun and rain exposure.
29. Rustic Branch Fence – Handmade Woodland Boundary
Gathering branches from your own property and building a fence from them is one of the most satisfying DIY garden projects possible. The result looks entirely at home in a natural or woodland-style yard. No two branch fences look alike, which gives this style an authenticity that bought fencing rarely matches. Beans and peas climb through the irregular gaps willingly. The whole structure settles into the landscape quickly and looks like it has always been there.
Selecting and Securing Branches That Last More Than One Season
Hardwood branches outlast softwood significantly — oak, hickory, and locust are ideal. Avoid branches that are already showing signs of decay or fungal growth. Drive sturdy wooden stakes into the ground as the primary support structure first. Weave or stack branches between the stakes rather than relying on the branches themselves to bear load. Bind crossing points with natural jute twine rather than plastic ties, which look out of place. Expect to replace some branches every two to three seasons as they decompose naturally.
Where to buy: Materials come from your own yard, neighbors, or tree trimming services — this is intentionally a no-cost or near-zero-cost option.
30. Staggered Height Fence for Visual Interest
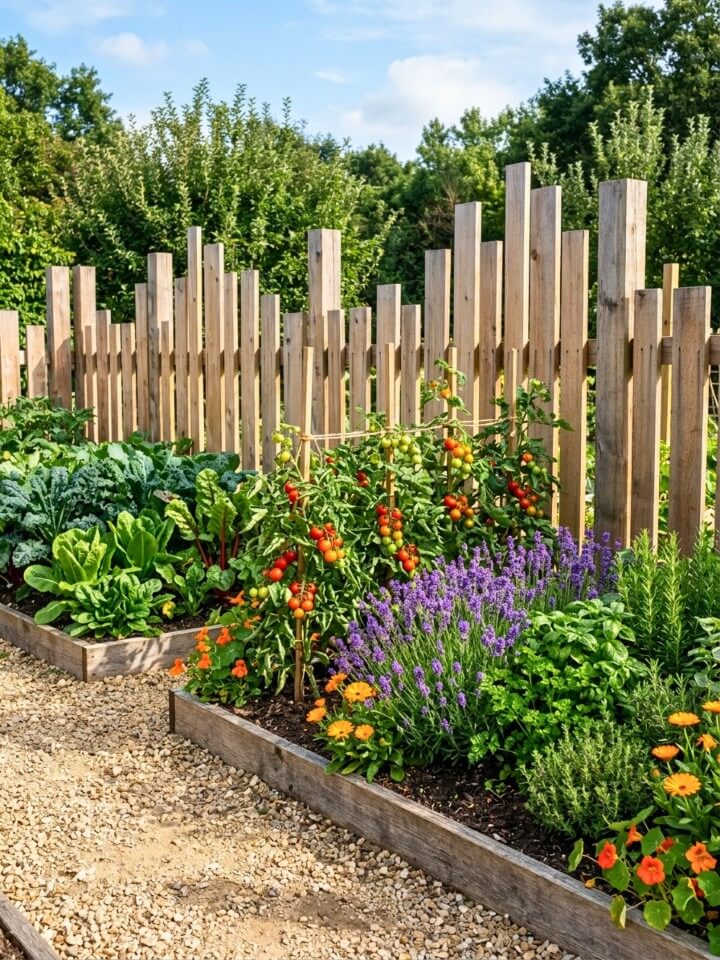
Alternating fence panels or posts at different heights creates a dynamic boundary that draws the eye across the garden rather than stopping it. Taller sections support climbing crops like peas and indeterminate tomatoes while shorter sections let light reach lower-growing vegetables nearby. The variation feels deliberate and designed rather than accidental. Wire or mesh fills the gaps between panels to maintain pest protection at every height. This style suits long garden borders particularly well.
Planning the Height Variation Before You Build
Sketch the pattern before buying materials — random variation looks unplanned while a consistent rhythm looks intentional. A simple alternating pattern of tall-short-tall works well. Keep height differences meaningful: at least 12 to 18 inches between high and low sections for visual impact. Use the same post material throughout so the variation reads as a design choice rather than a repair job. Taller sections work best placed on the north side of the garden so they don’t cast shadow over shorter sections during peak growing hours.
31. Vertical Slat Fence with Built-In Trellises
Evenly spaced vertical slats give a garden boundary a clean, architectural quality. Incorporating trellis panels directly into the design means the fence supports climbing crops without any additional structure. Beans, cucumbers, and peas grow up naturally while the slats provide privacy at eye level. The combination works especially well along property lines or patio edges where both function and appearance matter. Nothing about this design looks temporary or makeshift — it reads as a permanent, intentional feature.
Integrating Trellis Panels Without Breaking the Fence’s Clean Lines
The trellis sections need to sit flush with the slat surface rather than projecting forward — otherwise the clean profile disappears. Recess trellis mesh into the frame opening between posts so the front face remains flat. Use the same timber species for both slats and trellis framing so weathering stays consistent across the whole fence. Space trellis sections strategically where climbing crops are planned rather than running them along the full length. This keeps the fence looking structured and intentional rather than covered.
Note: Combined slat-and-trellis fence construction typically runs $20–$45 per linear foot depending on timber quality and trellis style.
FAQs About Fenced Vegetable Garden Ideas
These are the most common things gardeners want to know before building a fence around their vegetable garden – and the answers are simpler than you might expect.
How Deep Should Fence Posts Be Set for A Vegetable Garden?
For most vegetable garden fences, posts should go at least 18 to 24 inches deep. Deeper posts resist wind, frost heave, and soil shifting. Always set corner posts deeper than middle posts since they handle the most structural stress.
What Is the Best Fence Height to Keep Deer out Of a Vegetable Garden?
Deer can jump surprisingly high. A fence needs to be at least 7 to 8 feet tall to reliably deter them. Alternatively, a double fence with two shorter barriers spaced three feet apart confuses deer and works nearly as effectively.
Can I Build a Vegetable Garden Fence without Concrete?
Yes. Drive metal T-posts or wooden stakes deep enough into firm soil and they hold well without concrete. However, corner posts and gate posts carry more load and benefit significantly from concrete footings for long-term stability.
How Do I Stop Animals from Digging Under My Vegetable Garden Fence?
Bury the bottom six inches of wire mesh in an L-shape, bending it outward underground. This physical barrier stops rabbits, groundhogs, and other diggers from tunneling beneath the fence line without requiring a deep trench.
What Low-Maintenance Fencing Material Lasts Longest Outdoors?
Galvanized steel, powder-coated metal, and pressure-treated cedar consistently outlast other materials outdoors. Metal requires almost no upkeep beyond occasional cleaning. Cedar naturally resists rot and insects, making it the best low-maintenance wood option for garden fencing.
Conclusion:
A fenced vegetable garden isn’t just about keeping rabbits out – it’s about creating a space that feels intentional, cared for, and worth spending time in. Whether you go with simple chicken wire or stone pillars with timber panels, the right fence changes how you experience your garden every single day. It shapes the light, directs foot traffic, supports your crops, and quietly tells anyone walking past that something good is growing here. Start with what fits your budget and yard right now. You can always build on it. The best gardens never really finish – they just keep getting better season by season.