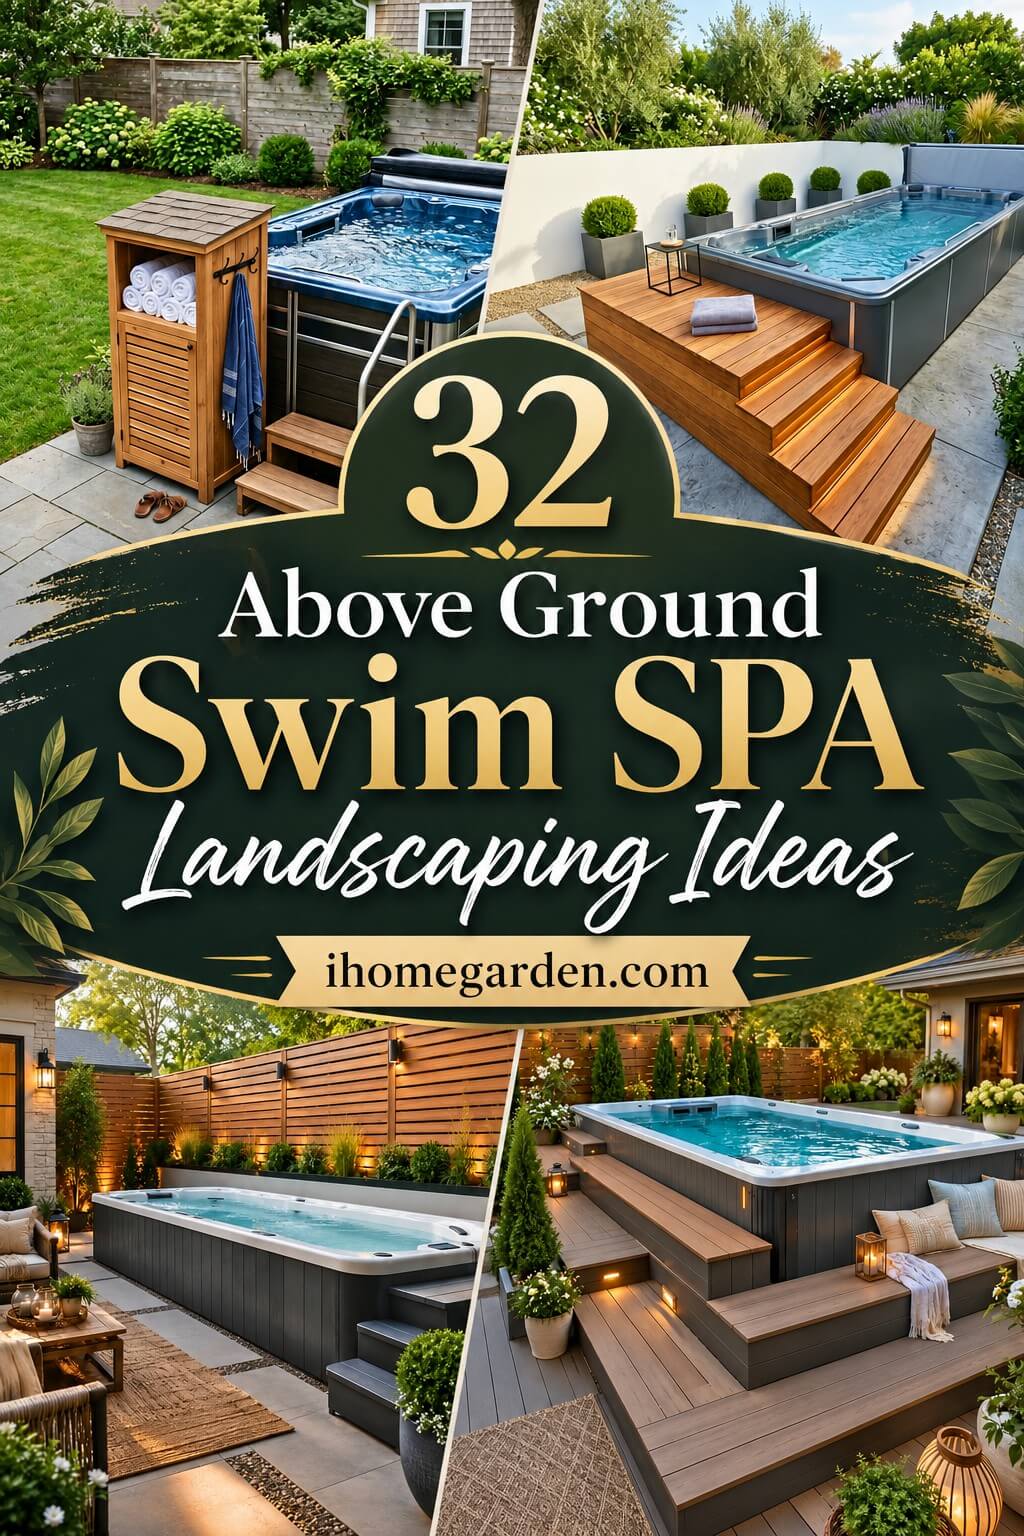
32 Above Ground Swim SPA Landscaping Layouts To Explore
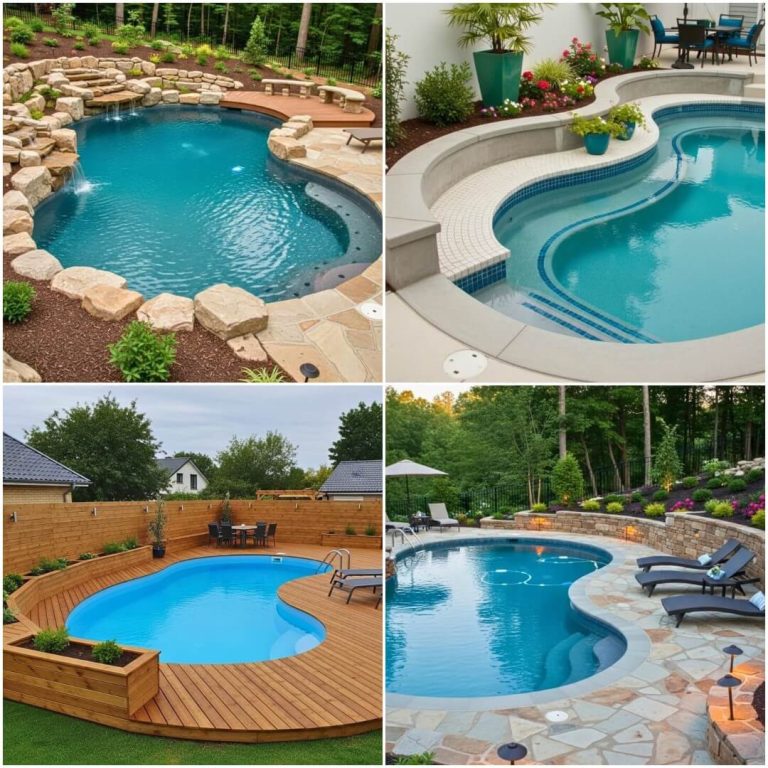
Most swim spas end up sitting in the middle of a yard like an afterthought — functional, yes, but looking like something that was delivered and never truly settled in. With the right 32 gorgeous above ground swim spa landscaping ideas, that changes quickly. A little planning around the outside turns the whole setup into something that looks like it genuinely belongs where it sits.
The space surrounding a spa affects how often people actually use it. A muddy path, zero shade, and no place to set a towel makes the whole experience feel unfinished. Good landscaping solves those small frustrations quietly — adding privacy, safe footing, shade, and somewhere to sit without making the yard feel overcrowded or overdone.
These landscaping ideas range from simple gravel borders and stepping stone paths to pergolas, raised beds, and built-in seating. Some take a weekend, others need a little more planning. Either way, there is something here worth using — keep reading to find what fits your space.
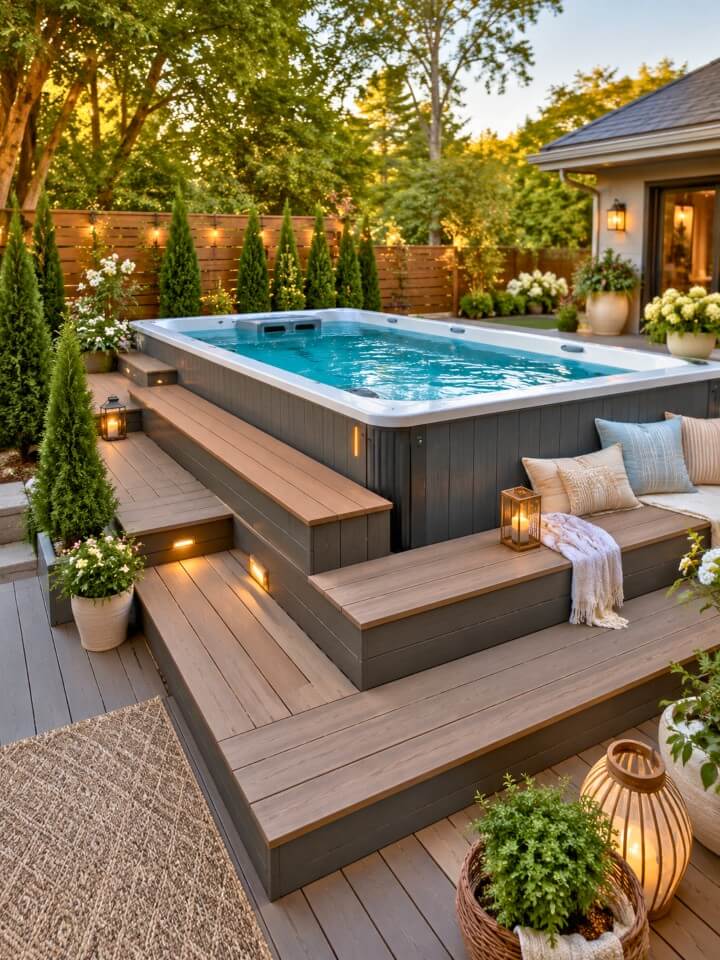
1. Build a Corner Deck With Built-In Seating
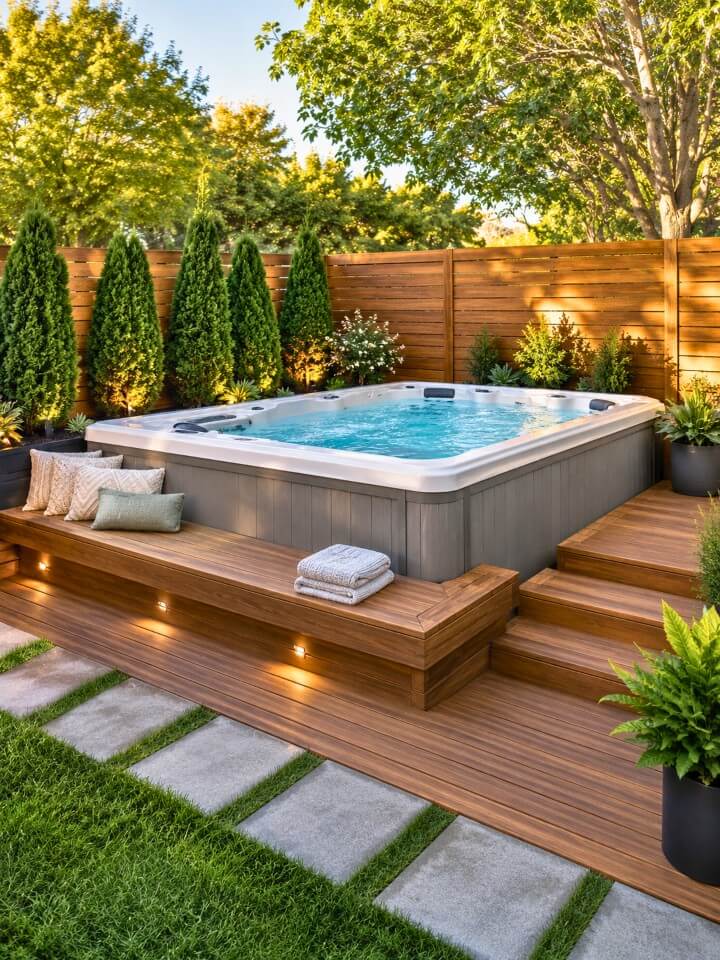
Positioning the spa in a back corner and wrapping a deck around two sides makes efficient use of space that often goes unused in fenced yards. Built-in bench seating along the outer deck edge eliminates the need for separate furniture and keeps the area from feeling cluttered. Frame the bench at seventeen to eighteen inches high — standard seat height — and build it deep enough at fifteen to sixteen inches for comfortable sitting. Composite decking on both the platform and bench faces creates a unified look that requires almost no seasonal maintenance. Leave a gap between the bench back and any fence for airflow and to prevent moisture buildup behind the structure.
Designing for Drainage
Gap deck boards a quarter-inch apart during installation to allow water to drain freely. Boards laid too tight trap moisture between them and accelerate surface deterioration even on composite materials.
2. Add a Stepping Stone Path Across the Lawn
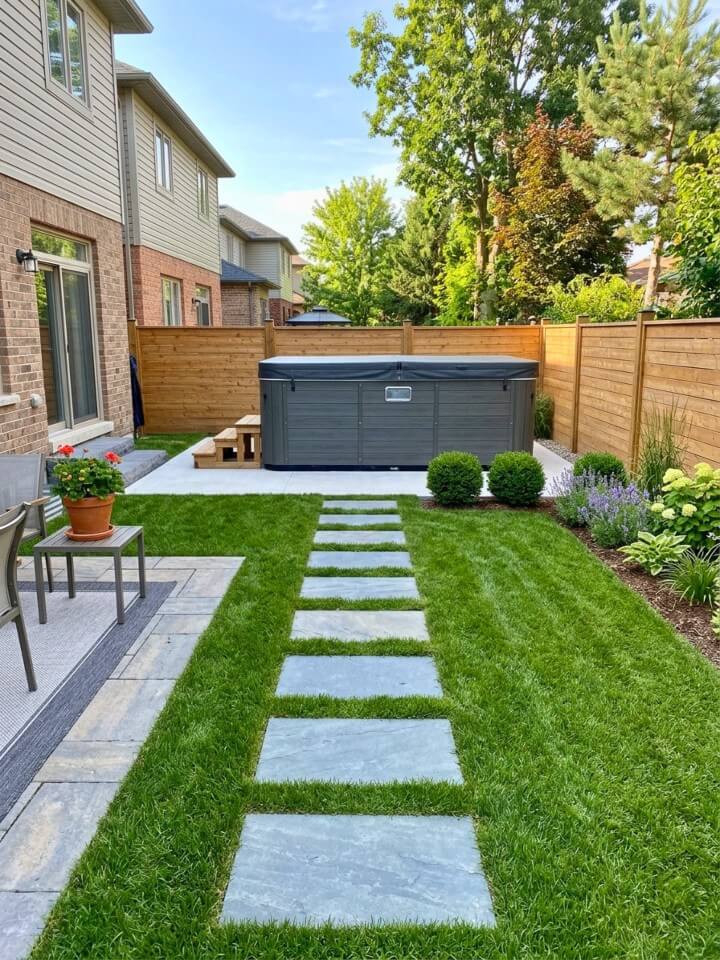
Grass wears thin quickly along any route that gets daily foot traffic, leaving bare muddy strips that are difficult to restore. Stepping stones interrupt that wear pattern by giving feet a surface to land on rather than grinding the turf down. Bluestone is dense, flat, and stays grippy when wet — practical qualities near any water feature. Set each stone so the top sits flush with the surrounding lawn, making mowing easier and reducing trip hazards. Space them to match a natural walking stride, roughly eighteen to twenty-four inches from center to center, so the path feels comfortable rather than forced.
Bedding Stones So They Stay Level
Dig each stone into a sand and gravel base rather than setting them directly on soil. Soil-set stones rock, sink unevenly, and frost-heave in cold climates — a two-inch sand bed keeps them stable season after season.
3. Add a Pergola for Light Shade
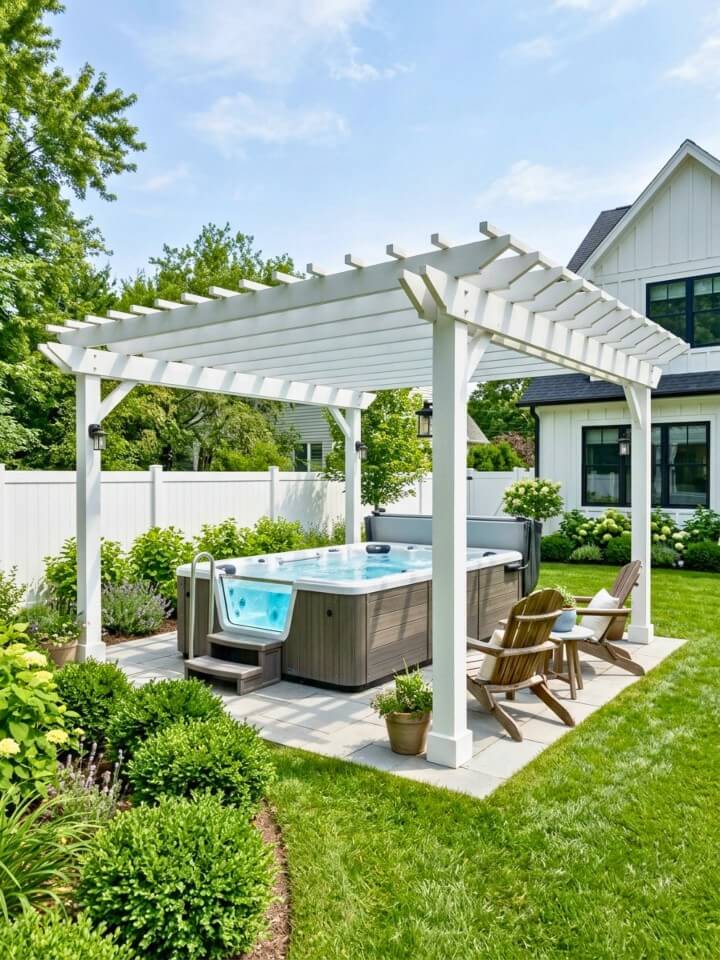
A pergola over or beside the swim spa cuts the harshest afternoon sun without making the space feel enclosed. A freestanding 10×12 structure works well for most spa setups and doesn’t require attaching anything to the house. Use cedar or Douglas fir for a natural finish that weathers gracefully, or powder-coated aluminum if you want something that needs almost no maintenance.
Leave the rafters open rather than covering the top — solid roofing traps humidity and makes the area feel heavy. If wind is a concern in your yard, angle the structure slightly and add a lattice panel on the exposed side, similar to how unique fence line landscaping ideas use vertical structure to soften exposed edges.
Sizing the Pergola Correctly
The pergola should extend at least two feet past the spa edge on the sitting side so there’s shaded floor space to stand and dry off. A structure that only covers the water itself misses most of the practical benefit.
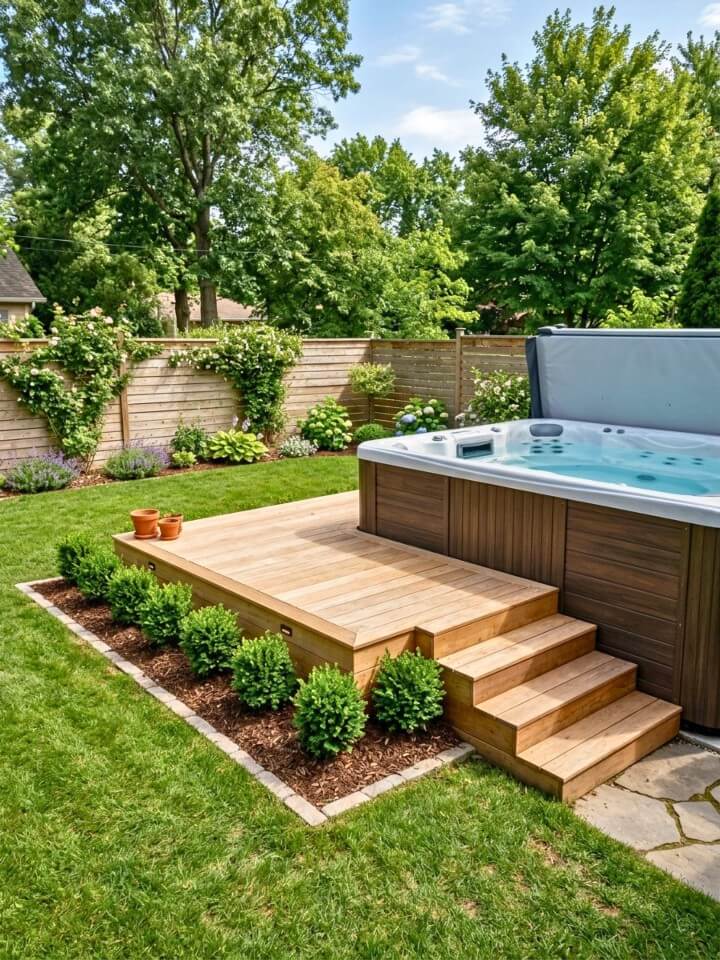
4. Add a Low Deck Along One Side
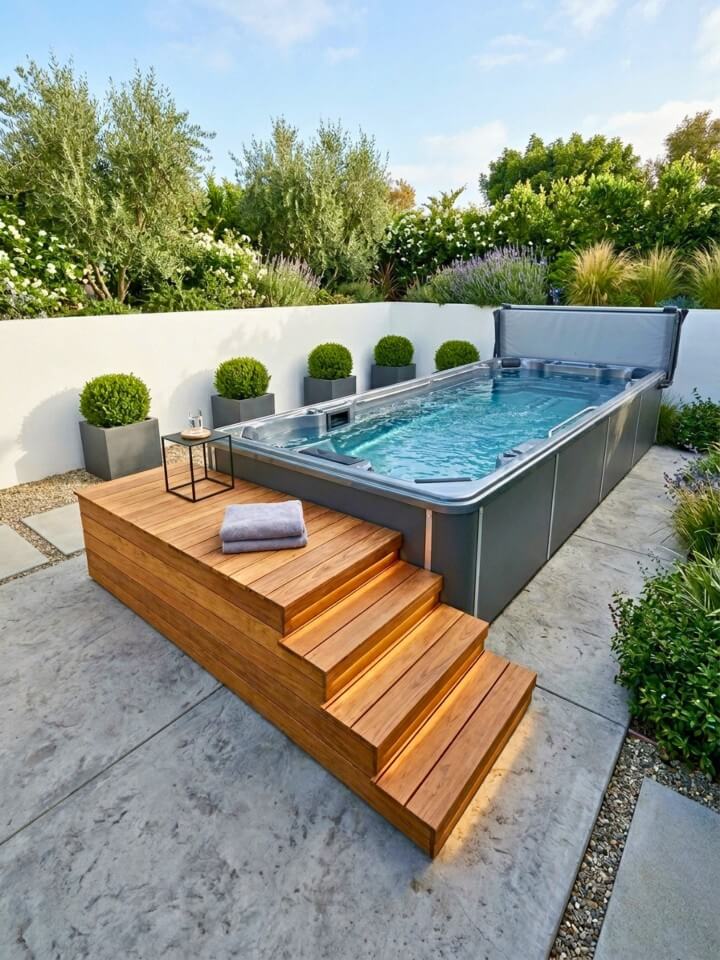
A low deck built along one long side of the spa gives everyone a stable place to step in and out without rushing. Use pressure-treated lumber for a budget-friendly build, or go with composite boards if you want something that holds up better through wet seasons. Keep the deck surface level with the spa rim — even a two-inch gap can feel awkward underfoot. Add a simple handrail on the open edge for safety, especially if kids or older adults use the spa regularly. Width-wise, four feet of decking gives enough room to move without crowding.
Choosing Your Decking Material
Composite boards cost more upfront but resist warping and splintering far better than wood in humid conditions. If you go with wood, cedar and redwood handle moisture well and won’t need replacing for years with basic annual sealing.
5. Use Tall Planters for Privacy
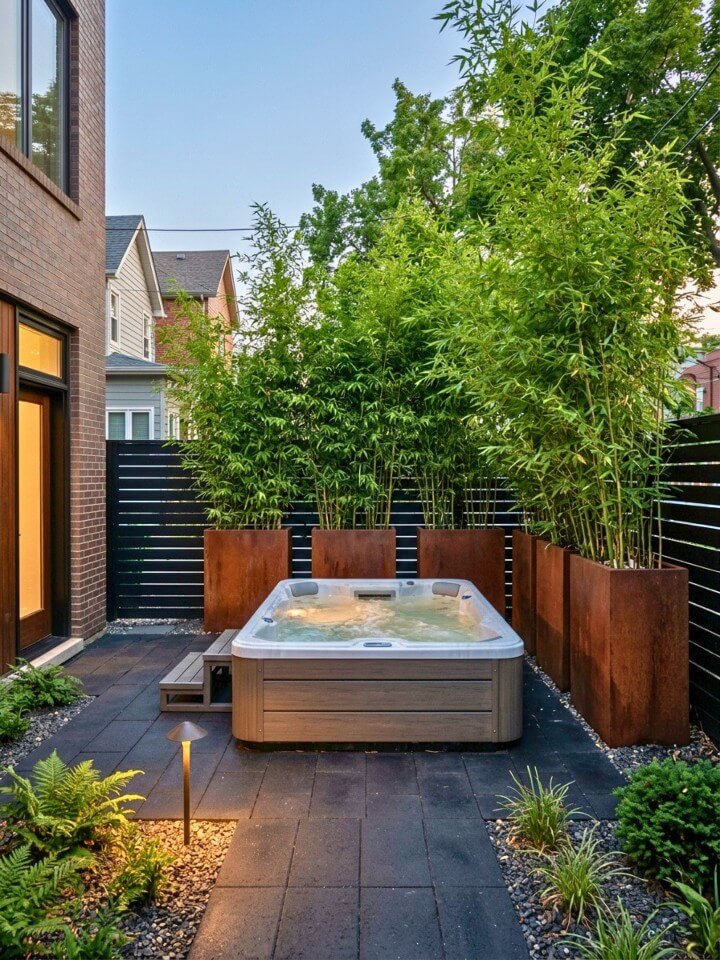
Instead of building a fence, tall planters let you control exactly where the screening goes and move things around if the layout changes. Arborvitae in large planters can reach six feet or more within a couple of seasons, giving solid coverage on the neighbor-facing side. Bamboo works faster but needs a root barrier inside the planter to stop spreading. For a softer look, mix ornamental grasses with a few tall evergreen shrubs. Use planters that are at least 18 inches wide and deep so roots have room and the plants don’t dry out after a few hot days.
Picking the Right Planter Size
Lightweight fiberglass planters are easier to reposition than concrete or stone, which matters if you ever want to shift the layout. Dark-colored planters absorb heat, so check soil moisture more often during summer months.
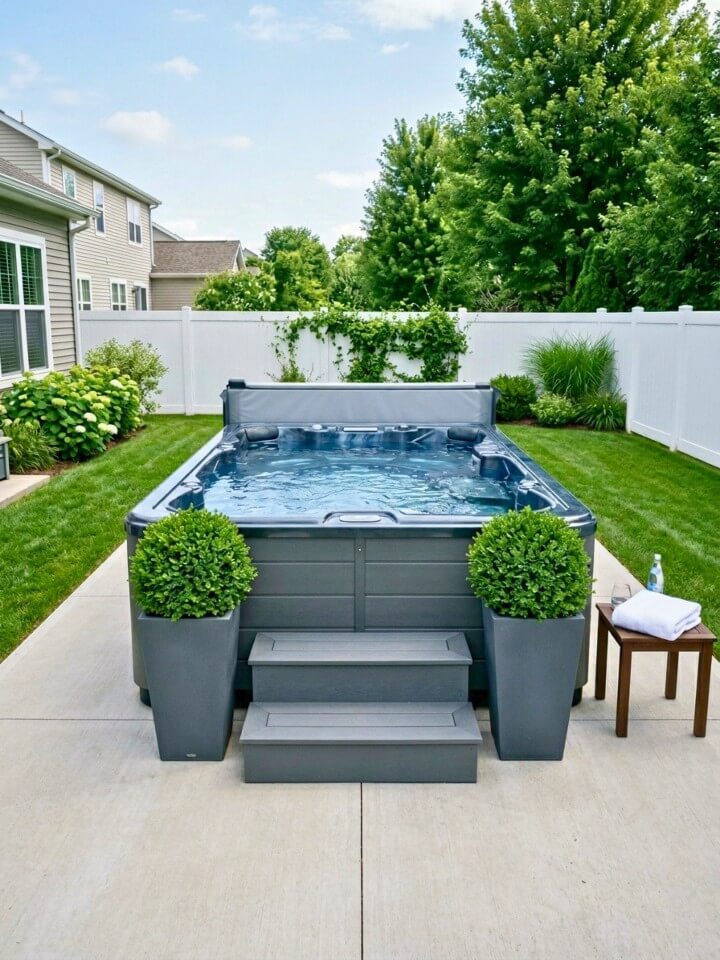
6. Build a Wraparound Step Platform
A wraparound platform that covers the front and one long side of the spa is more useful than a simple step because it gives multiple people room to enter, sit on the edge, or set things down at the same time. Build it from composite decking for low maintenance, or use pressure-treated pine if you’re keeping costs down. The platform doesn’t need to be tall — sitting six inches below the spa rim feels natural and keeps entry easy. Add a non-slip strip along the front edge where people step up most often. Include a small gap between the platform and the spa casing for drainage.
Platform Depth That Actually Works:
A minimum depth of three feet on the entry side gives enough room to turn around before stepping in. Anything narrower feels cramped in practice, especially when two people are using the spa at the same time.
7. Create a Nighttime Glow With String Lights
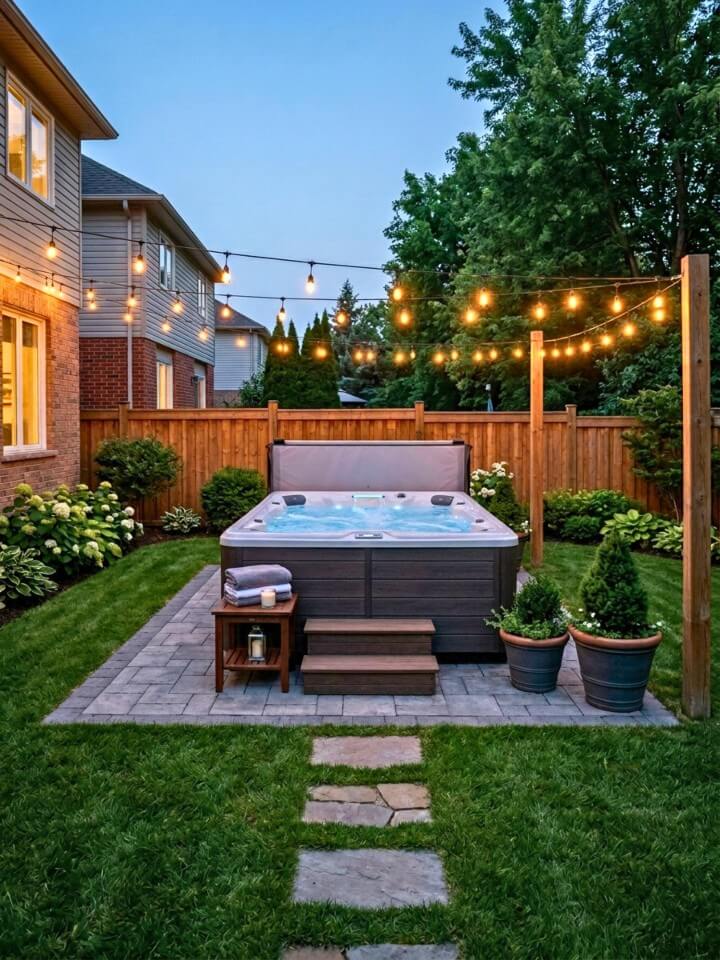
A compact deck and soft lighting can transform your outdoor space with swim spa backyard ideas that feel relaxing and modern. Evening use of the spa becomes noticeably more enjoyable when the surrounding area has warm, low-level light rather than a single bright overhead fixture. Café-style string lights hung between pergola posts, fence tops, or simple shepherd hooks create an even glow without harsh shadows.
Look for commercial-grade outdoor string lights with shatter-resistant bulbs — standard decorative lights sold for seasonal use burn out quickly under year-round outdoor conditions. Hang lines at least eight feet above the deck surface so they stay well clear of head height and any steam rising from the water. Plug everything into a weatherproof outlet with a timer so the lights come on automatically at dusk without any extra steps.
Anchoring Lights Without Permanent Hardware
Shepherd hooks pushed into garden beds or gravel borders offer a flexible way to hang string lights without drilling into fences or structures. Space hooks no more than ten feet apart to prevent lines from sagging visibly between anchor points.
8. Create a Small Lounge Zone Beside the Spa
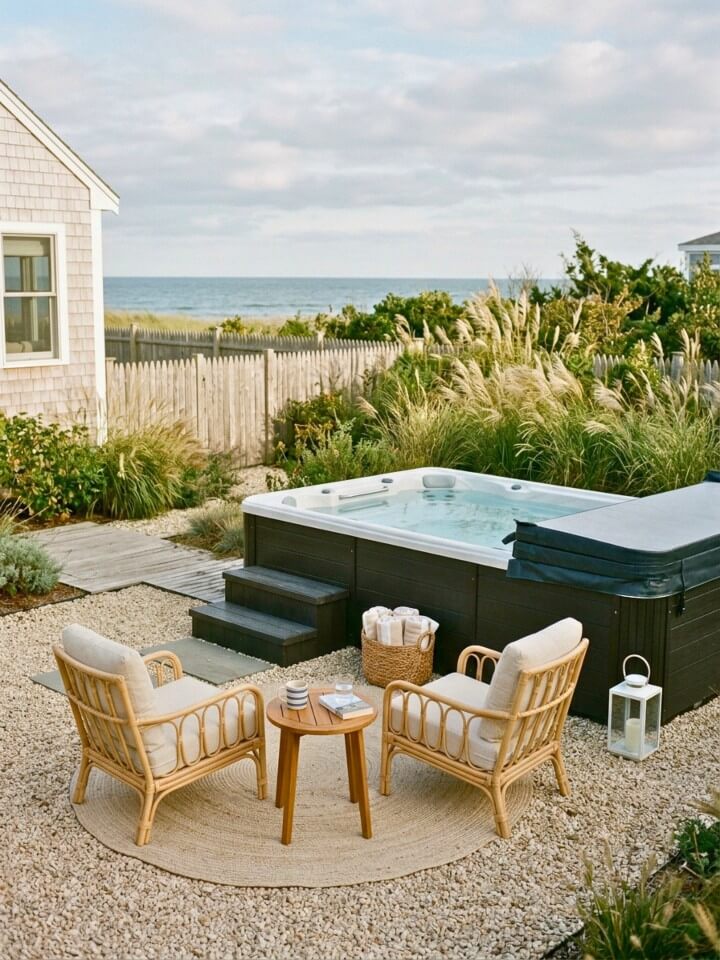
A pair of weather-resistant chairs and a low side table beside the main entry gives the whole setup a more finished, usable feel. This doesn’t need much space — a six-by-eight-foot area is enough for two seats, a small table, and room to walk through. Teak and eucalyptus furniture hold up through sun and rain without needing covers every season. A flat stone or paver surface underneath keeps chair legs stable and prevents furniture from sinking into soft ground. Add a small outdoor rug if the surface is pavers — it makes the area feel warmer and more intentional.
Furniture Placement Tip
Keep chairs facing the spa rather than parallel to it — this feels more natural and makes the area look like it was designed together rather than added as an afterthought.
9. Add Tropical Plants Around the Corners
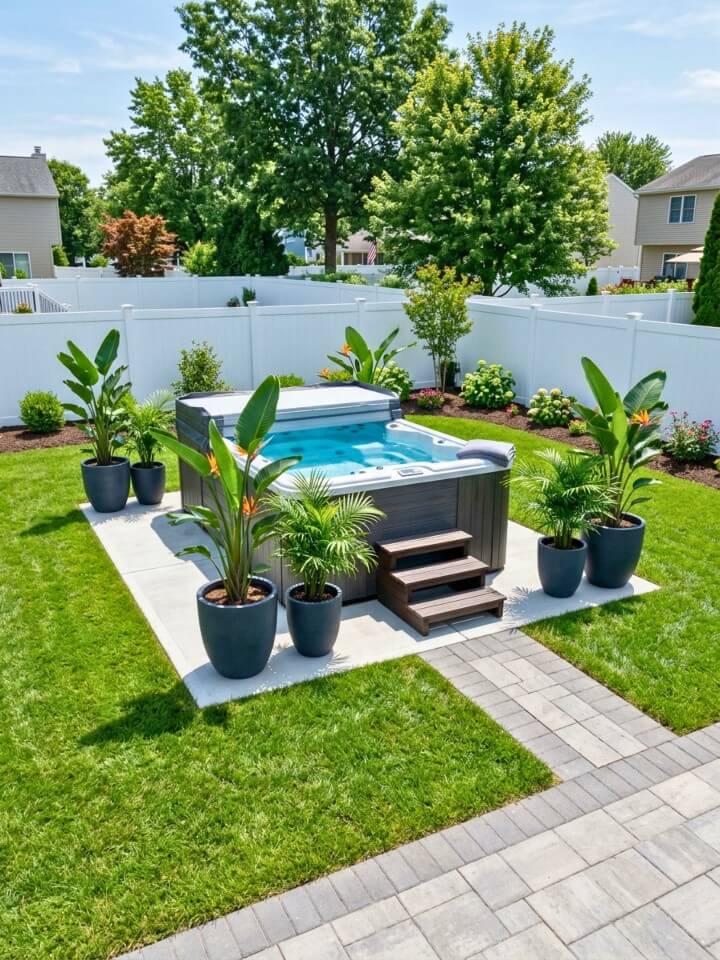
Large-leafed tropical plants at the corners of the spa give the space a resort-like feel without requiring permanent landscaping changes. Bird of paradise works well in containers — the broad leaves create immediate visual impact and the plant handles heat and direct sun reliably. Canna lilies fill in quickly during summer and come in bold colors that stand out near water. Use matching planters at each corner for a clean, symmetrical look, or mix container styles if the yard has a more relaxed, collected feel. Bring tender tropicals indoors before the first frost or treat them as seasonal plants replaced each spring.
Container Soil for Large Tropical Plants
Standard potting mix compacts too quickly in large containers. Blend in perlite at roughly 20 percent of the total volume to keep drainage open and prevent root rot during stretches of heavy watering or rain.
10. Create a Wood Slat Backdrop
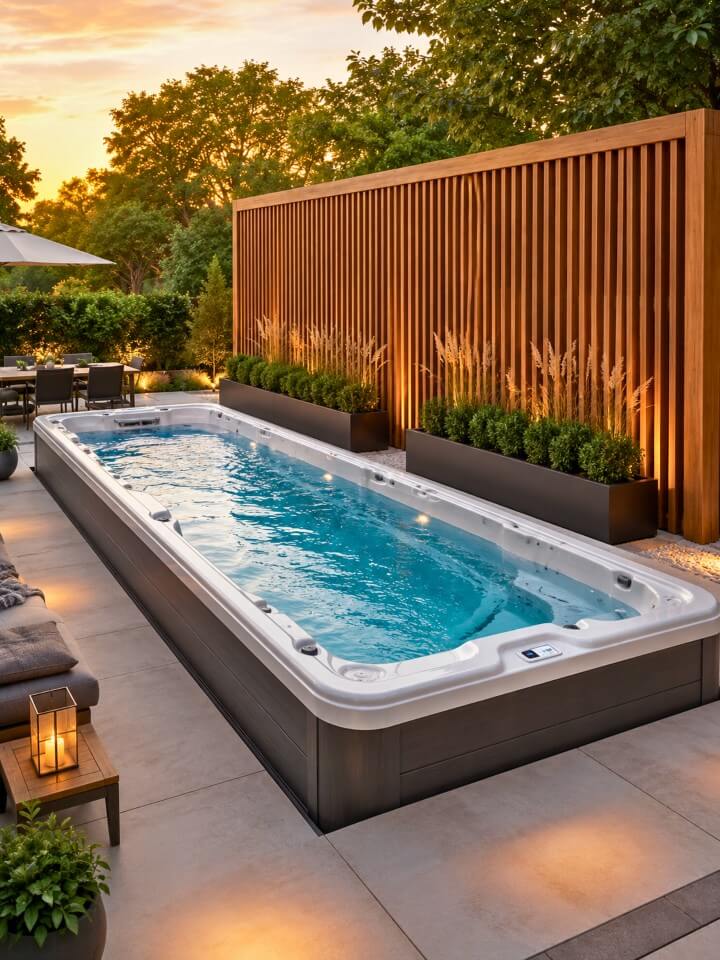
A wood slat backdrop mounted behind the spa turns a plain fence or blank wall into a design feature that anchors the whole space. Cedar slats in a vertical pattern suit natural and modern yards equally well. For a darker, more dramatic look, use stained pine or ipe with tight spacing between boards. Mount the slats on a simple horizontal frame with a half-inch gap between each board — this allows airflow, prevents warping, and keeps the structure from acting like a sail in wind. The frame can attach directly to an existing fence or stand independently with posts set in concrete footings.
Finishing the Wood to Last
Untreated cedar weathers to gray within a season, which some homeowners prefer. If you want to hold the warm wood tone, apply a penetrating oil sealer every one to two years — surface paint eventually peels in outdoor conditions and creates more maintenance, not less.
11. Add a Fire Pit Seating Area Nearby
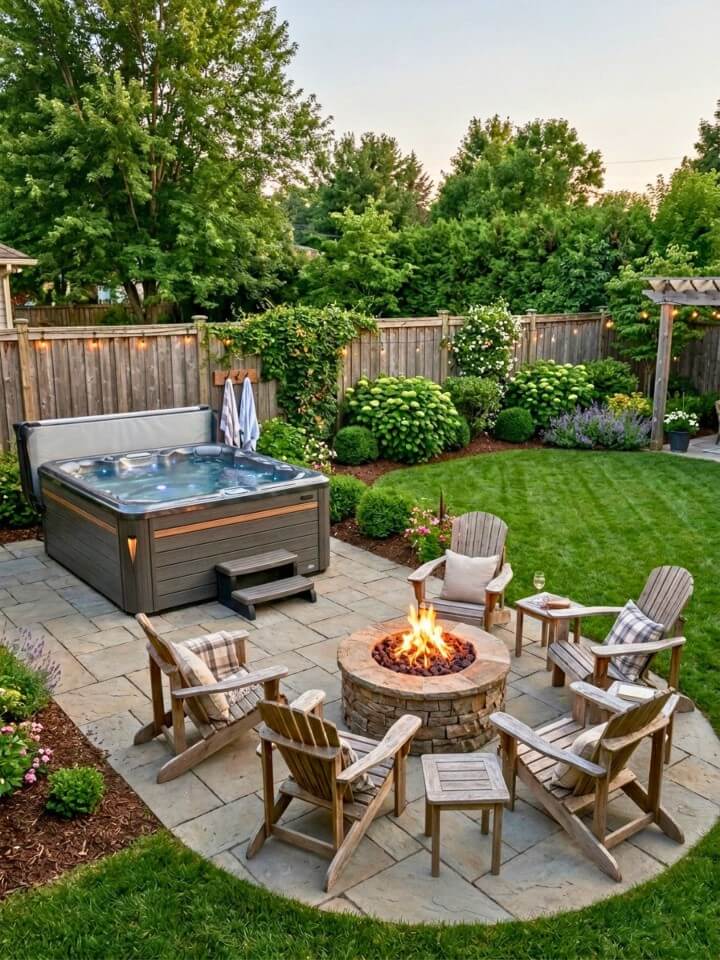
A fire pit area a short distance from the spa gives the outdoor space two distinct zones — one for active use, one for winding down afterward. Position it at least ten feet from the spa to keep heat and embers away from the cover and equipment. A gravel pad under the seating area works better than grass, which gets damaged quickly from chair legs and foot traffic. Use four chairs arranged in a loose circle rather than a rigid square — it feels more relaxed and makes conversation easier. A simple steel fire bowl on legs is easy to move if the layout needs to change later.
Choosing the Right Fire Pit Style
In-ground fire pits look permanent and polished but limit flexibility. A raised bowl on legs costs less, requires no digging, and can be repositioned or stored off-season without any effort.
12. Soften the Base With Ornamental Grass
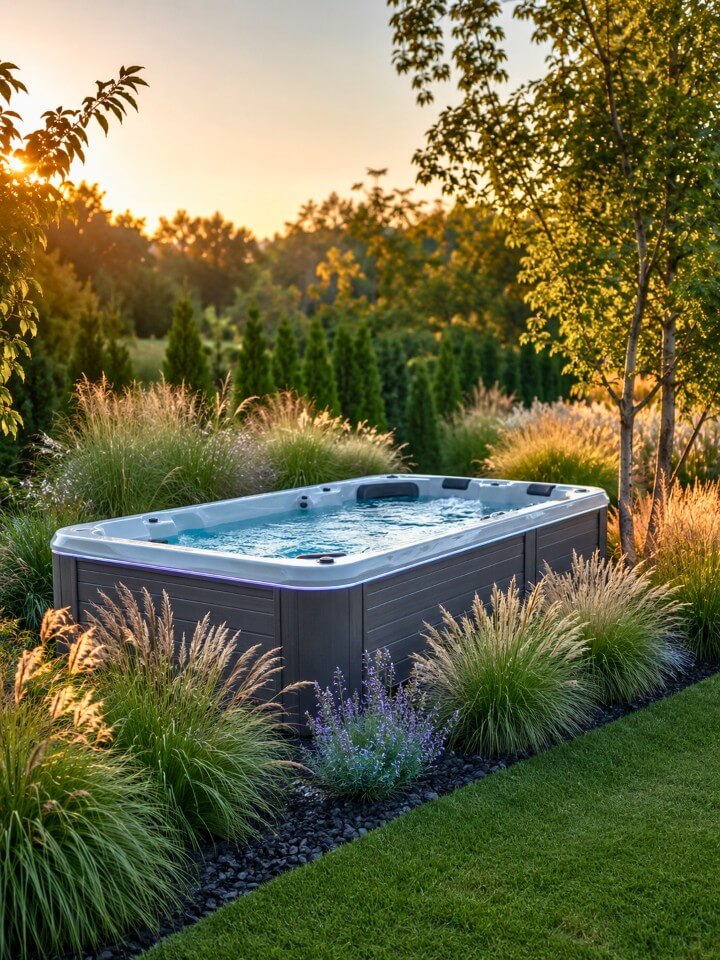
The lower panels of an above ground spa often look industrial, and ornamental grasses planted in curved beds around the base change that quickly. Feather reed grass stays upright through wind and rain, making it a reliable choice near water. Blue fescue adds a cooler color contrast if the spa casing is a warm tone. Plant grasses about eighteen inches out from the panels so air can still circulate and service access stays clear. Mulch between the plants keeps weeds down and makes the bed look intentional rather than patchy.
Seasonal Care to Keep in Mind
Most ornamental grasses only need cutting back once a year in late winter before new growth starts. Avoid planting fountain grass in areas with cold winters — it won’t survive a hard freeze and will leave gaps in the bed.
13. Use Gravel Around the Swim Spa Base
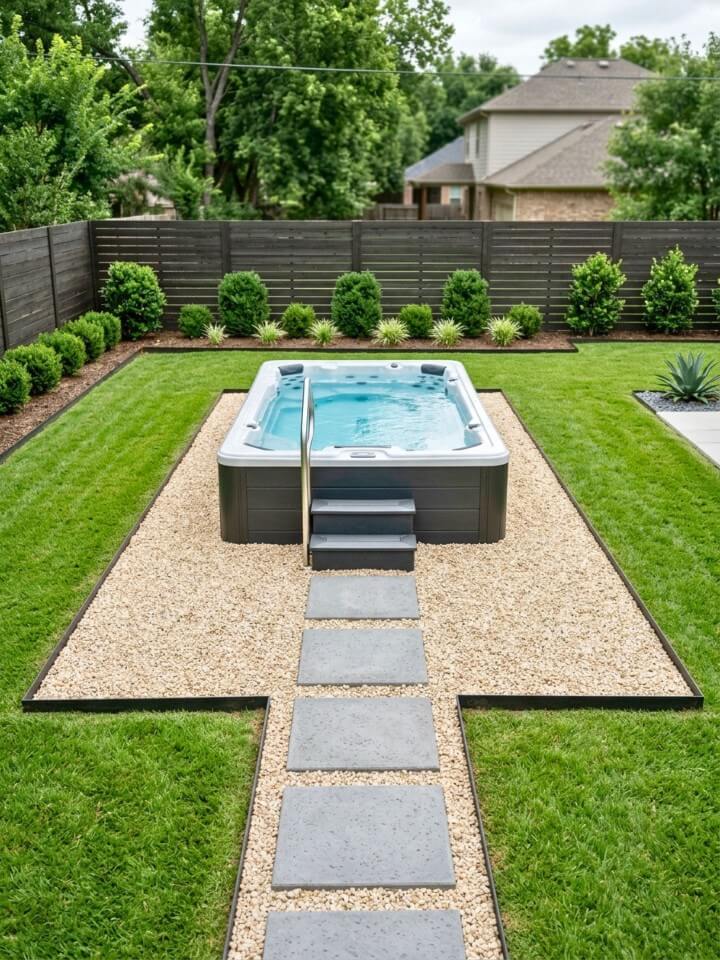
A gravel border around the base of the spa solves the drainage problem that pavers and concrete sometimes create — water moves through it instead of pooling. Pea gravel is comfortable underfoot and easy to rake level after heavy rain. Crushed granite compacts better and stays in place more reliably, which works well if the area gets regular foot traffic. Use steel or aluminum edging to keep the gravel from spreading into the lawn. A two-to-three inch depth is enough for drainage without the gravel shifting underfoot when walking barefoot.
Keeping Gravel Neat Long-Term
Lay landscape fabric beneath the gravel before spreading it — this blocks weeds from pushing through without affecting drainage. Skip the fabric under large trees where roots eventually push everything up anyway.
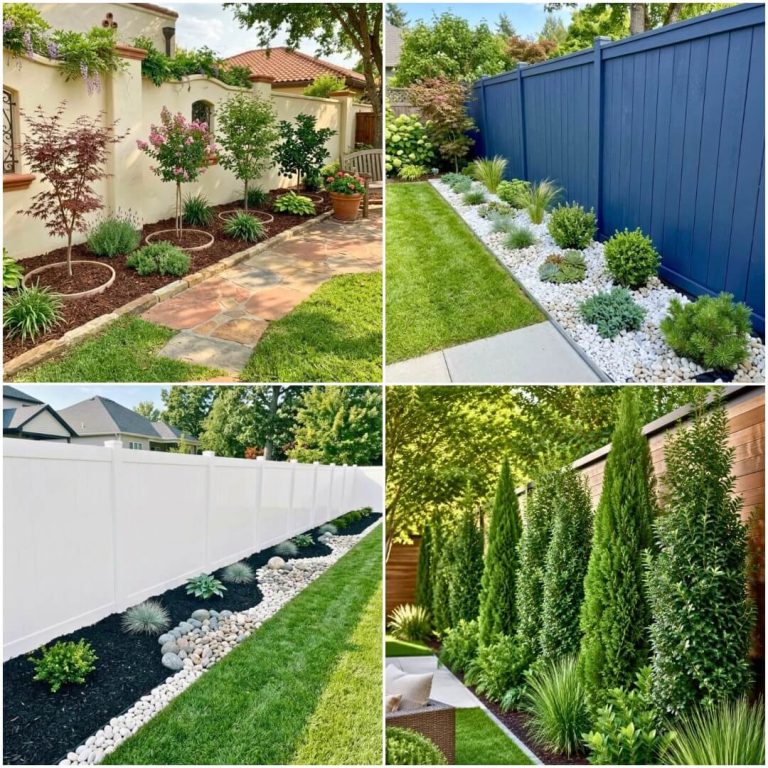
14. Plant Evergreens for Year-Round Screening
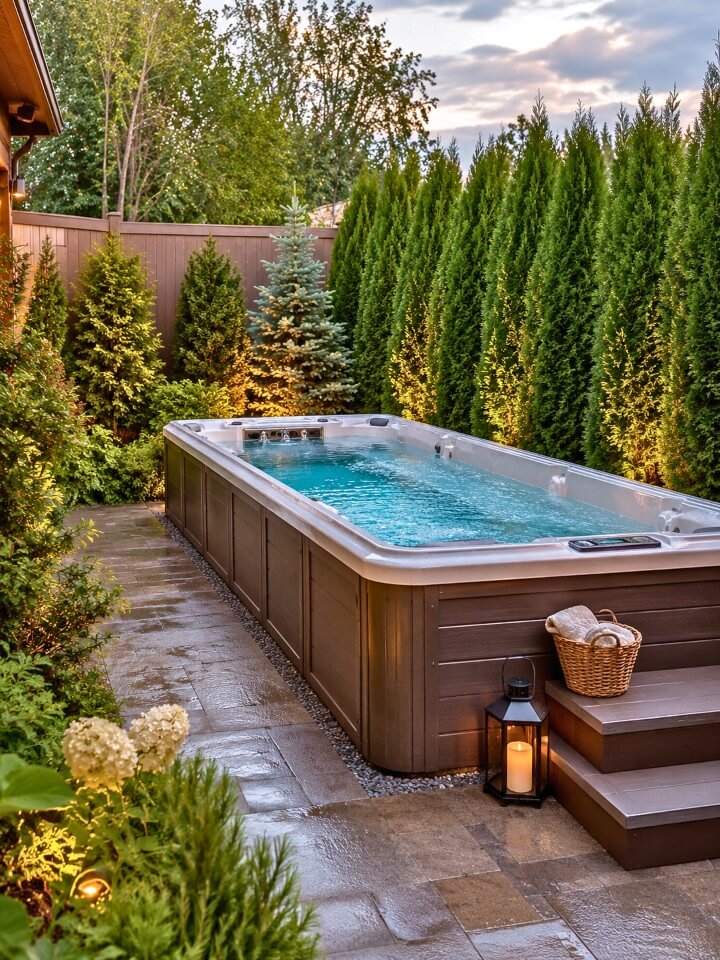
Deciduous shrubs and perennials look great in summer but leave the spa fully exposed by November. Evergreens planted along the back or neighbor-facing side keep the space screened without needing replanting each year. Emerald Green arborvitae is one of the most reliable choices — it grows in a tight column, reaches eight to ten feet, and doesn’t spread wide enough to crowd equipment panels. Holly and compact spruce are good alternatives for colder climates. Space plants according to their mature width, not their current size, or you’ll end up cutting them back every season just to maintain access.
Spacing for Healthy Growth
Check the mature spread on the plant tag before buying — arborvitae varieties range from two feet to six feet wide at maturity. Planting too close creates a crowded look and increases disease risk from poor air circulation.
15. Add Warm Path Lighting Nearby

Low-voltage path lights along the walkway to the spa make the area safer to use at night and give the yard a finished look without a large electrical project. Solar stake lights work in sunny spots, but wired low-voltage systems give more consistent output through cloudy stretches and winter months. Space lights every four to six feet along both sides of the path for even coverage without harsh bright spots. Warm white (2700K–3000K) keeps the mood relaxed. Avoid floodlights pointed at the spa — the glare makes it harder to see the water surface and disrupts the evening atmosphere.
Installation Without an Electrician
Most low-voltage landscape lighting runs off a simple transformer that plugs into a standard outdoor outlet. The wire buries just two to three inches deep, making it a manageable weekend project without permits or professional help.
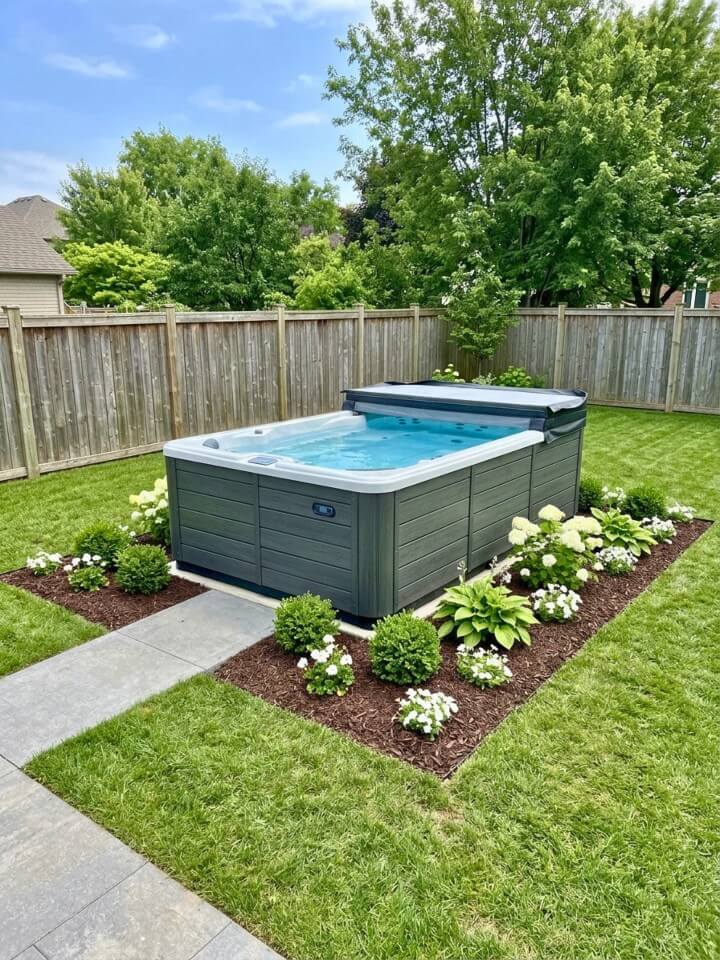
16. Frame the Swim Spa With Raised Garden Beds
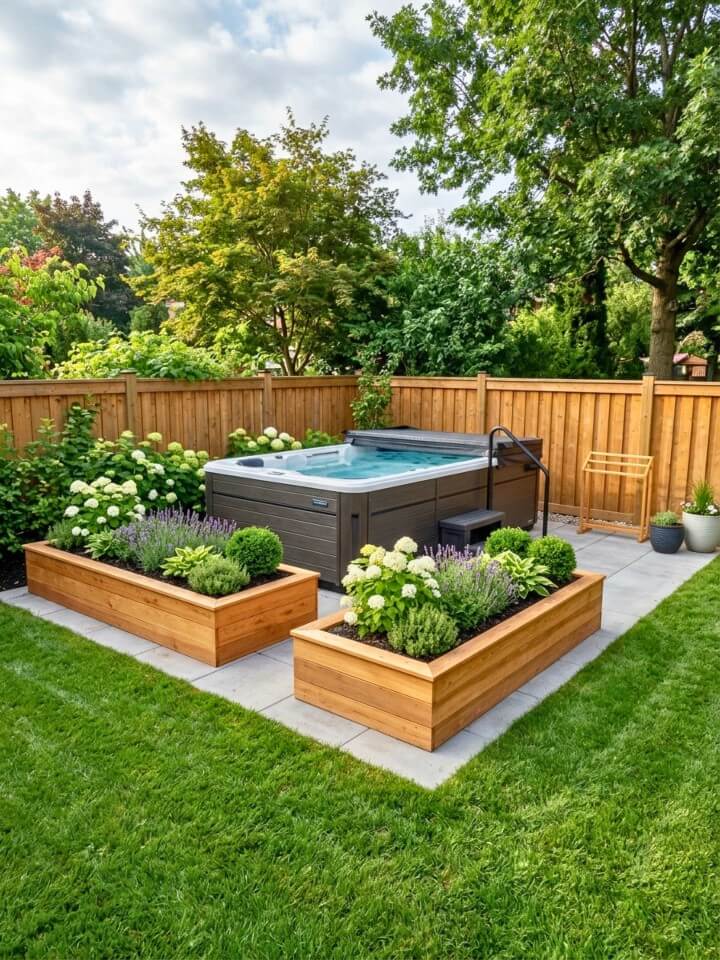
Raised beds on one or two sides of the spa give the whole setup a more planted, intentional look without requiring major landscaping work. Cedar is the most popular choice because it resists rot naturally and doesn’t leach anything harmful into the soil. Build the beds eight to ten inches tall — deep enough for real root growth but low enough to stay visually light. Fill them with lavender, compact hydrangeas, or low ornamental shrubs that won’t drop debris into the water. Leave the access panel side completely clear so servicing the equipment stays simple and doesn’t require moving anything.
Bed Width That Stays Manageable
Keep raised beds no wider than three feet if only one side is accessible — you should be able to reach the center without stepping in. Wider beds look fuller but become frustrating to weed and replant over time.
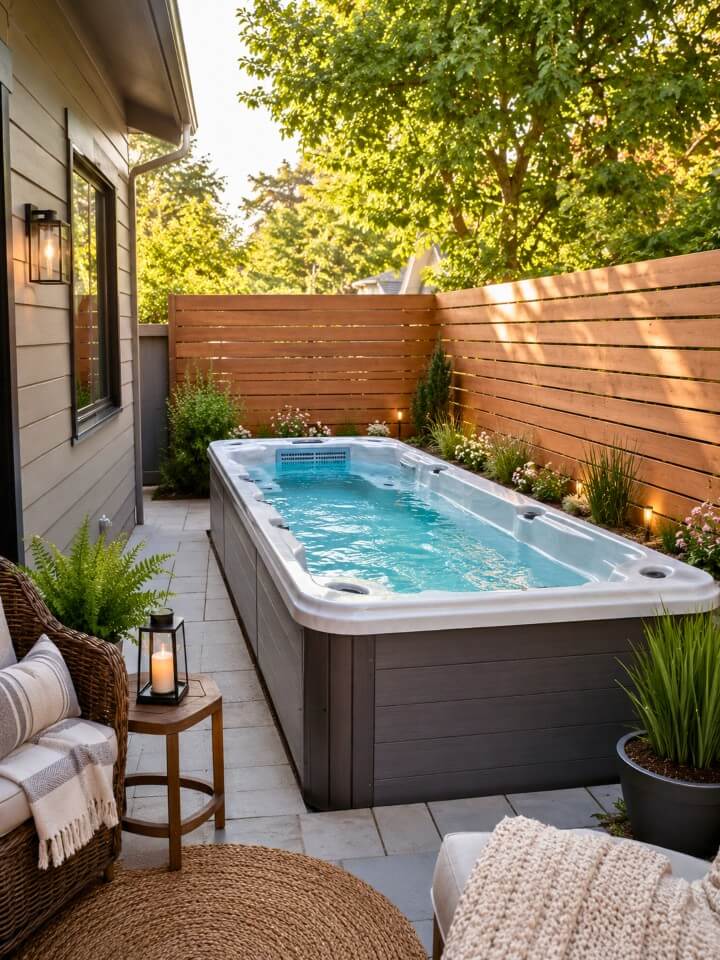
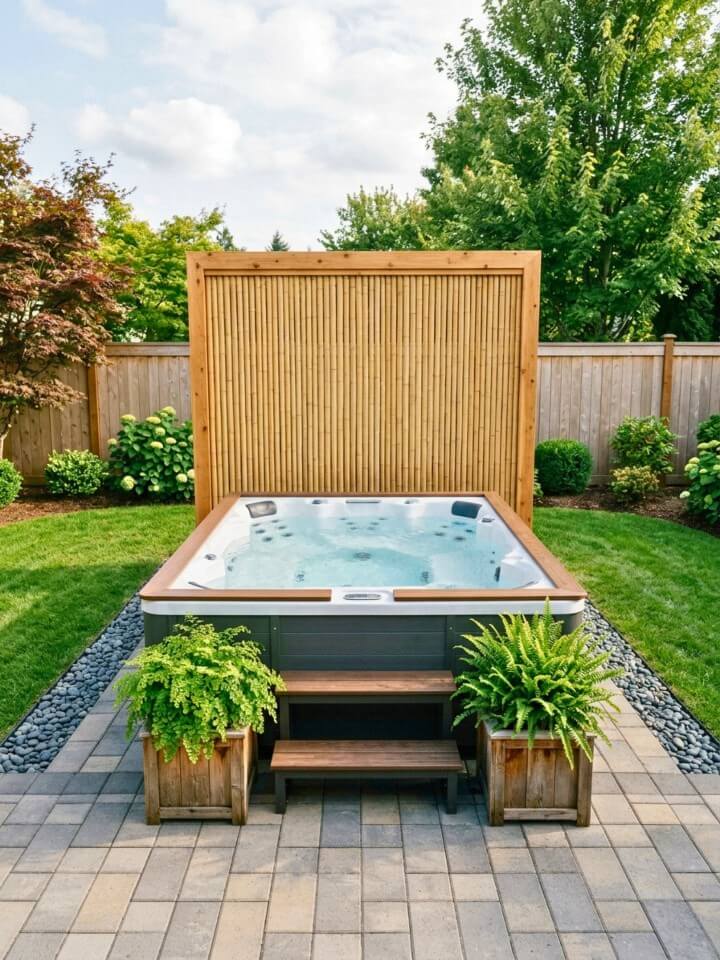
17. Add a Privacy Screen Behind the Spa
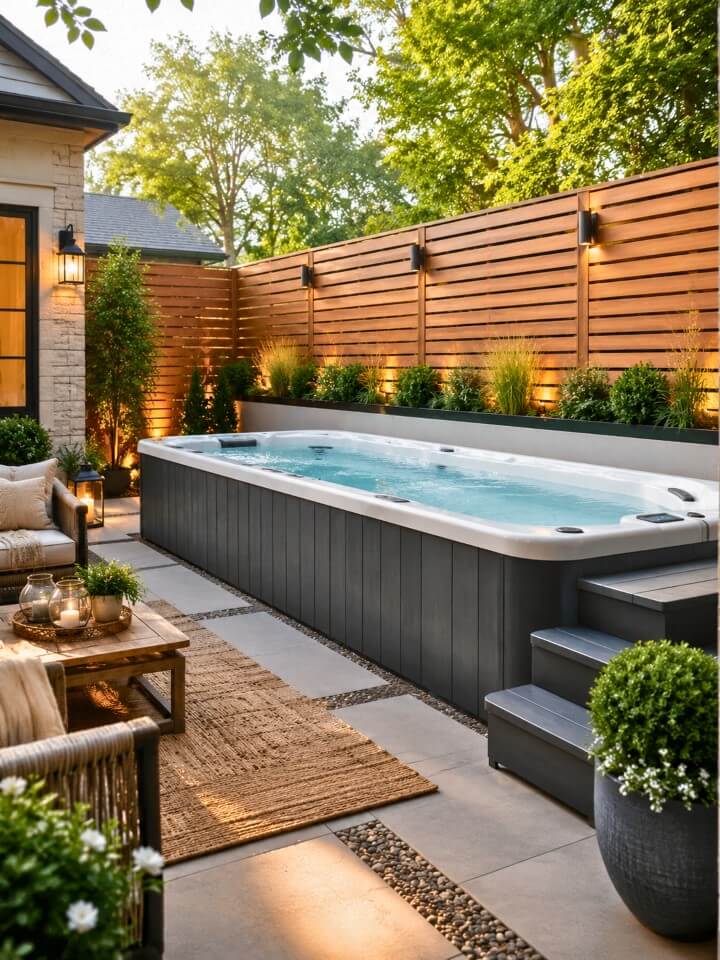
You can create a beautiful outdoor retreat by using above ground swim spa landscaping ideas with plants, stone borders, and privacy screens. A privacy screen placed directly behind the spa creates a clear visual backdrop and blocks the sightlines that matter most without fencing the entire yard. Horizontal cedar slats spaced one to two inches apart give privacy while still allowing airflow — important near water where humidity builds up.
Attach the screen to a simple freestanding frame so it doesn’t require digging posts or attaching to an existing fence. Keep the height between six and seven feet for solid coverage without making the yard feel walled in. A natural wood finish weathers to a silver-gray over time, or seal it annually to hold the original tone.
Framing the Screen Properly
A freestanding frame needs at least two feet of post buried in concrete on each end for stability. Skipping this step leads to leaning within the first season, especially in areas with regular wind.
18. Use Pavers to Create a Clean Spa Landing
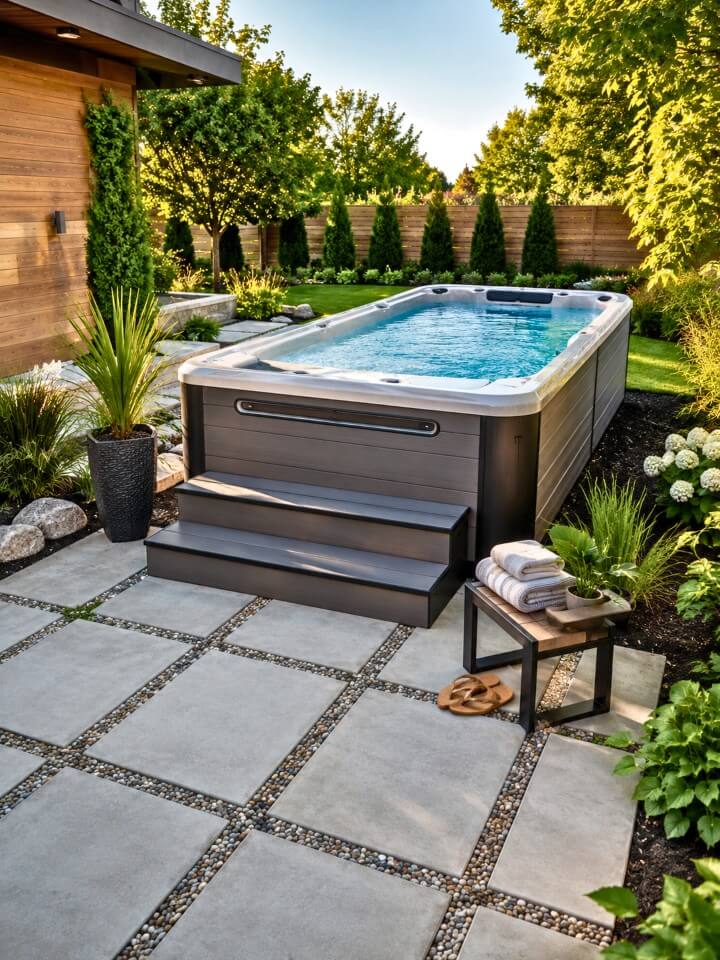
A paved landing around the main entry of the spa keeps mud, grass, and loose gravel away from the water. Large format pavers — 18×18 or 24×24 inches — look cleaner than smaller ones and require fewer joints where weeds can push through. Set them on a two-inch compacted sand base over four inches of gravel for proper drainage and a surface that won’t sink or shift.
Concrete pavers are affordable and come in neutral tones that work with most spa colors. For a warmer look, buff or sandstone-toned pavers blend naturally into garden settings without standing out too sharply. This same clean-edge approach is often used in fabulous rectangular pool landscaping ideas, where the hardscape needs to look polished while staying practical around water.
Handling the Edge Where Pavers Meet Lawn
Install plastic or steel edging along the lawn side before laying pavers — without it, the edge crumbles within a season or two and the whole landing starts looking unfinished. Polymer sand in the joints resists weeds better than regular sand.
19. Plant Climbing Vines Near a Trellis
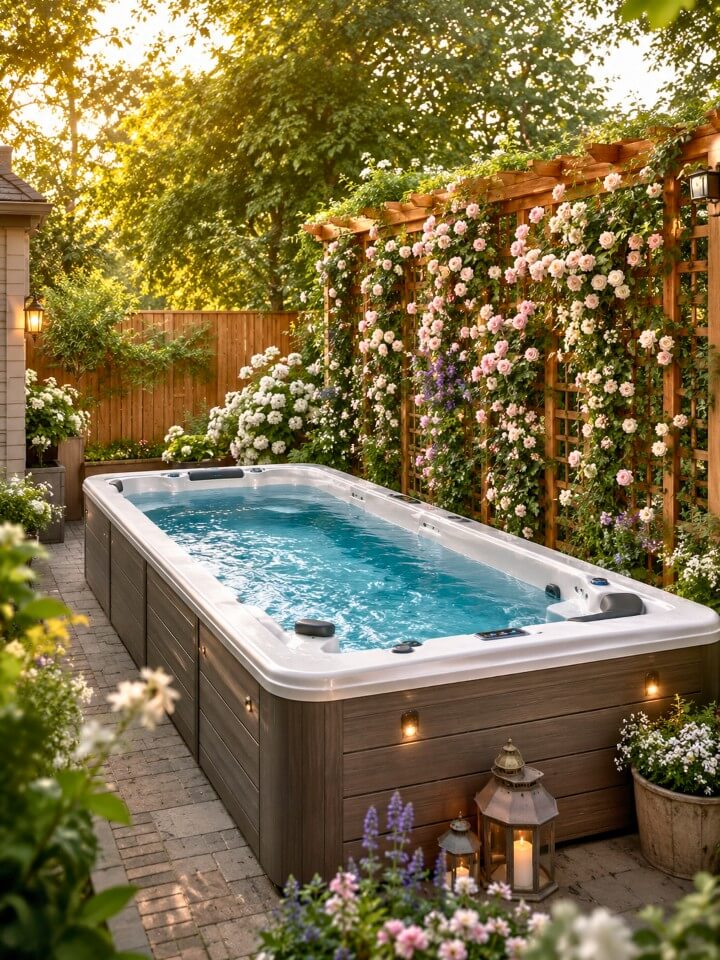
A trellis with climbing vines alongside the spa adds vertical interest and a layer of soft screening without the weight of a solid wall or fence. Clematis is one of the better choices — it climbs quickly, flowers reliably, and stays manageable with one annual pruning. Jasmine works well in warmer climates and adds fragrance that carries toward the water on calm evenings. Attach the trellis to a freestanding frame or an existing fence, keeping at least six inches of clearance behind it for air movement. Avoid aggressive climbers like wisteria near any structure — the root pressure and weight can cause real damage over a few seasons.
Training Vines for Even Coverage
Loosely tie new growth to the trellis with soft garden tape every few weeks during the growing season. Left to climb freely, most vines bunch toward the top and leave the lower half bare, which defeats the privacy purpose.
20. Build a Half-Wall for Shelter

A half-wall on the wind-facing side of the spa makes the water temperature feel noticeably warmer and reduces how fast the cover cools down overnight. Stacked natural stone looks solid and fits well in traditional or Mediterranean-style yards. Poured concrete or concrete block with a stucco finish suits modern or clean-lined outdoor spaces. Keep the wall between three and four feet tall — high enough to block wind at water level without cutting off sightlines or making the space feel enclosed. Cap the top with a flat stone or poured concrete ledge so it also functions as a surface for drinks or towels.
Building on the Right Foundation
Even a short wall needs a footing below the frost line in cold climates — a wall built directly on soil or a shallow base will crack and shift within a few winters. Check local frost depth before starting.
21. Use Mulch Beds to Soften the Edges
A mulch bed around the sides of the spa softens the visual gap between the equipment casing and the surrounding yard without requiring plants right away. Dark hardwood mulch gives the most contrast against green grass and warm-toned spa casings. Keep the mulch depth at two to three inches — deeper than that and it starts to mat and restrict water movement. Create a clean edge with a half-moon edger or install a flexible plastic border to keep the mulch contained after rain. Once the bed is established, add low shrubs or perennials in small clusters to build on the foundation gradually.
Refreshing Mulch Without Overdoing It
Top up mulch once a year rather than piling new layers on top of old. Compacted mulch below fresh layers can harbor mold and pests, and the buildup eventually pushes against plant stems in ways that cause slow rot.
22. Place Outdoor Benches Along One Side
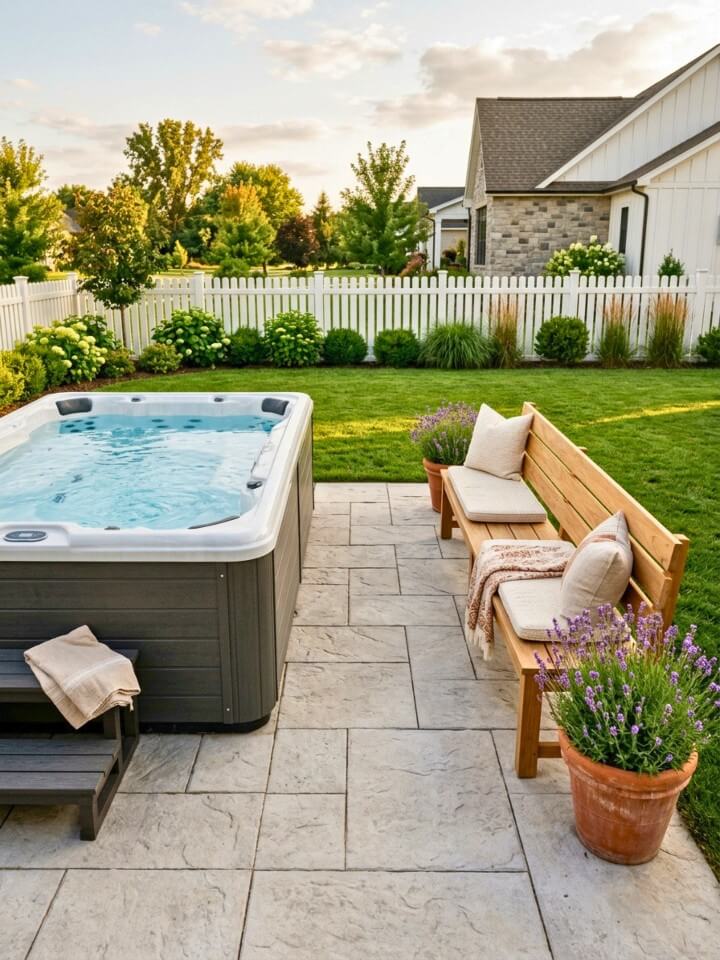
Adding comfortable seating and shade can make swim spa patio ideas more practical and inviting. A bench along one side of the spa gives users a dry surface to sit on before getting in or a place to cool down without walking back to the house. A teak bench holds up through sun and rain without much attention — it weathers to silver-gray naturally or can be oiled once a year to keep the warm honey tone.
For a more built-in look, attach a simple bench directly to an existing deck or platform frame rather than using a freestanding piece. Leave at least two feet of clearance between the bench and the spa edge so movement stays comfortable. Add a waterproof cushion if the bench will be used for longer periods.
Bench Length That Works for the Space
A four-foot bench seats two adults comfortably and fits most spa-side spaces without crowding. Six-foot benches work well on larger decks but can feel oversized in tighter setups where the spa is close to a fence or wall.
23. Add a Gravel Path Leading to the Spa
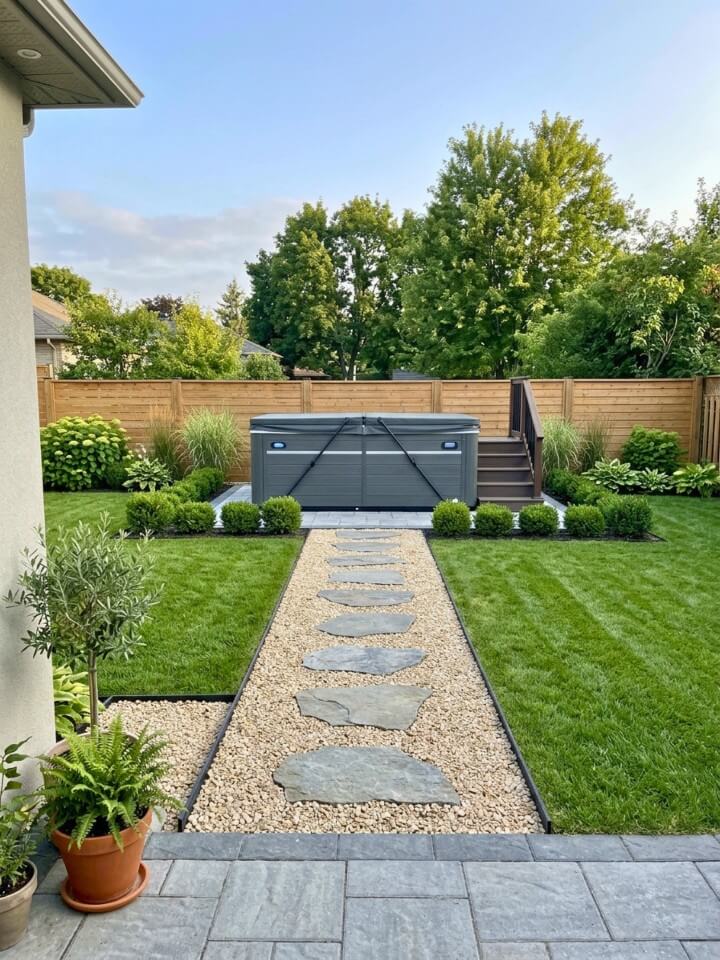
A well-planned backyard layout can feel more inviting when you study pictures of swim spas in backyards for real design inspiration. Bare lawn between the house and the spa turns muddy quickly with regular foot traffic, especially after rain. A gravel path solves this without the cost or permanence of poured concrete.
Pea gravel is soft underfoot but shifts more than crushed granite, which compacts into a firmer surface over time. Lay landscape fabric beneath before spreading gravel to block weeds from pushing through the base. Keep the path at least three feet wide so two people can walk side by side comfortably. Flat stepping stones set through the middle give bare feet a smoother surface on the way to the water.
Keeping the Path Edge Sharp
Steel edging holds a cleaner line than plastic over multiple seasons and won’t buckle from frost or root pressure. Install it slightly below grade so it doesn’t catch feet or create a tripping edge near the spa entry.
24. Use Large Planters to Mark the Entry
Flanking the spa entry with two matching planters creates a clear visual threshold that makes the whole setup feel more designed. Boxwood trimmed into simple rounds gives a clean, year-round presence without needing seasonal replanting. Dwarf Alberta spruce works well in colder climates where boxwood struggles — slow-growing, dense, and reliable through hard winters. Fiberglass planters in a dark matte finish suit modern spa settings, while white or terracotta fits more relaxed garden styles. Size matters more than most people expect — planters under fourteen inches wide look too small against a full-size spa and lose the intended visual effect.
Watering Containers Near the Spa
Planters in full sun near reflective water dry out faster than those elsewhere in the yard. Check soil moisture every two to three days during hot stretches rather than following a fixed watering schedule.
25. Build a Small Privacy Fence Around One End
Wrapping a short fence section around the most exposed end of the spa blocks the sightlines that matter without enclosing the entire yard. Horizontal boards spaced a half-inch apart give privacy while keeping the structure from feeling heavy or solid. Pressure-treated pine is budget-friendly and takes stain well, while cedar holds up longer without treatment and resists warping in wet conditions. Set posts in concrete at least two feet deep — a short fence catches more wind than people expect, and shallow posts work loose within a season or two. Leave the entry side completely open so the space stays easy to move through.
Matching the Fence to Existing Structures
If the yard already has a fence, match the board direction and finish as closely as possible. A privacy addition that looks like a different project draws attention to itself rather than blending into the overall layout.
26. Add a Covered Towel and Storage Station
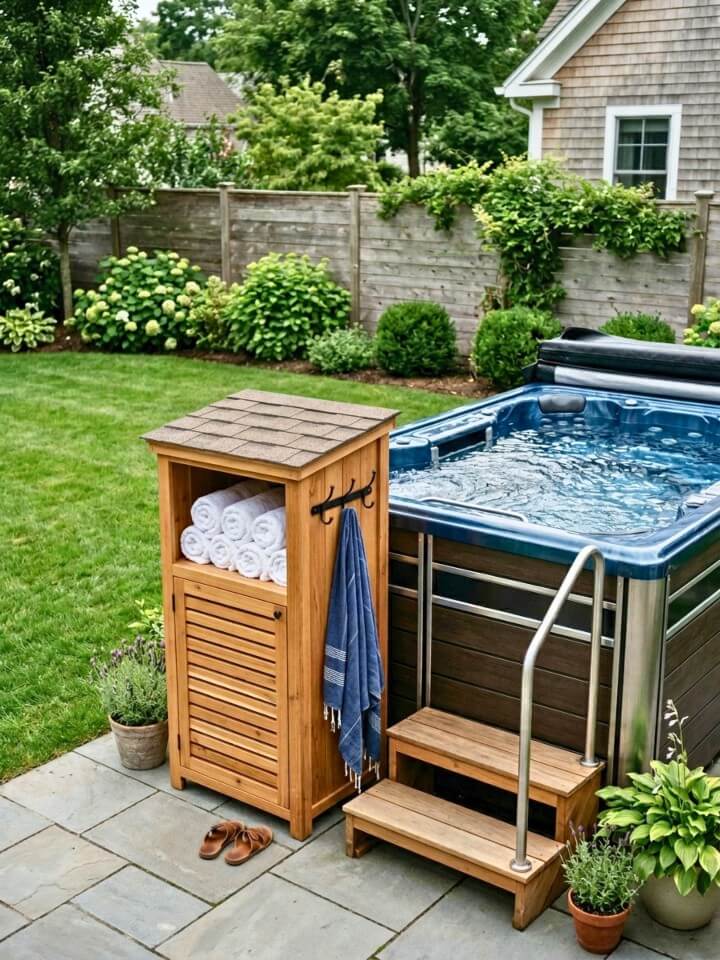
Wet towels draped over spa edges or chair backs make the whole area look cluttered within minutes of use. A small covered storage unit beside the entry keeps everything organized without requiring trips back to the house. Look for units with a top compartment for towels and robes and a lower section for sandals, chemicals, or small maintenance tools. Resin cabinets handle moisture and sun exposure better than untreated wood in most outdoor conditions. Mount a simple hook strip on the side panel for robes or wet swimsuits that need to air dry rather than sitting bunched inside.
Protecting Contents From Weather
Even weatherproof storage units benefit from a small silica pack or two inside to reduce interior humidity. Check the door seals annually — cracked or compressed gaskets let moisture in and are usually cheap and easy to replace.
27. Plant Low Shrubs Around the Platform
Ground-level planting around a spa platform softens the hard line where the structure meets the yard. Compact boxwood holds its shape through seasons without aggressive pruning and stays dense enough to look intentional year-round. Dwarf yaupon holly is a lower-maintenance alternative that handles heat, drought, and poor drainage better than most boxwood varieties.
Space plants according to their mature spread — crowding them fills gaps faster but creates maintenance problems once they mature and start competing. Mulch between shrubs keeps the bed tidy and reduces how often watering is needed during dry stretches. Flowering shrubs can also work nearby if they are kept far enough from the water, and amazing lilac bush landscaping ideas offer a useful starting point for adding seasonal color without overwhelming the spa edge.
Pruning to Keep the Scale Right
Lightly shear shrubs once or twice a year to maintain a consistent height below the platform edge. Letting them grow taller than the platform gradually hides the structure in a way that looks overgrown rather than intentional.
28. Use Bamboo Screening for a Relaxed Look
Rolled bamboo panels offer one of the faster ways to add privacy around a swim spa without building anything permanent. Most panels come in six or eight-foot heights and attach directly to an existing fence frame or a simple post-and-rail structure. Natural bamboo weathers from tan to silver-gray within a season outdoors — some homeowners prefer the aged look, while others apply an exterior UV sealer to slow the color shift. Pair the screening with gravel groundcover and low planters at the base to keep the overall look intentional rather than temporary. Replace panels every three to five years as natural fiber degrades in outdoor conditions.
Choosing Between Natural and Synthetic Bamboo
Synthetic bamboo panels cost more upfront but hold color and structural integrity significantly longer than natural options. For a permanent installation, the extra cost usually pays off within the first few years of avoided replacement.
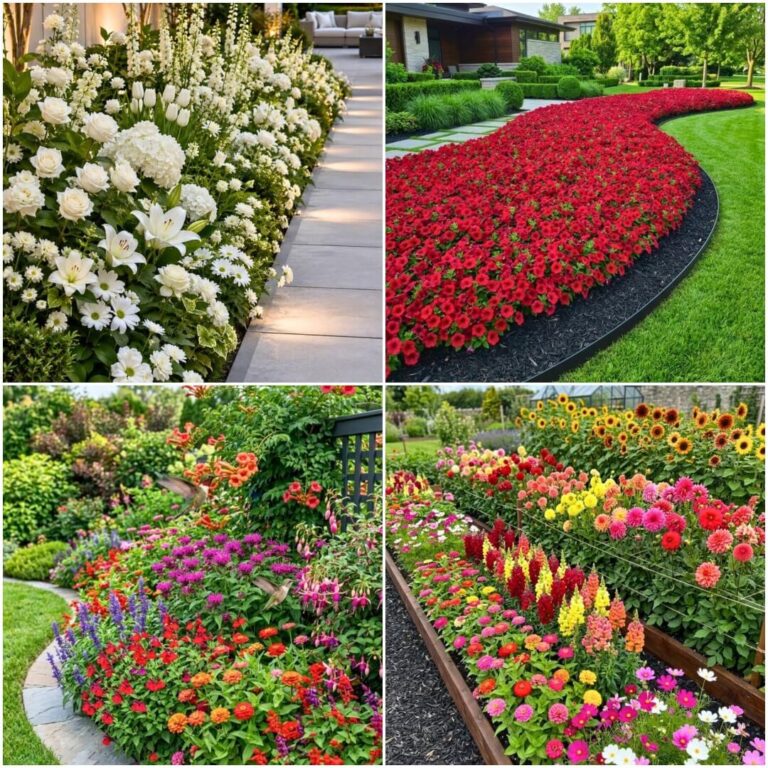
29. Add Flower Beds Near the Spa Steps
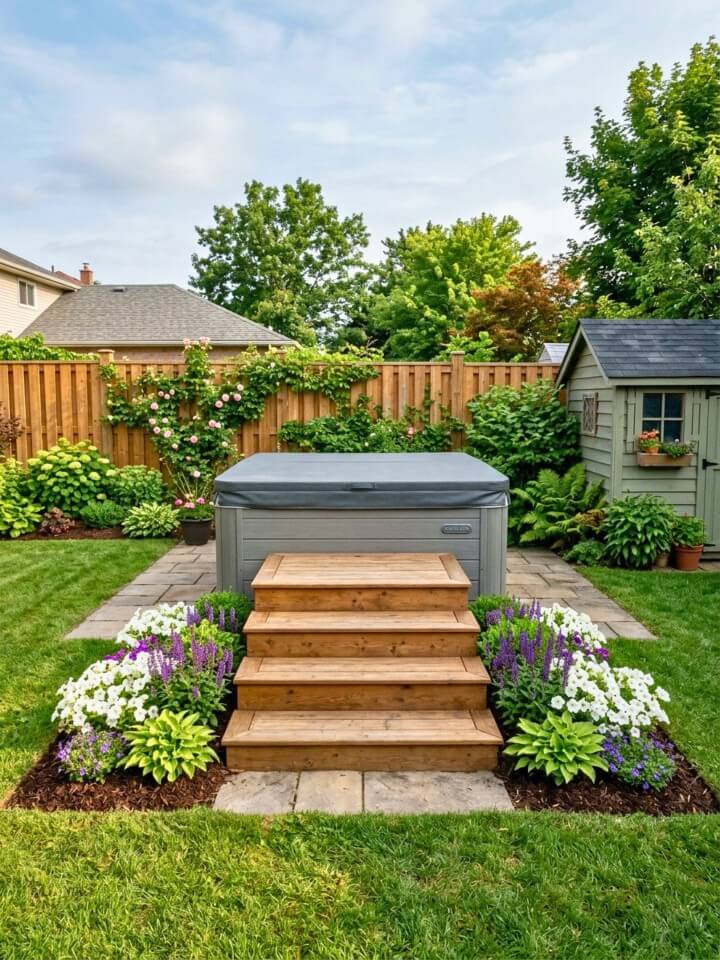
Color near the entry point of the spa draws the eye downward and makes the approach feel more welcoming than plain mulch or bare ground. Petunias and salvia are reliable warm-season choices that bloom heavily with minimal deadheading. For a longer seasonal display, layer spring bulbs beneath summer annuals so something is flowering from early spring through fall. Keep bed widths narrow enough — eighteen to twenty-four inches — so plants don’t lean or flop over the step edges as they fill in. Use a clean edging border between the flower bed and any adjacent pavers or lawn to keep the layout looking intentional as plants grow.
Choosing Plants That Won’t Drop Debris
Avoid plants with heavy seed heads or large dropping petals near spa entries — they find their way into the water quickly. Fine-textured plants like salvia, ornamental grasses, and compact lavender stay much tidier around water than large-flowering varieties.
30. Build Stone Steps Up to the Spa
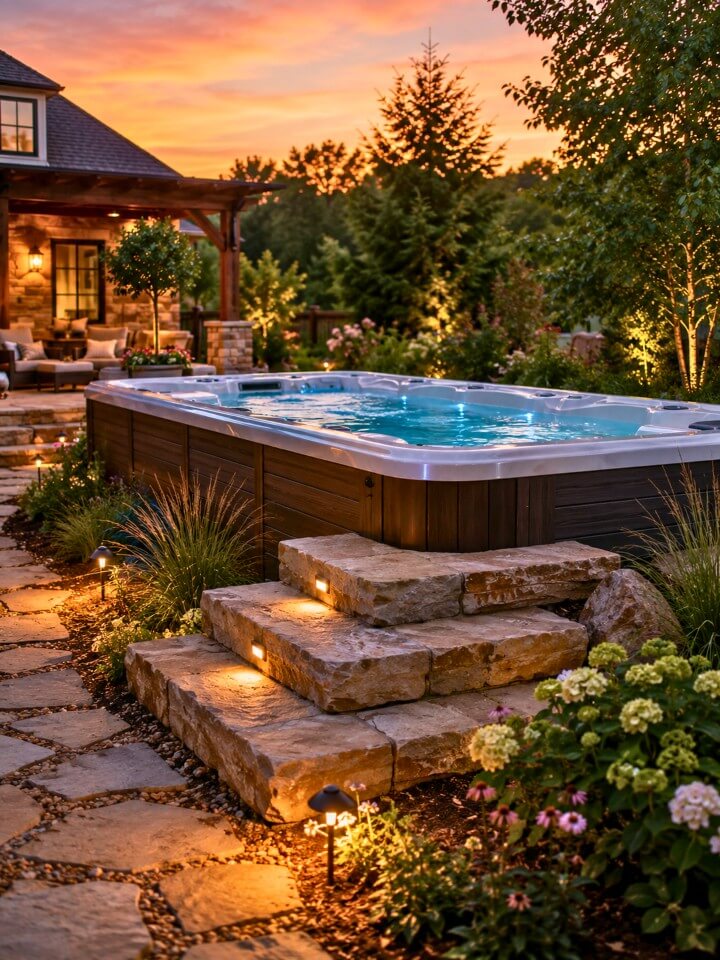
Stone steps work best when the spa sits higher than the surrounding ground, making the climb feel intentional rather than awkward. Cut bluestone or flagstone creates a clean, flat surface that stays grippy when wet — which matters more than appearance near water. Set each step at roughly seven inches of rise with a tread depth of at least twelve inches so the stride feels natural. For rustic yards, dry-stacked fieldstone gives a sturdy, organic look. Mortar everything into a compacted gravel base so the steps won’t shift through freeze-thaw cycles over the years.
Adding Grip to Stone Surfaces
A light wire-brushed or sandblasted finish on smooth stone reduces slip risk without changing the look. Avoid polished or honed stone near any water feature — it becomes dangerously slick even with minor splashing.
31. Use Outdoor Curtains Around a Pergola
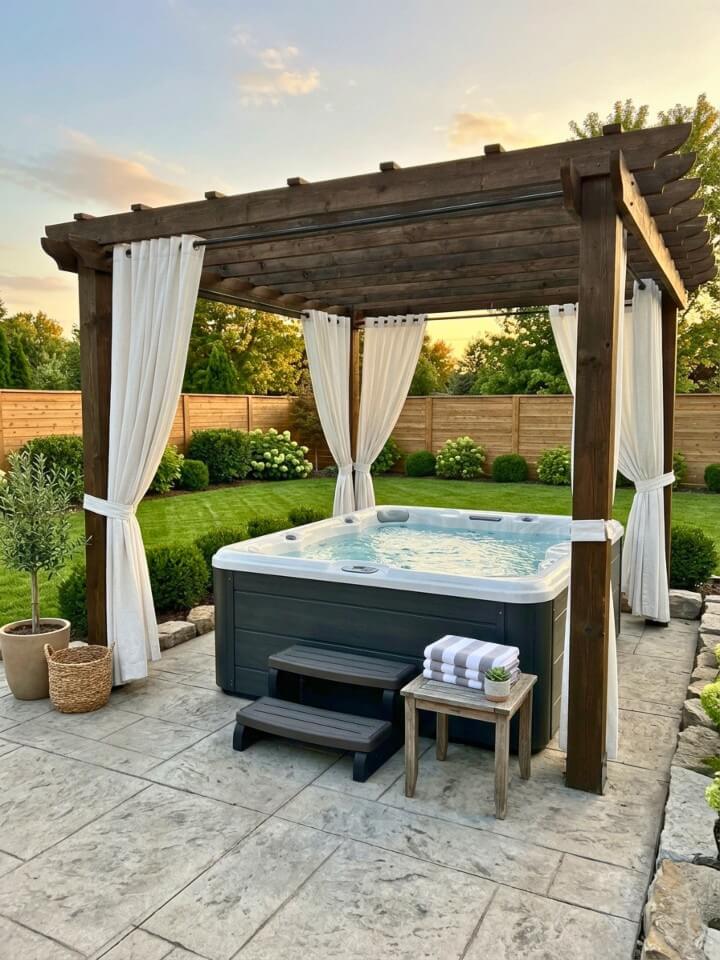
Curtains on a pergola change the feel of the spa area more dramatically than most structural additions at a fraction of the cost. Sunbrella or other solution-dyed acrylic fabrics resist fading, mold, and moisture far better than standard outdoor fabric sold at most home stores. Hang panels on a stainless steel cable or curtain rod attached to the pergola beams rather than using hooks that rust within a season near water. Two panels per side — one tied back, one closed — gives flexibility depending on wind direction and how much privacy is needed. Keep curtain hems at least six inches above the deck surface so they don’t wick up standing water after rain.
Washing and Storing Curtains Seasonally
Most solution-dyed fabrics only need a mild soap and water scrub with a soft brush. Remove and store panels before winter in climates with heavy snow — wet fabric frozen against hardware causes staining and tears that ruin panels faster than sun exposure does.
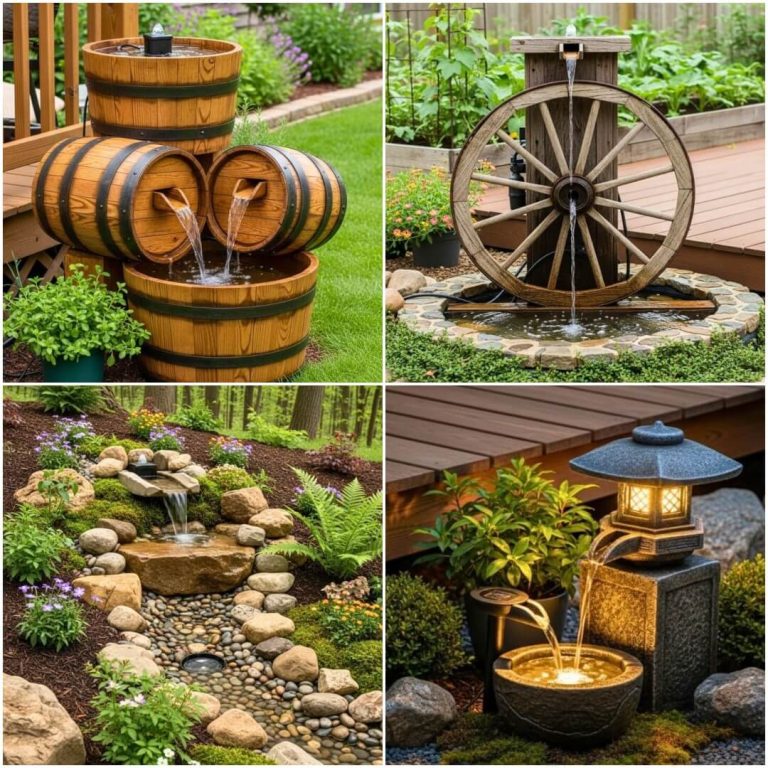
32. Add a Small Water Feature Nearby
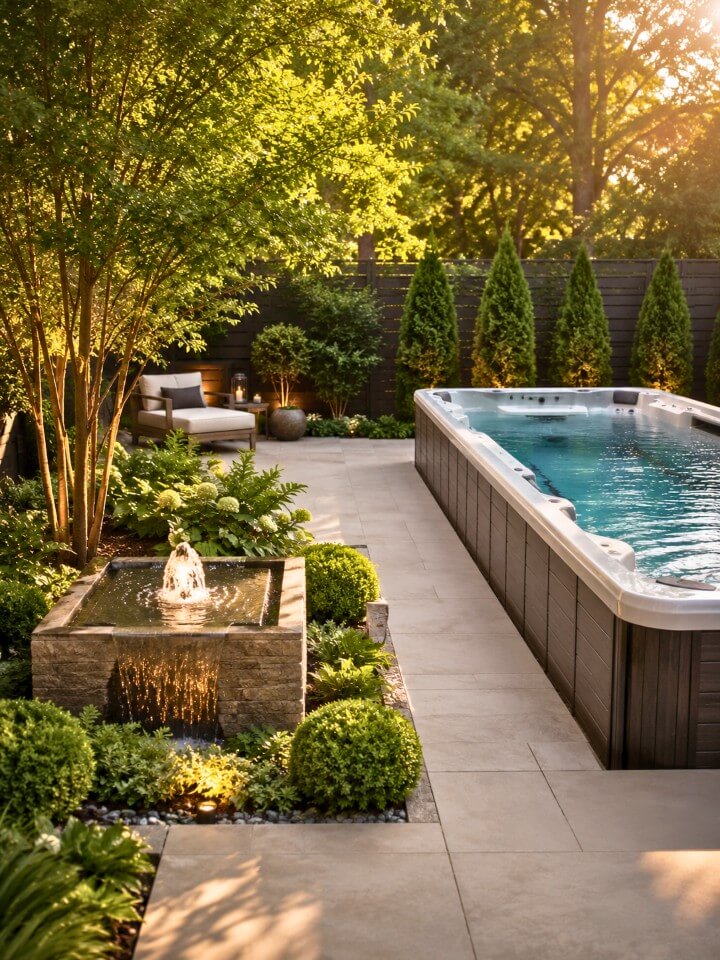
Running water near the spa masks mechanical pump noise that some people find distracting during quieter evening sessions. Even a compact recirculating fountain on a nearby paver or planting bed ledge creates enough ambient sound to change how the space feels. Stone or cast concrete fountains suit traditional and cottage-style yards, while corten steel or geometric concrete fits modern outdoor spaces. Keep the fountain within ten feet of the spa seating area so the sound carries without needing a large unit. Check the pump every few weeks during summer — evaporation in warm weather can drop the water level fast enough to run the pump dry.
Preventing Algae in Small Fountains
Add a small amount of fountain enzyme treatment to the water every two weeks rather than relying on cleaning alone. This keeps the pump clear and reduces how often the basin needs scrubbing, especially in full-sun locations.
FAQs Above Ground Swim Spa Landscaping
These questions cover the practical details that most planning guides skip over — the kind of things that come up once the spa is already installed and the real work begins.
Q1: How Much Space Should I Leave Around an Above Ground Swim Spa for Landscaping?
Leave a minimum of three feet on all sides of the spa before starting any landscaping. This clearance keeps service panels accessible, allows air circulation around the equipment, and gives enough room to walk comfortably without brushing against plants or structures. On the entry side, four to five feet is more practical — especially if you plan to add steps, a small deck, or planters near the access point. Check your spa manufacturer’s manual for any specific clearance requirements before breaking ground on any permanent landscaping feature.
Q2: What Is the Best Ground Cover Material Directly Around a Swim Spa?
Gravel and pavers are the two most practical options directly around the spa base. Gravel drains quickly, stays cool underfoot, and requires almost no maintenance beyond occasional raking. Pavers give a cleaner, more finished look and are easier to walk on barefoot. Avoid plain soil or mulch directly against the spa casing — both hold moisture against the equipment panels and accelerate wear over time. Rubber stepping tiles are another option worth considering near the entry point, particularly where wet feet make the surface slippery.
Q3: Can I Install Landscaping Around a Swim Spa Myself or Do I Need a Professional?
Most landscaping around a swim spa falls well within DIY range — gravel borders, planters, stepping stones, mulch beds, and even basic timber decking are manageable weekend projects with standard tools. Where professional help makes sense is with anything structural: poured concrete footings, attached deck framing, electrical work for path lighting, or retaining walls near sloped ground. Attempting structural work without proper experience or permits creates safety risks and can affect your spa warranty if drainage or load issues damage the equipment over time.
Q4: How Do I Keep Landscaping Plants Healthy Near a Swim Spa without Damaging the Water Chemistry?
The main concern is fertilizer and pesticide runoff finding its way into the spa water. Use slow-release granular fertilizers rather than liquid sprays near the spa, and apply them on dry days with no wind. Choose plants that don’t require heavy chemical maintenance — drought-tolerant shrubs, ornamental grasses, and native perennials generally need far fewer inputs than high-maintenance flowering varieties. Keep mulch and soil at least six inches away from the spa shell itself, and rinse the surrounding area lightly after any garden work to clear debris before it blows or washes into the water.
Q5: What Landscaping Ideas Work Best for A Swim Spa on A Sloped Yard?
Sloped yards need a level base before any other landscaping makes sense — a spa sitting on uneven ground creates structural stress on the shell over time. Retaining walls built from natural stone, concrete block, or treated timber create flat terraces that work well for planting beds, gravel borders, and step installations. Once the base is level and stable, tiered planting on the uphill side adds visual interest while controlling erosion. Steps cut into the slope leading down to the spa entry make access safer and give the whole layout a more deliberate, designed feel than a simple ramp or steep path would.
Conclusion:
Good landscaping around a swim spa is less about making things look expensive and more about making the space actually work for the people using it. These above ground swim spa landscaping ideas cover a wide range of budgets, yard sizes, and personal styles — so there is no reason to wait until everything feels perfect before starting. Pick one idea that solves the most obvious problem first, whether that is a muddy entry, too much sun, or a neighbor’s direct sightline. One change leads naturally to the next. A year from now, the spa that once looked dropped into the yard will feel like the most considered corner of the whole outdoor space.